I bought a KGR rifle stock, and this is what I think of it: First, I understand that I did not purchase a top of the line product, but simply a middle of the road product; however, it is not an “el cheapo” product, since it is right at $500.00. I do not know what the definition of “an average income person” is for you, but for me, $ does not come easy.
So, with that out of the way, let’s get on with the review, and please, feel free to blast me out without mercy: The product came in the typical card board box, and, for some reason, as soon as I see lots of hardware; I know this is not going to end up well for me. After the inventory, I proceeded to bring my rig out of the safe and to take the action out. I must tell you that it is somewhat difficult to thread the action screws on this stock, and I started to doubt my mechanical abilities. Is this a left-hand thread?
I finally got to start the action screws, and all seems to be fine. I read the instructions and the recommended torque for the screws is 65 foot pound. No problem, I got fat Albert out of my tool box and proceeded to torque the action screws, only to find out that one of the screws is recessed so deep that I cannot find a drill bit long enough to get the torque wrench to work for me. For the action screw near the trigger, no problem, but the one at the fore end, it is a lost cause. One of my thoughts was that the manufacturer had included such wrench in the hardware pack: no luck there.
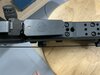
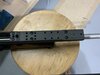
After deciding to just go with the” ¼ turn after I feel resistance on the screw” rule of thumb, I moved to complete the installation. I went to my spare parts box and found a Pic Harris bipod that I do not use very much because it is not quick disconnect, and I proceeded to install the pic rail that is included in the hardware pack. Remember when I said that a bulky hardware pack means trouble? OK, I get the pic section and I was eager to install it, only to find out, that this is not a very friendly pic rail to install. I guess I have to attend a magician’s course to be able to install this pic rail, because, unlike an M-lock, this thing requires powerful mind bending techniques to keep it steady while trying to start the screws to install the pic rail. You guess it: after a few futile attempts to install it, I gave up, and I have to wait till I get to the store and purchase an M-lock pic rail. Kids, do not try this at home, it will drive you insane. After the frustration with the pic rail, I went back to my parts bin, and found a pic rail that I could install on the knob the manufacturer had install to use with a Harris bipod, the kind that has a hook and a nut to tighten it. So, I will take my rig to the range, tomorrow.
Another interesting point on this stock is the adjustable cheek pad. Well, there is no pad there, just a hard plastic thing that reminded me to visit the dentist soon. As I leaned into it, I found this feature to be useless due to the discomfort as I placed my mug there. I took it off, and I am using a home-grown pad that my wife developed for me to use on my other rigs. It is comfortable, and it provides enough elevation to see through the scope without much fuss. I have other factory rigs that offer a much more enjoyable cheek pad, but this one, I do not know. It could be that I am older now, and I am a soft SOB that needs pillows around to feel safe?
The butt pad, well, is there, and it seems like it will absorb the recoil, but I am not concerned with recoil since I am used to magnum rifles. I will let you know how it went after my visit to the range with this thing. Oh, it is a Rem 700 in 243. The reason for the new stock? I abandoned this rifle for almost 4 years, and when I went back to use it because my local range does not allow 6.5 CM, the cheap factory stock was warped, and I could not get the rifle to group on paper at 100 yards. I address the plastic where it rubbed on the barrel, but I decide to upgrade. I hope this thing works, or else, I am out of $500 buck, and no, I will not sell it to anybody.
So, with that out of the way, let’s get on with the review, and please, feel free to blast me out without mercy: The product came in the typical card board box, and, for some reason, as soon as I see lots of hardware; I know this is not going to end up well for me. After the inventory, I proceeded to bring my rig out of the safe and to take the action out. I must tell you that it is somewhat difficult to thread the action screws on this stock, and I started to doubt my mechanical abilities. Is this a left-hand thread?
I finally got to start the action screws, and all seems to be fine. I read the instructions and the recommended torque for the screws is 65 foot pound. No problem, I got fat Albert out of my tool box and proceeded to torque the action screws, only to find out that one of the screws is recessed so deep that I cannot find a drill bit long enough to get the torque wrench to work for me. For the action screw near the trigger, no problem, but the one at the fore end, it is a lost cause. One of my thoughts was that the manufacturer had included such wrench in the hardware pack: no luck there.
After deciding to just go with the” ¼ turn after I feel resistance on the screw” rule of thumb, I moved to complete the installation. I went to my spare parts box and found a Pic Harris bipod that I do not use very much because it is not quick disconnect, and I proceeded to install the pic rail that is included in the hardware pack. Remember when I said that a bulky hardware pack means trouble? OK, I get the pic section and I was eager to install it, only to find out, that this is not a very friendly pic rail to install. I guess I have to attend a magician’s course to be able to install this pic rail, because, unlike an M-lock, this thing requires powerful mind bending techniques to keep it steady while trying to start the screws to install the pic rail. You guess it: after a few futile attempts to install it, I gave up, and I have to wait till I get to the store and purchase an M-lock pic rail. Kids, do not try this at home, it will drive you insane. After the frustration with the pic rail, I went back to my parts bin, and found a pic rail that I could install on the knob the manufacturer had install to use with a Harris bipod, the kind that has a hook and a nut to tighten it. So, I will take my rig to the range, tomorrow.
Another interesting point on this stock is the adjustable cheek pad. Well, there is no pad there, just a hard plastic thing that reminded me to visit the dentist soon. As I leaned into it, I found this feature to be useless due to the discomfort as I placed my mug there. I took it off, and I am using a home-grown pad that my wife developed for me to use on my other rigs. It is comfortable, and it provides enough elevation to see through the scope without much fuss. I have other factory rigs that offer a much more enjoyable cheek pad, but this one, I do not know. It could be that I am older now, and I am a soft SOB that needs pillows around to feel safe?
The butt pad, well, is there, and it seems like it will absorb the recoil, but I am not concerned with recoil since I am used to magnum rifles. I will let you know how it went after my visit to the range with this thing. Oh, it is a Rem 700 in 243. The reason for the new stock? I abandoned this rifle for almost 4 years, and when I went back to use it because my local range does not allow 6.5 CM, the cheap factory stock was warped, and I could not get the rifle to group on paper at 100 yards. I address the plastic where it rubbed on the barrel, but I decide to upgrade. I hope this thing works, or else, I am out of $500 buck, and no, I will not sell it to anybody.

")