
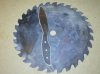
I decided to try making a hunting knife in my spare time. For steel I started with a dull steel (not carbide tipped) circular saw blade. I put it in the charcoal grill and let it go until the grill was cool. The blade didn't have any temper left then. I sandwiched it between two pieces of 1/4" plywood and cut out the profile of a knife I liked but no longer owned. Having drawn the temper I could cut it out using my Delta scroll saw with metal cutting blades. I broke 3 blades in the process but they only cost about $.20 each. Ground the edge to almost sharp and polished the blade using successive grit sandpaper ending with 2400 grit carborundum paper. Drilled holes in the handle for rivets. Not I need to temper the blade and don't have much of a clue as to how to do it. A friend said to just heat it up with a torch and drop it into a bucket of oil. Somehow there has to be a little more technique needed than this. Any help in tempering steel? I don't expect this to be a work of art since the steel isn't that good but I am just in the first learning process.
You are using an out of date browser. It may not display this or other websites correctly.
You should upgrade or use an alternative browser.
You should upgrade or use an alternative browser.
Learning knife making on the cheap
- Thread starter Oldnamvet
- Start date
- Status
-
Not open for further replies.
Sorry, I can't help, but I love these knifemaking threads. I'm going to try my hand at it sometime.
I wish there was a way to know what kind of steel was in each circular saw blade.
Please post pictures when you've finished it. Sounds like fun.
Steve
I wish there was a way to know what kind of steel was in each circular saw blade.
Please post pictures when you've finished it. Sounds like fun.
Steve
Smokey Joe
Member
- Joined
- Jan 2, 2003
- Messages
- 2,617
Knifemaking 101
Oldnamvet--You're off to a REAL good start!
Re: tempering: Yeah, it's not that hard (pun intended ). Heat it a uniform cherry red, drop it into used motor oil, let it cool. Then NEVER drop it on concrete or such.
This is kind of rough-and-ready but it'll get you a sharpenable edge-holding knife hardness.
IIRC, somewhere in the Foxfire book series there is a very good article on home tempering of knives made from various recycled steels: Saw blades, buggy springs, and the like.
What are you planning to use for a handle? Wood scales held on with copper rivets (the solid kind called belt rivets) have worked well for me. Shape 'em to your taste with a belt sander. Easy, inexpensive, and look good. You can go up the line by buying scales of exotic woods or other materials, and instead of rivets, use those rivet-like screw-together things, which are admittedly neater.
Oldnamvet--You're off to a REAL good start!
Re: tempering: Yeah, it's not that hard (pun intended
). Heat it a uniform cherry red, drop it into used motor oil, let it cool. Then NEVER drop it on concrete or such.This is kind of rough-and-ready but it'll get you a sharpenable edge-holding knife hardness.
IIRC, somewhere in the Foxfire book series there is a very good article on home tempering of knives made from various recycled steels: Saw blades, buggy springs, and the like.
What are you planning to use for a handle? Wood scales held on with copper rivets (the solid kind called belt rivets) have worked well for me. Shape 'em to your taste with a belt sander. Easy, inexpensive, and look good. You can go up the line by buying scales of exotic woods or other materials, and instead of rivets, use those rivet-like screw-together things, which are admittedly neater.
Tempering is something you do AFTER quenching . Come over to www.bladeforums.com and learn all about it .
Is this a carbon or stainless steel? Alot of the (newer)saw blades I've seen are made with a chrome moly steel, thats not necessarily something you can heat treat with a simple set up.
Get the scrap left over from the saw blade and make yourself some test peices (just small strips, maybe 1/2" X2 or 3 inches should work), you're going to have to work up your own heat treating procedure for this.
First off, treat it as a simple carbon steel. Heat it until it becomes non magnetic. This will most likely be somewhere between 1400 and 1500 deg F, and the blade will be a dull to medium red, not quite orange. Its best to just have a magnet handy to check it. Color is subjective, and will depend alot on the amount of light where you're working. Its better to check with a magnet and learn what color to look for in your shop.
Once it has become non magnetic, hold it there for a little bit to ensure even heating. Be careful not to overheat the tip or any of the thin parts as this will cause grain growth.
Now let it air cool until it can be handled by hand. This is normalizing. It will erase and work hardening, or prior heat treating done to the steel. You will get a uniform grain structure to start your heat treatment with, and it will help reduce warping or cracking when you quench. Normalizing isn't as important for the test peices, but you want to use a consistent method so you can do the knife at the end.
Heat the peice to non magnetic again, this is called the critical temperature. Its the point at which the steel forms austenite (carbon is dissolved). Once again, heat evenly and do not overheat.
Now quench the peice in a light oil that has been preheated to 110-120 degrees or so. Used motor oil, hydraulic oil, vegetable oil etc. all work usually.
You have to be quick on this, the steel should still be at critical temperature when it hits the oil. By doing this you trap the carbon in the crystal structure, and transform the austenite into martensite. This change is what makes the steel hard enough to be used as a knife. If there isn't enough carbon present, or the alloy is too complex for your heat treating method, the outcome will be a soft blade.
Once the peice has cooled to the temperature of your quenching oil, test it with a file. The file should skate across it like a peice of glass, rather than bite into it. Compare filing an untreated peice to your test peice. If the file skates, you're in good shape.
You can also try to snap a peice off of it in a vice. If it hardened, it should break like glass before tempering. If it bends alot before breaking, or won't break, it didn't harden enough. If it does break, take a look at the grain where the break is. The finer is is, the better it will be.
If it did harden, you can move on to tempering. I'd start out putting it in your oven at 350 degrees and seeing what color it turns(clean the scale off first), your looking for a light straw color. It generally shows up around 400 deg F, but kitchen ovens are always off a little bit, so your best off to start low and work up to it the first time. Then you can use the same procedure on your knife blade.
If it didn't harden, you can try the same procedure again quenching in water (don't use cold water). You can also try holding the peice at non magnetic longer before you quench. Some steels with a more complex alloy take longer to austenitize. So hold it at heat for 5 or 10 minutes and see what happens quenching it in oil again.
I'm pretty confident that you can get a useable blade out of this if you put a little work into figuring out the heat treat. It may not harden as well as you'd like but I bet that it turns out useable. This is why I really like to stick with a known steel, so that I have a heat treat procedure available and only have to do a little fine tuning to get the results I want from my equipment.
Valkman
Member
Redneck told you everything you need to know - and it's how I do it. I simply heat the blade to non-magnetic and then quench in olive oil, although I do use refractory cement along the spine of the knife. Then 1 hour in the toaster oven at 400 degrees for tempering. Your results may vary, as I use O1 tool steel. Good luck!
Thanks to everyone, especially Redneck, for taking the time to inform me. One further question, the best way to heat it to red heat. Can I do this on a gas grill? Or do I need a torch, propane or MAPP gas? I'll try to attach a picture of what I have done so far. No idea whether the blade is chromium alloy or just steel. It rusted within a few minutes when I let it sit after wet grinding. So I don't think it is stainless steel.
Attachments
Smokey Joe
Forgot to mention that I intend to put on wood scales with brass rivets. One of my other hobbies (like I need even more) is turning wood pens on the lathe. So I have a lot of small pieces of exotic woods from all over the world. I'll dig through my box and see what strikes me at the time.
Forgot to mention that I intend to put on wood scales with brass rivets. One of my other hobbies (like I need even more) is turning wood pens on the lathe. So I have a lot of small pieces of exotic woods from all over the world. I'll dig through my box and see what strikes me at the time.
A grill might work, haven't tried that. A couple of soft firebricks (can usually be found locally for about $1 a apeice) and a propane torch will work also for small blades. MAPP gas, does burn hotter, but from my experience it causes more scaling, and can be harder to get an even heat. I would try propane first.
Depending on how far you want to get into this, there are lots of good ideas for small to large forges here: http://refractory.elliscustomknifeworks.com/
A coffee can and a little bit of Kaowool,and some satanite will go a long way in heat treating small blades.
You really only have to get the part you want to harden up to critical temperature, so you only have to have enough heat to get the blade itself there. I generally like to harden it back beyond where the handle will be though to avoid having it bend too easily.
Valkman
Member
Also pick up Wayne Goddard's "The $50 Knife Shop" - invaluable stuff there on how to get set up for very little money. I took his idea of the one-brick forge and expanded it to 2 fire bricks wired together and hollowed out and have used that for 6 months now with a MAPP gas torch sticking in the side.
they covered the heat treating process well. the only thing i have to add is...
you may want to not finish the knife to such a fine grit before heat treating if you arent using a controlled atmosphere. when you heat the knife with a torch scale will form and you will have to grind/sand that off anyways. i usually go no higher than 320 grit before heat treat. everyone has their own preference on what grit to stop finishing at.
looks like it will end up being a nice knife! make sure to post pics of the completed version.
You can stack soft fire brick to make a heat treating chamber or hollow out a single brick just enough to "comfortably" fit your blade. You'll want your torch to intorduce the flame into the chamber through the side at a slight angle and heat the chamber orange/yellow before you put the blade in.
What are you using for tongs?
What are you using for tongs?
- Status
-
Not open for further replies.
Similar threads
- Replies
- 10
- Views
- 837
- Replies
- 0
- Views
- 708
- Replies
- 46
- Views
- 4K
- Replies
- 8
- Views
- 1K