Mounting pattern for Dillon Strong Mounts RL550/Square Deal B

Status
Not open for further replies.

mahansm

Member
Joined
Mar 2, 2010
Messages
311
Location
Panama City, Florida
I'm setting up a new bench and plan on it being multipurpose. I've just received strong mounts for my RL 550B and Square Deal B. I'm wondering if anyone knows what the side to side mounting hole spacings for the workbench are for the two presses. The front/back spacing is the same for both.

I'd like, if possible, to use the same footprint for both presses, putting studs into the bench (well, captive through bolts) so that I can place the press I'm planning to use on the bench, use four nuts, and proceed. Both presses will normally live in a cabinet near the bench.

If the lateral space is large enough, 6 studs will allow me to mount either press, leaving a pair of studs beside one of the strong mounts.
 
I've answered my own question. The Square Deal B on strong mounts is approximately 1 inch narrower than the RL550 B, also on strong mounts.

Number is approximate because there are oval slots on each piece of the strong mount, allowing for some width adjustment.

Side note: The adapter plate for the strong mount on the Square Deal has "this side up" printed on the top. However, if that side is up you can see it and it's not needed. If it's upside down you can't see it...
 
I use bolts and wing nuts with my Dillon 550. It takes just a couple of minutes to R/R it to my bench. I also do the same with other items. Very convenient and the bench doesn't have anything sticking up such as the studs you mentioned.

Hobie
 
I was thinking of doing that but there are drawers underneath the mount points and I didn't want to have to go in there every time I swapped out a press.

I took a large cutting board from Sam's that I had purchased for another project that never happened, drilled holes to fit over the studs, and dropped it on the bench for when I'm not loading. The studs don't quite reach through the plastic board and now I can do destructive operations (cut, drill, whatever) that may damage the work surface.
The plastic boards are cheap.
 
Bench easy on / off alternative

I have a few presses and don't like to leave my work bench full so often remove and replace them.

The fastening method that made the most sense to me was to install threaded inserts into the work bench. I can quickly use thoumb screws or bolts and ratchet to attach when needed. It literrally takes seconds to remove a press.

Here is a link that will show you the kind of fasteners I used.

http://http://www.youtube.com/watch?v=tIhEqoKE8Dc
 
Old Goat had a better idea. I removed the studs, enlarged the holes with a 3/8" drill, and installed threaded inserts. The inserts were just over $1.00 each and are available from McMaster Carr. They shipped the same day I ordered and UPS dropped them off the day after I ordered (standard shipping).

This means that I can also bolt down my trimmer and (upcoming purchase) swaging tool, as well as a bench vise.

Part number and description for the inserts is:
90192A124
High Strength Steel Tapping Insert for Wood, Hex Drive, 1/4"-20 Internal Thread, 25/32" Length, packs of 10
 
Just an FYI. I copied an idea someone posted in the reloading bench sticky around 2007 (member Rembrandt). I did this 2 years ago and believe it is about the best set up ever devised! :rolleyes: 
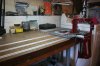
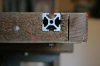
I can attach whatever press or other tool I want anywhere along the bench. For example, I attach my Sinclair/Wilson trimmer directly to one of the slots, without a base plate. If keep one of those plastic kitchen cutting boards handy for when I want to do some banging or cutting, though I don't do much banging on this bench.

Originally I was concerned about the font edge breaking off due to it's composition and the proximity of the routered slot (photo 2). It's hard to tell from the photos, but there is a 1 1/2" door mounted on top of a 1 1/2" benchtop. The door is about 20" longer than the bench so there is 10" overlap on each end. So far so good. I keep thinking I should install a few studs horizontally from the extrusion to the front.
 

Attachments

  • 2590.jpg
    2590.jpg
    32.5 KB · Views: 23
  • 2581.jpg
    2581.jpg
    22.3 KB · Views: 22
Last edited:
Status
Not open for further replies.
Back
Top