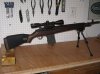
Here is my M1A. It was a gift from my lovely wife and it is my favorite gun to shoot. The rifle doesn't have as many bells and whistles and dodads as some do, but I sure like how this gun is set up.
It started life as a Springfield Scout Squad and soon had a Burris 2.75x scout scope on it. It was a nice compact package and I hunted pigs with it this way, but I always wished that I had a little more magnification. Thus started the quest to mount a scope over the receiver and what a chore this turned out to be.
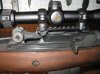
Because I didn't want to have to mess with a big cheek riser, I tried to keep the scope as low as possible relative to the bore. For this reason I chose the ARMS #18 design. After two trips to the range and about 80 rounds fired, the Blue Loctite seems to be doing its job and I have had no FTE issues that some people have mentioned when using the ARMS #18.
As you can probably tell from the pictures, the real challenge of keeping the scope low was maintaining clearance over the rear sight. A nice thing about this setup is that the rear sight is currently zeroed at 100yards and the scope still goes right over the top of it with about two millimeters of clearance.
Another challenge was finding a scope that would slide far enough back to match my natural cheek weld. As shown in the pictures, the scope turret housings are slid all the way up against the rear ring which is in the last slot on the rail. The Nikon Team Primos cleared the rear sight (when the sight was all the way depresed), but being a somewhat compact scope, there was not enough eye relief and I was always straining my neck forward trying to improve the sight picture. I switched to the Nikon Buckmaster 3-9x40 which is a long scope, and the occular lense reaches far enough back to meet my eye very comfortably.
Other scopes that would have worked as well are the Monarch 3-9x40 and the SII Big Sky 3-9x40: while not as elongated as the Buckmaster, both of these scopes have enough eye relief to provide flexible mounting options. The main thing is make sure that the power ring does not align directly above the rear sight, because if that happens, you will need higher rings. I stuck with 3-9x40 scopes because there seem to be so many good value options in that configuration. I will save the higher power scopes for a precision rifle that has a barrel that is longer than 18".
Speaking of rings, I really like the Burris Signature Selects. They are not very tactical and they don't come off very quickly, but they seem very sturdy. Also, I used the plastic inserts to adjust my piont of aim and it took exactly ONE CLICK on the scope to get dialed in at 100yard with 150grain FMJ.
Next up will be some accuracy testing with 168 and 175 HPBT.
Here is the setup with approximate prices:
M1A Scout Squad 18" Barrel with Muzzle Brake $1,600
Harris 9-13" Bipod mounted to a sling stud $70
Promag Heavy Duty Steel Scope Mount (same design as ARMS #18) $90
Burris Signature Select 1" Medium Rings $40
Nikon 3-9x40 Buckmaster w/ BDC Reticle $210
Beartooth slip-on 1/2" Cheek Riser $18
Fulton Armory Black Handguard $20
Future add ons include Butler Creek scope caps and a sling.
It started life as a Springfield Scout Squad and soon had a Burris 2.75x scout scope on it. It was a nice compact package and I hunted pigs with it this way, but I always wished that I had a little more magnification. Thus started the quest to mount a scope over the receiver and what a chore this turned out to be.
Because I didn't want to have to mess with a big cheek riser, I tried to keep the scope as low as possible relative to the bore. For this reason I chose the ARMS #18 design. After two trips to the range and about 80 rounds fired, the Blue Loctite seems to be doing its job and I have had no FTE issues that some people have mentioned when using the ARMS #18.
As you can probably tell from the pictures, the real challenge of keeping the scope low was maintaining clearance over the rear sight. A nice thing about this setup is that the rear sight is currently zeroed at 100yards and the scope still goes right over the top of it with about two millimeters of clearance.
Another challenge was finding a scope that would slide far enough back to match my natural cheek weld. As shown in the pictures, the scope turret housings are slid all the way up against the rear ring which is in the last slot on the rail. The Nikon Team Primos cleared the rear sight (when the sight was all the way depresed), but being a somewhat compact scope, there was not enough eye relief and I was always straining my neck forward trying to improve the sight picture. I switched to the Nikon Buckmaster 3-9x40 which is a long scope, and the occular lense reaches far enough back to meet my eye very comfortably.
Other scopes that would have worked as well are the Monarch 3-9x40 and the SII Big Sky 3-9x40: while not as elongated as the Buckmaster, both of these scopes have enough eye relief to provide flexible mounting options. The main thing is make sure that the power ring does not align directly above the rear sight, because if that happens, you will need higher rings. I stuck with 3-9x40 scopes because there seem to be so many good value options in that configuration. I will save the higher power scopes for a precision rifle that has a barrel that is longer than 18".
Speaking of rings, I really like the Burris Signature Selects. They are not very tactical and they don't come off very quickly, but they seem very sturdy. Also, I used the plastic inserts to adjust my piont of aim and it took exactly ONE CLICK on the scope to get dialed in at 100yard with 150grain FMJ.
Next up will be some accuracy testing with 168 and 175 HPBT.
Here is the setup with approximate prices:
M1A Scout Squad 18" Barrel with Muzzle Brake $1,600
Harris 9-13" Bipod mounted to a sling stud $70
Promag Heavy Duty Steel Scope Mount (same design as ARMS #18) $90
Burris Signature Select 1" Medium Rings $40
Nikon 3-9x40 Buckmaster w/ BDC Reticle $210
Beartooth slip-on 1/2" Cheek Riser $18
Fulton Armory Black Handguard $20
Future add ons include Butler Creek scope caps and a sling.