Need Taurus 82 assembly schematic

Status
Not open for further replies.

chuckj5

Member
Joined
Nov 15, 2011
Messages
9
Location
Four Oaks, NC
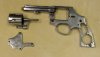
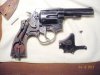
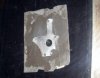
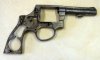
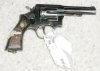
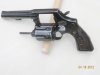
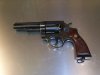
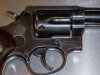
I picked up a used Taurus 82 in good shape with a bad finish. I have disassembled the gun down to the frame for cleaning, polishing and bluing. As I was taking it apart, I took a lot of photos to correctly reassemble. I seem to have a part that does not appear in the photos. It is a small pin, about 1/2" x 3/32" with a nipple on one end, I assume this is for the bolt spring. I really can't identify the part from any schematic I can find on the web. They all seem to be rough and not very clear.
I can't seem to disassemble the cylinder from the extractor. Is there a secret to taking it apart?
Does anyone have access to assembly instructions and/or a readable schematic and parts list.
Thanks for any help.
 
Taurus 82 project

Started rebuilding today. Completely disassembled gun thanks to weregunner.
Used NavalJelly to strip old bluing then spent 6 hours sanding and polishing. Next step is a few more hours final polishing to make her shine. Then Brownells Ox Pho bluing.
Grips are being stripped and refinished in my break time.
Pictures are coming that will illustrate the transition from junk box ugly to beauty queen.
 
Be aware that while Oxpho Blue is an excellent cold blue and very good for touchups, it still is not as durable as a hot blueing job.

Not trying to discourage you at all, I have done the same as you're doing, just making you aware.
 
I did almost exactly this same thing, but I went with a black powdercoat for a durable carry finish.

The piece you describe sounds like a detent pin. There are two pin detents on the 82. One tensions the hand from behind inside the cut out in the side plate, the other tensions the cylinder stop from under the screw on the front of the trigger guard.
 
Deep rust pits

While polishing the side plate on the 82, I have found some deep rust pits that I can't buff or polish out. I have used 600 grit wet or dry sandpaper on a glass plate with mineral oil. I did remove some of the pits but I'm afraid if I continue to sand, that I will sand off the Taurus logo and the side plate will be lower than the frame.
Should I bite the bullet and console my self with the fact that I have a darn nice 40 year old handgun or buy a new side plate and fit it to the gun?
I'd like to do a hot blue but I can't find anyone that can hot blue out here in the boonies.
I'd like to post some pictures but it requires a URL for the photos. I don't subscribe to a service that provides that feature, is there a recommended site that does this?
 
Photos

So lets see if we can plug in some pictures of what we are talking about.

photostream

After 6 hours of polishing

photostream

After stripping with Naval Jelly

photostream

This is the side plate with the bad pitting around outer edge where the grip were

photostream

This is the Taurus 82 when I bought it earlier this week. It was a military/LOE trade-in from South America. We know how well they don't maintain their firearms. Pretty sad to look at but locks up tight for a Taurus and the cylinder/bore alignment is perfect. Smooth trigger pull. No internal rust on springs or pins.
 

Attachments

  • Polished.JPG
    Polished.JPG
    43.4 KB · Views: 21
  • Received 4-17-12.JPG
    Received 4-17-12.JPG
    52.3 KB · Views: 20
  • Side plate.JPG
    Side plate.JPG
    49.4 KB · Views: 14
  • Stripped.JPG
    Stripped.JPG
    40.5 KB · Views: 16
Reblueing "70s Taurus 82 completed

So after hours of sanding with 400, 600, 1000 w/t paper to remove rust, pits and level the metal, more hours than I can count at the polishing wheel making the pistols look like polished stainless steel. The finished job is very good but I would have perferred hot bluing.
Anyway, she is a smooth, tight shooter and feells like a real gun should.
Now I'm looking for another wreck to make into a beauty queen.
 

Attachments

  • Before Right.jpg
    Before Right.jpg
    98.8 KB · Views: 9
  • Before left.jpg
    Before left.jpg
    50.9 KB · Views: 9
  • Left Side.jpg
    Left Side.jpg
    71.9 KB · Views: 14
  • Right side.jpg
    Right side.jpg
    73.2 KB · Views: 18
Well done.
I picked up a cosmetically rough 82 several months ago. I cleaned it, rubbed it down with steel wool then gave it a cold blue job. It doesn't look much like yours but then I didn't put nearly that much effort in it. I did a bit of spring work and internal polishing then used it as a trainer for my wife and daughter. It runs flawlessly.

Yours however looks great and I hope it shoots that well for you too.
 
Thanks and more photos

Thanks everyone for the compliments. It was a lot of polishing and sanding but preparation is 90% of the finished appearance. It is very satisfying to do something yourself that turns out well, anyone can throw money at a project, I paid $140.00 for the Taurus and $15.00 for the OxPho. Where can you find a gun in that condition for $155.00? Handles and shoots as well as my S&W 67 ss. Fit and finish is not as great, but then the S&W was $456.00.

Two photos one with cylindar open, other is side view, check the lockup and gap. I think I got lucky with the gun I bought, sight unseen from Auction Arms. My local gunshop had 6 of these ex-military/LEO handguns. They all were shaky lockup and cylindar gap was excessive.
 

Attachments

  • Closeup.jpg
    Closeup.jpg
    99.3 KB · Views: 6
  • open.jpg
    open.jpg
    74.4 KB · Views: 8
Status
Not open for further replies.
Back
Top