Remington R51

Status
Not open for further replies.
Excellent detail, TCB! Many of your comments agree with my findings. The magazines do hurt the thumb! I also found that the mag base in my support hand made my palm quite sensitive.

If someone buys the R51 thinking it will be a dummy-proof pistol, he/she will be quite disappointed. It functions differently and one needs to "learn" the pistol. IMHO
 
"If someone buys the R51 thinking it will be a dummy-proof pistol, he/she will be quite disappointed."
Oh, hell, I suppose it's doomed, then :D

"Think about how stupid the average person is, and then realize that half of them are stupider" --George Carlin

TCB
 
Most primers appeared better supported in the middle where the FP stuck out a bit more, but some showed a negative FP impression because there was no firing pin support after ignition. The hammer is a rebounding type that has a lot of free travel when discharged, and my theory is the firing pin actually bounces off the primer after strike and pushes the hammer back through its rebound because it has such little mass. I think tungsten-carbide firing pins will be a growth area for this pistol. Maybe the firing pin return spring is helping to cause this, but I doubt it due to the incredibly short time spans involved in primer flow which a spring really can't combat much.

Look closely at the action animation linked in post 397. Note that this is not a tiltING block action, it is a tiltED block action. When the slide is in battery, the breech block is tilted down at the rear relative to the chamber face and case head. The only contact with the case is at the bottom with the gap increasing towards the top.

At the moment of ignition, the primer is unsupported and should bulte unevenly to match the slant of the face of the breechface. This unsupported condition holds until the breechface is camed upward to a level positon and the breechface is perpendicular to the bore axis. But this does not occur until the bullet has left the barrel and chamber pressure has dropped. So unlike a Browning design where the case remains flush against the breechface under pressure, when the case is under pressure in the R95, the primer is loosely supported the whole time.

This action is different and it is going to take some adjustment in thinking to get used to the idea that bulged primers are not catastrophic . :eek:
 
barnbwt, nice report on the R51. The R51 is fun to shoot.

Your experiences are similar to mine although my pistol seems to not have as many machine marks on it. The underside of the bolt could be polished up a bit with 600 to 1000 grit emory cloth or wet/dry sand paprt and it would remove any high spots left from the overzealous milling. The bolt would then ride easier/smoother on the top round in the magazine

I will have to remember using an FMJ bullet to pot out the slide stop if necessary when tools are not handy.

My recoil spring sleeve is getting scratched although some of the scratches may be from disassembly and re-assembly.

Take down of the R51 is not intuitive and until one learns exactly what is needed, it can be difficult. Definitely, requires a bit more smarts than the average pistol.

I find disassembly goes smoother if once I grab the barrel, to not let loose of it until after the slide is removed from the frame and the bolt removed from the slide. Less wear and tear on the other hand getting the barrel retracted again.

I am planning to shoot my R51 again on Sunday along with an M&P9 for some comparisons.
 
Look closely at the action animation linked in post 397. Note that this is not a tiltING block action, it is a tiltED block action. When the slide is in battery, the breech block is tilted down at the rear relative to the chamber face and case head. The only contact with the case is at the bottom with the gap increasing towards the top.

I think if you look closely at the R51, you will find the breech is parallel with the barrel when the gun is in battery. The lugs on the frame that hold bolt in place at the start of recoil are above the frame rails not recessed into the frame rails.

As the slide continues to retract, the bolt cams up into recesses in the slide and the bolt is released from the lugs on the frame.

The recoil action of the slide is started by a small movement of the bolt/case and then the bolt contacts the lugs on the frame. The bolt stops and the slide continues.

I had to disassemble the pistol and fool with the parts at different levels of assembly to see how it worked. The animation gives an excellent look at how the action works.
 
-Still sucks, but never locked back improperly, or anything
-An FMJ bullet is a great tool for popping it out in the field

A corner of the magazine floorplate works as well. And you will probably have a mag even when you have no FMJ. ;)

cfullgraf: When I look at the animation and at the parts in various states of disassembly, it really looks like the bolt/breechblock is tilted when fully in battery. :scrutiny: I've got another day before I can get to the range, so I guess I'll spend most of the time looking at the bold/barrel/slide/frame from different angles. ;)
 
cfullgraf: When I look at the animation and at the parts in various states of disassembly, it really looks like the bolt/breechblock is tilted when fully in battery. :scrutiny: I've got another day before I can get to the range, so I guess I'll spend most of the time looking at the bold/barrel/slide/frame from different angles. ;)

Install the barrel on the frame without the slide or recoil spring. Put the bolt in position on the frame. The bolt may not be perfectly parallel with the barrel, but I do not feel it is off much.

Any way, i've slept since I looked at it.:)
 
Install the barrel on the frame without the slide or recoil spring. Put the bolt in position on the frame. The bolt may not be perfectly parallel with the barrel, but I do not feel it is off much.

BTDT Definite tilt. Look at the extractor in the bolt. Compare it to the top of the bolt. It is set at an angle. When the bolt is on the frame, the extractor is parallel with the bore axis...and the bolt is tilted downward into the camming notch on the frame but not against the camming lug. As the bolt moves rearward, it moves deeper into the notch at a downward angle, then cams up to ride the frame rail parallel to the bore. While the bolt is moving into the camming notch, the exractor is extracting the case along the bore axis. It has to do this because almost all of the case is still in the chamber so it has to follow the bore axis, not the line of movement of the bolt.
 
"Look closely at the action animation linked in post 397. Note that this is not a tiltING block action, it is a tiltED block action. When the slide is in battery, the breech block is tilted down at the rear relative to the chamber face and case head. The only contact with the case is at the bottom with the gap increasing towards the top."

I don't have a great way to measure it, but the breech looks square with the front of the bolt, which is perpendicular to the bore when dropped and fully forward (contact marks across its whole face). The breech face is there to support the case head over its entirety when in battery, and the fact the cases are not angled in the course of firing leads me to believe the breechface is perpendicular when in battery. This means it is inclined slightly when feeding rounds, causing them to 'climb' the breechface in stead of merely sliding over it, which would cause some increase in resistance. I'll have to take a picture of the firing pin to show just how pointy they make them (I think even at its furthest penetration into the primer cut, the edges of the pin are below flush on the bolt face).

I really do think this action needs hard metal and very smooth surfaces to work well, and will not reach its potential without that. It'd be like Kyber pass dwarves trying to make AR15's instead of AKs; they'd get it work, they always do, but it wouldn't the best use of their 'unique skillset' ;). Trying to make the Pedersen loosey-goosey does not appear to increase reliability, but rather hinders it (this makes a lot of sense if you think about all the camming going on which other recoil-op designs don't have)

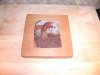
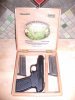
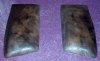
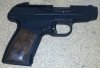
Grips are currently fitted to the gun, just need to plane down the palm surfaces (the started out 3/8" thick, and I think need to get down below 1/3rd of that :p). The grips will be thickest in the middle front/back, 1/3rd up from the bottom, and will sort of 'dome' outward from there until flush with the frame edges. It was nice of Remington to make 3 of the sides straight and all edges the same height; makes grip panels really easy to make. The thinnest part of the grips will be about 1/16" thick :eek:, which means I'll be soaking these grips in superglue or epoxy to hopefully stabilize them. As thin as these scales are, I would actually suggest people avoid wood if possible, and roll with plastics instead (or wood soaked in plastic, like I'm doing)

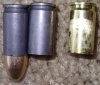
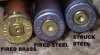
I added pictures of the fired casings in all their (in)glory; check out the "tacktical stippling" on the brass case and the patented primer partial-ejection system :D. FWIW, the gun appears to love cheap steel cases, just not the cheap hard primers that come with them.

TCB
 

Attachments

  • P4120011.jpg
    P4120011.jpg
    108 KB · Views: 42
  • P4120012.JPG
    P4120012.JPG
    110 KB · Views: 45
Last edited:
I don't have a great way to measure it, but the breech looks square with the front of the bolt, which is perpendicular to the bore when dropped and fully forward (contact marks across its whole face). The breech face is there to support the case head over its entirety when in battery, and the fact the cases are not angled in the course of firing leads me to believe the breechface is perpendicular when in battery.

Well, I probably can measure it which I will do and I'll get some pix to show what I am describing (either that or I will see it completely differently).

Everytime someone describes something I'm taking this thing apart to check it. I'm going to take it down and leave it in pieces until I go to the range. :cuss:
 
The animation and the R51 are not exactly the same.

Functionally the same but physically not the same.
 
OK, i can't good pix of the protractor on the bolt. I'll have to set up my light box tomorrow, but the angle of the bolt is 4 degrees off of the bore axis. The bolt face lugs (that contact the barrel) form an 86 degree angle with the top of the bolt, as does the bolt face itself. So the case head and bolt face are perpendicular to the bore and parallel to each other. But their is at least 0..08"-0.10" between the extractor claw and the bolt face (twice the 0.050" rim thickness) which allows the case to feed, but also allows the the firing pin to push the case and primer away from the boltface at ignition. That probably contributes to the primer anomalies.
 
"That probably contributes to the primer anomalies."
I think so, at least if the chamber is rough enough. Even my sand-papery chamber apparently doesn't allow the case head to float enough to cause the whole primer to back out, though. The only lack of support I see is at the pin hole itself, which would suggest the pin tip or pin mass/support is the culprit on that count. To be honest, though, after 250 rounds and not a single pierced primer, I'm not convinced it's even an issue. It's crappy, like the case scratches, but doesn't appear to affect function. At least on my particular gun. YMMV

TCB
 
To be honest, though, after 250 rounds and not a single pierced primer, I'm not convinced it's even an issue. It's crappy, like the case scratches, but doesn't appear to affect function. At least on my particular gun. YMMV

Like I said earlier, we may need to adjust our thinking in some areas. Like the first time I shot and HK and didn't know about fluted chambers. :eek:
 
Like I said earlier, we may need to adjust our thinking in some areas. Like the first time I shot and HK and didn't know about fluted chambers.

Or the first time I noticed the breech face on my Gen2 G19 looked like someone took a wood chisel to it.

As for the metal shavings you guys are finding in this gun, I had the same experience with a brand new 1975 AMF Harley Davidson and I learned more about motorcycle maintenance and mechanics from owning that bike than any other motorcycle I ever owned.

Sorry for the thread drift!

I do want to thank you guys though. This is the best thread I've found on the internet about the real actual gun sans all the hyperbole and hand wringing.

JB
 
Last edited:
"As for the metal shavings you guys are finding in this gun, I had the same experience with a brand new 1975 AMF Harley Davidson and I learned more about motorcycle maintenance and mechanics from owning that bike than any other motorcycle I ever owned."

Was it this thread I made the Harley/Ural & XDs/R51 comparison? I take it back, then :neener:

TCB
 
Storage options

Found a neat place to store the R51 out of sight while keeping it handy on a side table or desk:

(Joya de Nicaragua, Numero 5)
 

Attachments

  • R51-Box.jpg
    R51-Box.jpg
    32.6 KB · Views: 34
  • R51-BoxOpen.jpg
    R51-BoxOpen.jpg
    40.8 KB · Views: 35
Another 120 rounds (about 250 total so far) through my R51. Performed flawlessly. It is getting smoother as it is shot more.

My only issue is that my R51 shoots low with my 115 FMJRN ammunition. I need to try some different weight bullets unless I can find some different height sights.
 
I Have Cracked the Walnut!

(Walnut being puzzle, not the grips I'm making :eek:)
I have found the cure to the "Crappy Out of Box Experience" common to the R51:

Remember how I said a sharp corner on the slide's camming lugs were digging into the bolt? Tore it down again today while fitting the new grips, and found little slivers of bolt metal shaved off right below those corners. They are actually adhered, and I had to pick them off with a dental pick. Convinced they were the problem, I tried hitting the corners with a needle file.

The slide laughed. The slide appears to be harder than most files (probably north of Suomi bolt wood-pecker-lip hard), so don't bother. I laid a thin strip of 120grit sandpaper on the file and drug it over about four times, until all the abrasive was scraped off (did I mention these are hard?). I noticed a very thin shiny line right on the corner, but that was about it. I cleaned out the slide real good, and not bothering to really re-lube it or anything put it back together.

Not butter smooth, but approaching oatmeal smooth. Noticeably better than right before. I also sanded down the barrel ridges somewhat, sanded the corners of the spring bushing (and found some burrs on them), and polished the inside of the slide nose a rippled rather than jagged finish. I'm confident the slide sanding is what did it (and I only used 120grit, not even close to a smooth finish for a metallic surface)

Maybe this voids the warranty, I don't care so long as the slide is no longer eating the bolt surfaces. The initial rack effort to cam up the bolt dropped by like 2 pounds (bear in mind the bolt camming surface is still uneven from the slide damage, so I think now that the much-harder slide is smoother, it will burnish the bolt instead of cutting it)

The grips are nearly done; just need to soak them in some Super Glue and buff them to final luster with some fine sandpaper. Right now they are about 3X thicker than the stock flat grips at the widest point, so the grip is about 1/4" fatter overall. I plan on dropping that to 1/8" but I want to go slow since adding wood back is more difficult ;). The tree crotch this wood is from is fairly hard, so I think with the glue soaked in it will be one notch below indestructible.

TCB
 
I like the pistol box, JRH. My 1912 Steyr Hahn came with a home-made wood case with a red felt lined and fitted interior. They make guns so much classier, that I understand why ladies like jewelry boxes so much :D. I don't think the Remington is classy enough to deserve something nice, yet, but if it had a polished/blued slide and polished/black anodized frame, maybe.

TCB
 
My only issue is that my R51 shoots low with my 115 FMJRN ammunition. I need to try some different weight bullets unless I can find some different height sights.

Well, that's promising since I invariably find myself holding it about 1/2 blade high. I'll know tomorrow.

FWIW, considering the market placement as a CCW, the intended ammo is probably Remington Ultimate Defense 9mm which is 124g. It should shoot a little higher.
 
Remember how I said a sharp corner on the slide's camming lugs were digging into the bolt? Tore it down again today while fitting the new grips, and found little slivers of bolt metal shaved off right below those corners. They are actually adhered, and I had to pick them off with a dental pick. Convinced they were the problem, I tried hitting the corners with a needle file.

Exactly which lugs and bolt surfaces are these? I'd like to know where to look when I get back from the range tomorrow. I haven't seen any shavings or gouges from hand cycling on any surfaces except the barrel bushing.

I did notice today that the firing pin was hanging up and the bolt had to to rapped sharply to jar the FP loose. I assumed shavings or something inside but found nothing (the FP spring looks like it came from a ball point pen). i found the pin itself was hanging up inside the channel. I chucked it in my drill press and buffed it a bit with 1200 grit paper which took care of the problem.
 
The ramped lugs in the slide that contact the ramped surface of the bolt. one end of them is a knife edge (the end way down in the slide that never contacts anything) and one of them terminates at the rails in chamfer. The corner between them is razor sharp from the factory. Even if the ramp angles are perfect, under the force of recoil that corner will deform the bolt slightly and the subsequent sliding of cams will scrape away metal there. This appears to be the factor causing the 'tool marks' on the bolt cam surfaces.

I'm starting to think I should detail strip everything and toss it in a tumbler full of sand for a few hours...like how good machine shops debur things ;)

TCB
 
Not quite done, but getting there:

Sorry for the darkish pics of the gun; I caught glare off the shiny grips from every other possible angle. They are only finished with 120grit sandpaper and a single coat of superglue as a sealant/dressing for the pictures. Also there's no screw holes, yet (and no screws, since I'll need longer ones and Remington appears to have used some weird microscopic ultra-fine metric thread. :mad: I'm extremely tempted to blow the holes out to 6-32)

The grips are about 3/16" at their thickest (a rhombus-shaped pad that covers a little more than the lower third, and tapers in a hollow grind to match the frame edges. They are much tighter in the grip sockets than the factory ones. The grips are about 3X thicker than the originals, which works out to an extra 4 grip panels from what there was originally. They feel nice, but I think they are too thick for the rest of the gun which is of course the same thickness as before. I plan to sand them down to about 2X the original thickness, which would add only 1/8" to the overall width and be more in keeping with the skinny feel of the gun while still offering some curvature for the palm. The figure in the black walnut popped a lot more than I thought it would; it looks pretty bland until you slap a liquid on it.

To be honest, I think the brown wood doesn't go as well as something dark red or near-black would. With the white metal of the barrel/bushing and the black slide/frame, the brown looks out of place since it is not an industrial texture. I think the right kind of checkering would help, but the showy wood doesn't completely do it for me (I do think it looks better than the originals, but not by a lot). I think this gun would look excellent with carbon fiber or some other 'modern' finish for the panels.

TCB
 

Attachments

  • IMG_20140413_200406_897.jpg
    IMG_20140413_200406_897.jpg
    86.6 KB · Views: 19
  • IMG_20140413_200837_789.jpg
    IMG_20140413_200837_789.jpg
    76.9 KB · Views: 37
Status
Not open for further replies.
Back
Top