Restoring Radom Vis 35 - DuraCoat/DuraFil

Status
Not open for further replies.

UlicniTrkac

Member
Joined
Apr 20, 2013
Messages
25
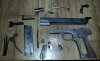
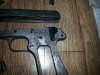
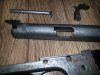
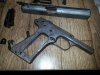
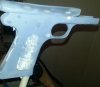
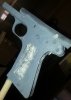
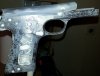
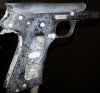
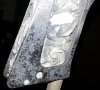
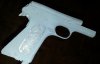
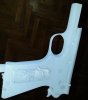
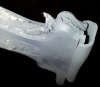
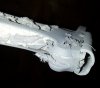
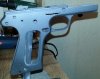
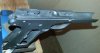
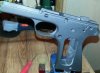
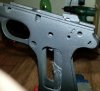
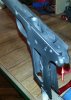
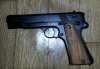
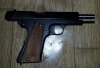
Got this one in bad shape. Outside, you can see how it looks. Inside, metal is good and almost no corrosion. I have blasted it a while back, to clearly see what I'm up against :D

All small parts are good. Missing a firing pin (but thats on the way) and springs (also ordered).

I plan to use DuraFil to repair slide and frame outside pitting, and then DuraCoat to finish. I have ordered matte black for this project.

But I have no experience with it. I can read the instructions of course, but can I sand/file off excessive amounts of DuraFil? How to apply it properly, not to over do it lol.
And then, painting with DuraCoat - will it add + on dimensions? I just want to use it on frame and slide outside, not the small parts. Small parts will be blued. Can paint cause small parts not to fit in?
Should I blue slide and frame prior to applying DuraFil and DuraCoat afterwards (to protect the insides that wont be painted)?
Thanks in advance


I am sure I will have more questions lol.
 

Attachments

  • IMG_20140506_163517.jpg
    IMG_20140506_163517.jpg
    114.2 KB · Views: 44
  • IMG_20140506_163531.jpg
    IMG_20140506_163531.jpg
    121.8 KB · Views: 28
  • IMG_20140506_163542.jpg
    IMG_20140506_163542.jpg
    123.2 KB · Views: 29
  • IMG_20140506_163618.jpg
    IMG_20140506_163618.jpg
    109.2 KB · Views: 30
You can lightly sand duracoat, but it will give it a slight sheen, if you use very smooth paper. I've done it to smooth out imperfections in the finish.

I've never used the filler though.
 
Yes, DuraCoat will build enough to cause pins and tightly-fitted parts to be too snug. Be careful with the frame and slide rails, grip safety mating surfaces and such.

You'll want to blast before coating to get the best adhesion, so I wouldn't blue it first unless you really protect the surfaces you don't want blasted somehow.
 
thanks for the quick reply fellas.

rails coating shouldn't be a problem, since there is enough gap between them (on slide and frame).
Can I blue it after I put on DuraCoat ( I believe it can't be done, but just to ask)

Those parts that I dont want to be coated, I can protect with tape I believe?
 
I don't think you'd want to blue after DuraCoating parts of the frame, but I shouldn't say it CAN'T be done. Yes, tape works great for masking parts to be sprayed.
 
If the pitting is too deep, it may take two or more passes with Durafil to get the desired smoothness. The instructions say to sand with 220 grit paper. Use a sanding block to insure flat surfaces. Carefully blast the pitted areas to get the rust out of the bottom of the pits for best adhesion of the Durafil.
Since the Durafil is sanded back to bare metal , there is no dimension change to worry about. On a wartime pistol like the VIS, I would not worry about the Duracoat buildup on the rails having any effect on operation. On tight pistols, I mask the rails but on looser ones, I just paint everything. If you want it, there is an SL Duracoat that is made for sliding surfaces. Self Lubricating, I think is the SL.
As far as the internals, lightly blast and Duracoat them or blue before Duracoat, not after.
 
Be very, very, very, very, VERY careful that you do not get any into the serial number, and don't let the final coating build too heavily there. Seriously bad mojo to do that.
 
I have used DuraCoat on several guns and have yet to have a problem with tolerances being closed up. Of course, now that I say this, the next gun will be hard to put together.....

This is common sense but you have to make sure your parts are clean, clean, clean before you paint. Also, it's better to make many light passes rather than fewer heavy ones. I found this out the hard way when one of my early projects had a shiny spot.
 
The only problem I've ever had with a 1911 and Duracoat was the safety lever. That seems like a tight area to go back together. The rails etc. went together nicely.

I airbrush Duracoat, so it goes on very thin, and all of the markings never get filled in. That being said, the filler will be crucial to a nice smooth surface.
 
Now I wonder should I get some professional, like car painter, to do the painting with DuraCoat, just for that reason to get it thin enough - cause of skills.

When I try to assemble Vis like this all small parts go in quite tight, so I will definitely have to get internals and holes covered, so coat stays only outside.
Rails, they shouldn't be the problem, there is enough "rattling" space on them.
 
well that firing pin wasnt for vis.

now I have to search more.
Maybe someone here can give me dimensions of it, so I can make one?
Thanks in advance
 
first hand of DuraFil
 

Attachments

  • IMG_20140523_172302.jpg
    IMG_20140523_172302.jpg
    57.5 KB · Views: 22
  • IMG_20140523_172323.jpg
    IMG_20140523_172323.jpg
    69.4 KB · Views: 16
sanding
 

Attachments

  • IMG_20140524_130055.jpg
    IMG_20140524_130055.jpg
    110.1 KB · Views: 18
  • IMG_20140524_130103.jpg
    IMG_20140524_130103.jpg
    83 KB · Views: 20
  • IMG_20140524_130109.jpg
    IMG_20140524_130109.jpg
    102 KB · Views: 18
second hand DuraFil
 

Attachments

  • IMG_20140524_133534.jpg
    IMG_20140524_133534.jpg
    45.6 KB · Views: 16
  • IMG_20140524_133543.jpg
    IMG_20140524_133543.jpg
    62.3 KB · Views: 14
  • IMG_20140524_133559.jpg
    IMG_20140524_133559.jpg
    53.8 KB · Views: 14
  • IMG_20140524_133552.jpg
    IMG_20140524_133552.jpg
    57.6 KB · Views: 10
Duracoated with matte black
 

Attachments

  • IMG_20140524_184625.jpg
    IMG_20140524_184625.jpg
    81.9 KB · Views: 18
  • IMG_20140524_184632.jpg
    IMG_20140524_184632.jpg
    65.8 KB · Views: 14
  • IMG_20140524_184658.jpg
    IMG_20140524_184658.jpg
    82.2 KB · Views: 14
  • IMG_20140524_184703.jpg
    IMG_20140524_184703.jpg
    91.4 KB · Views: 22
I have made a sanding mistake that I didnt notice prior to painting, and from what I understand, I cant do anything about it now (like just sanding that part and putting another layer or two of DuraCoat over it).

Next is the more trickier part, the slide. But that will take some time to finish. I'll update with pics
 

Attachments

  • IMG_20140524_184725.jpg
    IMG_20140524_184725.jpg
    92.5 KB · Views: 14
  • IMG_20140524_184714.jpg
    IMG_20140524_184714.jpg
    24.7 KB · Views: 20
just to update with pics.
I have made everything that was missing except the barrel myself (rear sight, grips, firing pin, springs, missing bolts including one for takedown latch). Only thing missing is decocker - I still havent made that small spring for it, but it will be done in a few days. I ll let you know how it shoots :evil:
 

Attachments

  • IMG_20140923_180603.jpg
    IMG_20140923_180603.jpg
    108.6 KB · Views: 27
  • IMG_20140923_180736.jpg
    IMG_20140923_180736.jpg
    123 KB · Views: 15
  • IMG_20140923_180803.jpg
    IMG_20140923_180803.jpg
    92.9 KB · Views: 13
thanks :)

But I do have one problem with it - it fires full auto - hammer wont stay in cocked position unless i manually cock it and keep it pointed downwards. Sear seems to be ok, but sear spring, the first left "finger" of it has some marks on it, and it seems to be a bit shorter than those on pictures I find online.
Does anybody knows will 1911 sear spring be a direct fit in it?
Thanks in advance

Edit - it doesnt fit :) I have just measured it.
 
Last edited:
Status
Not open for further replies.
Back
Top