Tale of a S&W 44 Double Action (yeah, this is getting old)

I did two things to address the push off. I installed the rear sear that came with the hammer/parts kit and that helped quite a bit. Although it could still pe pushed off, it took a substantial amount of force to do so. Using a plastic mallet it could be induced to release with a hard blow. It would not be drop safe either.

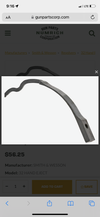
Next I bent the rear sear spring to apply more force on the rear sear and now it cannot be pushed off with fingers. But if hit with a very hard blow with the plastic mallet it can be tripped. So the push off is cured but it still isn't drop safe. At least not drop safe with the hammer cocked.

I've inspected the rear sear/full cock notch at full cock under high magnification and there is a surface on the rear sear that has the slightest curve that I think should be flat/square that would almost certainly lock the two together. It is in a location that is very hard to photograph. I'm going to have to photograph it with my microscope to show it. But that will have to wait until I retrieve my computer from work.
 
In the video you can hear that the cylinder has some play when at half cock. That is purely a function of the cylinder stop that is attached to the trigger. Basically the movement is due to the cylinder stop being smaller than the slot in the cylinder. On the bright side, the parts kit did come with those parts.
I performed a third operation and replaced the trigger from the parts kit with its two cylinder stops into my frame. This does reduce the amount of play in the cylinder when at half cock but not entirely. I suspect when the firearm was new it had this amount of play at half cock. Although there was not much play at lockup to begin with, it too improved with the new trigger and cylinder stops. Here is a link to the function using the new trigger. It is difficult to demonstrate one-handed, but there is virtually no play at lock up, the point in time when the hammer hits the primer.

 
Last edited:
I think these last operations clearly demonstrate that I’m a parts swapper.

FYI springs bent to apply more force return to their less bent shape over time and use. I suppose that is part of what a spring is/does.
 
As my last post indicated, Springs tend to want to go where they were originally set. Over time and use the added pressure from the rear Sear spring has faded and the gun can again be pushed off. It does take quite a bit of force to do so, but bending a spring to apply more pressure does not appear to be the appropriate correction for the push-off. Aside from the fact that the added spring pressure makes for one heck of a double action pull. Not quite Mosin EDIT I meant Nagant 1895 hard, but really hard. These were not known to have a great double action pull, but I think what I have, or have had, is above and beyond what should be expected.

The full cock Notch has a total height of approximately .020". Although it may be worn or slightly rounded, it is not visibly deformed. It may be soft also. There is some chatter on the internet that these hammers were known to be soft. That being said, my next Avenue of Investigation is the interface between the rear Seer and the full cock notch. Remember this diagram and how the rear sear and full cock notch interface. The pictures that follow are in the same position.

Parts Diagram.JPG

Keep in mind that the replacement hammer and the rear Seer that came with it are installed in my gun and appear in the below pictures.

20230731_175116.jpg

A little closer

20230731_175126.jpg


It seems to me that if the rear Sear were shaped more closely to the shape of the full cock notch, I would have a much stronger hold on the hammer/ rear Sear interface. I'm interested in the professionals View on this particular interface.

This isn't a surface I am comfortable monkeying with.
 
Last edited:
If I could rate this thread, it would get an excellant.

My classmaate may be making a rebound spring for a M-frame S&W; depending on whether the customer wants to pay for his labor.

If you look at the images, you can see how S&W designers were clever in replacing the leaf spring with a rebound slide and coil spring. However, I learned last week that many revolvers of the late 19th and early 20th Century had a complicated lockwork. Amazing how many early revolvers share similar lockwork with the earlier Colt Python (especially the Webley revolver).
 

Attachments

  • mframe2.png
    mframe2.png
    289.4 KB · Views: 3
  • Mframe1.png
    Mframe1.png
    788.2 KB · Views: 3
If I could rate this thread, it would get an excellant.
You realize that I use the forum to document my thoughts as I go along. If this forum was to ever go away I'd lose everything as I don't keep paper notes.
 
I’m not at all familiar with the ‘M’ Frames Smiths. Didn’t realize they existed.There is an interesting history to the rebounding hammer’s development at S&W. There are early models with them and later models without. I’ve been tempted to do a timeline of the early S&W single and double action models to see the overlap on functions. With other makers I’ve seen separate leaf springs used as a trigger return but not as a rebound spring.
 
You realize that I use the forum to document my thoughts as I go along. If this forum was to ever go away I'd lose everything as I don't keep paper notes.
I know it's an on-going thought process and for an unusual gun, it's good use of the forum.
 
What follows is going to appear to be counterintuitive. But one of the advantages of staring at the action trying to understand it is eventually it can get through even the thickest skull (mine). I learned part of this concept when I was trying to address the trigger follow on both the 32 and the 44 double actions. Basically, the front sear has to disengage and move away from the hammer before the single action sear is released. If not, the hammer will catch the front sear and drag it down with it pushing the trigger forward. In trying to fix that problem on the 44 double action I did what I do, I swapped some parts to see if it would work. And apparently it did. Except, for all of my testing I left the trigger return spring out. Once I installed the trigger return spring the problem of the trigger follow that appeared to be corrected without the trigger return spring reappeared once the trigger return spring was in place. The trigger on its return pulls the front sear down. And if it is still in contact with the hammer it will apply Force to the Hammer when at full cock.

With that in mind I wondered to myself if the mainspring applied less Force to the Hammer could the push off be improved? Fortunately the revolver came with a mainspring that someone had thinned in order to reduce the trigger pull. Tonight, I installed the reduced power main Spring and guess what? Even without extra pressure on the rear sear spring, it cannot be pushed off. Apparently there is enough friction between the rear sear and the full cock notch to counteract the reduced mainspring Force.

Now, I have been disillusioned before after testing many cycles of the action when an issue returns. So this isn't the end of it. I have a lot more testing to do with it. But if it makes it through the next 200 Cycles and still doesn't push off I think I may have the push off cured.

I do believe that the engagement between the rear Seer and the full cock Notch needs to be addressed. Even if the revolver remains without a push-off, it is not drop safe and a sharp blow to the grip frame will release the single action sear.
 
Last edited:
One other advantage to the reduced power mainspring. Double action pull has returned to normal. And, it’s not bad. And yes, the reduced power main spring does light off a primer.
 
I feel fairly confident that the revolver was designed to be drop safe when cocked. But possibly not. I’d hate to try to fix something that wasn’t in the original design.

@Michael Tinker Pearce , I think you have one of these 44 DA’s. Would you be willing to test the full cock hold by rapping the grip frame with a plastic mallet to see if the sear releases. That wouldn’t be an absolute determination but it would add information to the mix.
 
I learned part of this concept when I was trying to address the trigger follow

Once I installed the trigger return spring the problem of the trigger follow
The point I was trying to make, but I didn’t do very clearly was that at some point in the fitting or testing process, the entire firearm needs to be reassembled. I suspect people who do this for a living know that already. But for us tinkerers, it’s something to consider.
 
Now, I have been disillusioned before after testing many cycles of the action when an issue returns.

And once again, I was disappointed. Spring Force faded again, the friction at the engagement reduced, and it again could be pushed off. Above there are photos of the rear Shear that was mated to the new hammer and how poorly it was shaped to engage the notch on the hammer. Fortunately I have a new rear Sear that I purchased from Jack first. I proceeded to shape the new sear to match the knotch on the hammer. Consider that in all of the photos the height of the notch on the hammer is only 0.020". Adjustments by hand/ file/stone are maddening at Dimensions that small without a guide or jig. I got it as close as I can by hand. It certainly isn't perfect, but it did increase the surface area contact between the rear sear and the hammer. I am again in the test mode. As it is, it takes a great deal of force to push the hammer off. It also takes a very significant rap with a plastic mallet to release the rear. I'm going to give it several hundred Cycles testing every now and again for push off and see if things change before I go to the next step.

This is the sear/ Hammer engagement using the rear Sear and Hammer from the parts gun. It worked well as long as I could keep enough force on the bottom of the rear seat. But once the extra Force faded, it would push off.
20230731_175126.jpg

Here is a picture of the new sear with my best attempt to fit it to the notch in the hammer.
IMG_5951.jpg


My wife did come up with a plan to increase the spring pressure without bending the spring though I have not done so yet. Instead of bending the spring to increase its force, I will add a shim on the bottom of the Sear to increase its depth thus increasing the force from the sear spring. But that will wait until after this test period is over.

Another thing I did was to replace the rear Sear spring pivot pin and Trigger pivot pin with the pins from the parts kit. As it turns out, my pins were worn enough that I could feel the amount of movement when inserted in the parts held in my hand. The new pins are much tighter though they may be worn as well. And the replacement rear sear pivot pin did change the geometry of how the rear sear engages the hammer. Not a lot, but enough that I could actually see it.
 
And once again, I was disappointed. Spring Force faded again, the friction at the engagement reduced, and it again could be pushed off.

Another thing I did was to replace the rear Sear spring pivot pin and Trigger pivot pin with the pins from the parts kit.
Replacing the pins has given me hope that this adjustment will hold. All along I have felt that something was moving inside the gun to make the push off return. We have briefly discussed pins and holes for pins as the cause for problems before. Maybe I’ll get lucky.
 
I have done nothing else other than cycle the action testing intermittently for push off but have thought about the reason the adjustment seems to be holding. I feel certain that the new rear sear pivot pin has helped. But I think the alignment of the surfaces (rear sear to full cock notch) has had a bigger impact.

Under high magnification it appeared as if the mating edge of the rear sear was not parallel with mating edge on the hammer notch. In the high magnification images you can see that the edge closest to the camera is not touching. So something further away from the camera is touching. I can only get so close by hand as the misalignment I suspect is there measures in the single digit thousandths. I have no way to measure the misalignment. I can say with some degree of confidence that both surfaces are flat. But that doesn’t mean they are parallel when installed. Thoughts on how to measure and more importantly how to adjust precisely.

IMG_5951.jpeg
 
You can markup the surfaces and check the wear pattern of the mating surfaces. That will tell you if your contacting all the way across. Without a comparator it's going to be hard to measure your angles.
 
I considered smoking/marker but For the life of me I couldn’t figure a way to do that while the sear was under spring pressure. But as I was reading your post I may have thought of a way. I could possibly release the rear sear spring and drop it down from contact with the hammer, smoke/marker it, cock the hammer, push the sear into place and re-engage the sear spring. Do the same backwards to see the contact points. It’d be a three handed operation but maybe I could do that.

I’d be very interested in seeing what a “Comparator” for this operation would look like. Remember the angle would have to be measured in place under spring tension to provide useful information.

Thanks for the reply.
 
A google search of ‘Comperator’ identifies a class of instruments that are “devices for comparing a measurable property or thing with a reference or standard”. So one would have to be devised for the condition. Best I could think of is a device that could determine if the hammer stud and rear sear spring were parallel. A dial indicator maybe?

This is really off in the weeds. I’m going to try to smoke it.
 
I could possibly release the rear sear spring and drop it down from contact with the hammer, smoke/marker it, cock the hammer, push the sear into place and re-engage the sear spring. Do the same backwards to see the contact points. It’d be a three handed operation but maybe I could do that.
Or not! It was worth a try, but I am unable to mark the sear or the hammer and get any useful informatión out of it.

I know that bearings inside an engine are measured using a ptoduct called Plastigage. Is there any application here? Or a similar product?

EDIT TO ADD. One part of the testing accomplished was to confirm that when reassembled the revolver returned to the same state as before it was reassembled. It isn't unusual for a problem, or a new problem, to occur after after reassembly. So I was happy about that.
 
Last edited:
An old trick is to use carbon paper between the parts. The transfer will show the contacting area. It will not show the angle, but it can point you in the right direction. I don't know that it would work any better than marker and finding carbon paper might be a trick these days.
 
The problem with the marker is no matter how I assemble it I will be scraping most of the markings off as I assemble it.

I assume that the sear spring must be installed in order for the markings to provide useful information. With the sear spring installed the mating edge of the sear rolls over the edge of the notch in the hammer. So everything shows contact. I suppose I could just force The Sear up using my finger or a tool to contact the hammer. That would certainly be simpler to do. I just didn't think it would provide useful information. Maybe I'm overthinking this. I've been known to do that.

I like the carbon paper idea.
 
I feel fairly confident that the revolver was designed to be drop safe when cocked. But possibly not. I’d hate to try to fix something that wasn’t in the original design.

@Michael Tinker Pearce , I think you have one of these 44 DA’s. Would you be willing to test the full cock hold by rapping the grip frame with a plastic mallet to see if the sear releases. That wouldn’t be an absolute determination but it would add information to the mix.
Sorry, I was late seeing this. A repeated resounding whacks with a 2lb. plastic mallet did not cause the hammer to drop. Individual guns may vary according to how they have been used and/or abused.
 
Sorry, I was late seeing this. A repeated resounding whacks with a 2lb. plastic mallet did not cause the hammer to drop. Individual guns may vary according to how they have been used and/or abused.
Thanks for doing that. The revolver is 140 years old. A couple of days is insignificant in the bigger picture.

I expected that result from a properly functioning example. My wife found a post on the internet indicating that the hammers were known to be soft(ish) and the model was known for push off.
 
I've been tinkering these past 2 weeks trying to remove a slight hiccup in the single action trigger pull. I could feel the double action sear pulling off of the hammer as thesear released from the full-cock notch. In extreme cases this can cause the trigger to ffollow the hammer. In the below picture you can see the bottom of the hook on the double action sear is still in contact with the hammer. There is a little take up before the trigger reaches the rear sear and in this take up the trigger rotation wants to lift the double action sear and rotate it out of the way of the hammer. 140 years of wear plays into this issue. Previously I had replaced both the trigger and the hand from the parts gun but left the original double action sear in the revolver.

20230731_175538.jpg

I replaced the double action sear from the parts gun and I can no longer feel the double action sear pull off the hammer. I can still feel the hammer push the double action sear completely out of the way.

I'm about as far as my skills (more like lack of skills) will take me on this one. It can still be pushed off if I push hard enough and at full cock it will release if I hit the frame hard enough with a hammer. So it isn't drop safe with the hammer pulled back. It is drop safe when engaged with the half cock notch. Though if I drop the hammer before reaching the full cock notch it will not stop on the half cock notch and the firing pin will have enough momentumto fire a roun. I have 4 of these in different calibers and none of them will stop on the half cock notch if the hammer is dropped before reaching the full cock notch. I think it should.

@Michael Tinker Pearce I wouldn't be surprised if you declined to do so, but would you test yours to see if yours stops on the half cock notch if the hammer is released just before the full cock notch? The test is destructive, so I understand if you decline.
 
Back
Top