Tale of a S&W 44 Double Action (yeah, this is getting old)

Johnm1

Member
Joined
Feb 24, 2008
Messages
1,881
Location
Mesa, AZ
If you haven't noticed from my other posts, I do suffer from Obsessive, Compulsive Disorder. I was so smitten with the 38 DA that I bought a Junker 32 DA and got it back to working. It only follows that I'd buy a 44 DA. Consistent with the 38 and the 32, it needs work and is 'finish challanged'. But I'm too cheap to buy one that is a collector piece.

Just a little background. All three Double Action models are based on the same design and basically use the same parts just sized for the revolver. There were 5 design changes in both the 32 and 38 DA but the 44 never went through a design change. As such all 44 DAs have the double cyclinder stops and notches that the first and second model 32 and 38 had. The 32 was built on the #1 frame, 38 on the #2 frame, and 44 on the #3 frame that the earlier single actions revolvers were built on. I don't know if the frames were 'exactly' the same, but they are at least approximately the same size.

This one was purchased with full knowledge that it didn't hold on the single cock or half cock notch. Figuring this meant a new hammer my offer was substantially lower than the asking price. The list price was $1,400 that he quickly came down to $1,100. Assuming the hammer needed to replaced I walked away the first day to do some research. Research got me to a wild guess on what a replacement hammer would cost. My guess was $200. considering the finish and the hammer issues I offered $800 and he countered with $900. I probably should have walked away from the $900 but I didn't.

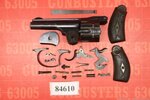
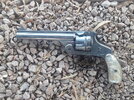
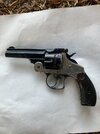
It does cycle OK in double action. Won't hold worth a darn in single action and for some reason didn't register that there was even a half cock notch. But all of that is limited to the hammer and possibly the rear sear and rear sear spring. Here are some basic pictures.

44 da2a.JPG 44 DA6A.JPG

So to get to the nitty gritty and keep this post relevant to the Gunsmithing forum, here are the issues I have to deal with.

As I said, the revolver will not hold at single cock. It pushes off. Looking at the hammer, the single cock notch looks sharp though I haven't taken it out to do a complete investigation. I cannot tell if the rear sear is in good shape or not without taking it out. I did purchase a new rear sear just in case. I probably should have bought a new rear sear spring as that provide the force to keep the rear sear in contact with the single cock notch. But that isn't the end of the issues with the hammer. It appears that someone has ground off the half cock notch entirely. Now that I didn't expect. Here is a picture of the hammer. In this picture you can see the rear sear pushing up against the bottom of the hammer where the half cock notch should be.

44 DA18A.JPG

Although the NRA did an article on the 44 DA and said there wasn't any type of safety, all of the pictures I've seen of 44 DA hammers have the half cock notch. For clarification, here is a picture of the 38 DA hammer showing the missing half cock notch with the rear sear engaged in the half cock notch.

Not held at half cock from further away.JPG

As you can see, quite a bit of metal has been taken off (why would somebody do this?) And it does cause some issues even with the double action trigger pull. The rear sear is constantly being pushed up by the rear sear spring and rides the contour of the bottom of the hammer. Although the double action always functions, the irregularity of the contour on the bottom of the hammer sometimes hangs up the rear sear and it feels 'different'.

The real answer is to find another hammer. And if I were to find one, the push off issue might be resolved. But so far none of the suppliers has one or even lists one. We may be taking a trip down to @Jackrabbit1957 to see what he thinks.

Any thoughts on how to salvage this hammer?

I've used this animation in a couple of posts. But it shows the inter-relationship of the hammer, rear sear, rear sear spring. The diagram below comes from the animation of a 38 DA that really helped me understand how to put these things together. The animation can be found here.


Below, the blue is the rear sear spring, the red is the rear sear, and the green is the cylinder stop. I believe the diagram below is with the hammer at single cock.
index.php
 
Hi John, two ways to salvage the hammer come to mind, one is to simply recut the halfcock notch which will move the engagement slightly forward, or weld it up and recut it in the original spot. Since the position of the notch isn't all that critical just recutting it should work just fine.
 
There was a well known wheeler dealer in Colt circles who welded and recut a lot of SAA notches. He would do them on exchange or be sure to send you your hammer back.
 
Hi John, two ways to salvage the hammer come to mind, one is to simply recut the halfcock notch which will move the engagement slightly forward, or weld it up and recut it in the original spot. Since the position of the notch isn't all that critical just recutting it should work just fine.

The half Cock notch would need to be put in its correct location. It is used to retract the hammer/firing pin so it is behind the recoil shield. By today's standards it is not safe, but back in the day it was the safety. The bigger issue is that the surface of the bottom of the hammer between the removed half cock notch and the single action sear was buggered when the half cock notch was removed. This curved surface has a specific contour that the rear sear pushes up against to properly function the rear sear and because they are connected, the cylinder stop. I can show this to you better in person. Also the single cock notch is assumed to be worn. Are you able to cut a new notch? I myself am not comfortable dong so. I have neither the tools nor the skills to do so.

Are you going to be around next weekend? I'll be traveling to Bisbee to see the youngest daughter and give the people at here work a short lesson on how to make a 'Found' gun safe. I can show you in person what the problems are. Even if you can't cut the single cock notch I'd like you to look at the half cock notch.

FYI - I do have extra 32 and 38 hammers so you can see what the hammer is supposed to look like and i have a fully functional 38 DA that will allow you to see the action 'in action' so you can see what I'm talking about on the contour of the bottom of the hammer. FYI - the revolver is classified as an antique if that makes a difference.

There was a well known wheeler dealer in Colt circles who welded and recut a lot of SAA notches. He would do them on exchange or be sure to send you your hammer back.

Hoping that @Jackrabbit1957 can provide that service.
 
Now that's an "intersting" little burg. Sort of a San Francisco Haight-Ashbury in the desert.

Benson is tame. You want to see unusual go an hour and a half down the road to Bisbee. Now there is an interesting little burg.

EDIT: Man I need to read better. Somehow I read Benson into your reply. Yes, my youngest lives there. Arts'y and a vibrant gay community.
 
I still haven't taken this one apart yet. Busy working onnthe 32 DA and the Meriden. Waiting on parts for both of them.

I mentioned in an earlier post that there was an article that implied thatthe 44 DA didn't have a safety notch. I'm pretty sure that is incorrect. But it's otherwise a decent read. The article can be found here:

https://www.americanrifleman.org/content/this-old-gun-smith-wesson-44-double-action-first-model/

In NJ that article it states:

First Model DA .44s employed the usual S&W top-break ejection system. The revolver could be fired double- or single-action, though it had no safety position, and the hammer did not rebound after the trigger was released, resulting in a potentially dangerous setup if the gun were dropped.

Chiccone's book clearly show the half cock notch in both the parts diagrammand in photographs

Screenshot_20230518-183148_Drive.jpg

Screenshot_20230518-183210_Drive.jpg

It was otherwise a good article. Another good article on the development of the double action revolvers is this one:

https://americanhandgunner.com/handguns/the-first-double-action-big-bore-sixguns/
 
Hey John, not sure yet about this weekend, may have some forced family fun to attend to. Not sure which day but will let you know.
 
Hey John, not sure yet about this weekend, may have some forced family fun to attend to. Not sure which day but will let you know.

If it works that'd be great. But if not I have a lot to do on the 32 DA and the Meriden this weekend. And, the oldest is working from 10 AM to to 111 PM both days. So we wouldn't get much visiting time this weekend. Thinking about going to Frontier Gun Shop on Saturday even if you and my oldest aren't available. I love looking around his shop.
 
I have made some progress on the 44 DA. I still need to travel/meet with Jackrabbit on the half cock notch and consider his option of just cutting a new half cock notch. I had originally thought it had to be put back the way it was originally, but that isn't necessarily so. We'd certainly have to look at thet onion. But I thought I should address the other shortcomings of the revolver before I did that.

Issue 1 - Will not reliably hold in full cock and can be pushed off when it does hold.
Issue 2 - Sometimes when the single action trigger is pulled, the hammer catches the front sear (double action sear) and carries the trigger with it.
Issue 3 - the afore mentioned missing half cock notch

I've learned a great deal in the past couple of weeks. I have finished the 32 DA and it works perfectly now. It too had the push off and trigger follow issue. In my internet research I found another person who had a similar issue with his 32 DA and have corresponded on the S&W forum with some detailed information. For brevity's sake I'm going to cheat and copy/past my last post on the S&W forum as it really has the information I want to share on this forum.

From my post on the S&W forum

I'll add a little bit to what I learned about the issue of the trigger following the hammer in single action. Although I can't say for sure that the double action sear is engaged while at full cock, it acts as if it is. One thing I am sure of is that the double action sear must move out of the way before the single cock (rear sear) is released. Here is a video of the action as it should happen. Notice how the front sear move forward/away from the hammer before the rear sear is released.

https://photos.app.goo.gl/VDVXzo3KdvnrVFo49

I am learning that the entire system has to be considered when tuning any of the S&W DA's. This includes the mainspring force, trigger return springs and rear sear spring. Each plays a part in both single action and double action trigger pulls.

While tuning a 32 DA I learned that the ability for a revolver to hold at full cock is directly related to how much force the rear sear spring can impart on the rear sear/full cock notch. If it is too little not only will you be able to 'push off' the hammer, the rear sear will release too early and before the double action sear has time to get out of the way. So when tuning these double actions, start with tension on the rear sear spring until it holds at full cock. Notice in the video that the double action sear moves at the first movement of the trigger and before the rear sear is released. It happens quick in the video, but it can be seen.

Here is a lesson I learned on a 44 DA that had the same problem. Function test with the trigger guard/return spring installed! It imparts downward force on the hammer (through the trigger/front sear) just as the mainspring imparts upwards force on the hammer. This is the reason I think the front sear is engaged when at full cock even though the engaging surfaces look to be 'disengaged'. Because the mainspring is located at the back of the hammer and the front sear (double action sear) is located at the front of the hammer, both impart force on the hammer in the same direction and the force of the rear sear spring must be strong enough on the rear sear to overcome both forces and still hold at full cock. I learned that when I thought I had the issue resolved on a 44 DA but when I installed the trigger guard the issue came right back.


Another thing I learned on the 32 DA that I recently completed is that where on the rear sear the rear sear spring imparts its force makes a difference. If the spring is too long and contacts the rear sear near the pivot pin, a lot of the spring force is wasted pushing against the pivot pin. Of course one has to be cautious about not making the spring too short or it will 'slip' off the back of the rear sear. Ask me how I learned this lesson. It should be very difficult to 'push' the rear sear spring down enough to install its retaining pin. Like, it should really hurt your finger to push it down that much. Another ask me how I know.

The blue is the rear sear spring and the red is the rear sear.

?hash=56fff8996231f13e99c7cd595468ea81.png


And finally, notice the bottom left of the red rear sear and how the trigger has 'come up' to the point of pushing up on that side of the rear sear and releasing the rear sear from the hammer. When you look at the rear sear you will see a little 'nub' on the bottom where the trigger will contact it. This nub is provided so one can trim it and delay when the rear sear is released. But I caution, don't work on this surface until you have the tension on rear sear spring/rear sear correct. The correct amount of tension on the rear sear (so it doesn't push off) actually delays when the rear sear is released. So if you try to correct the issue at the trigger/rear sear surface first and then correct the spring force on the rear sear you will at best cause a bunch of take up in the trigger. It may cause other things that I haven't experienced or figured out.


End of post in S&W Forum

Here is a short video of the now properly functioning 44 DA:

https://photos.app.goo.gl/yit8BgUMJfQi3nyE6

Not in the S&W post is another thing I learned. The EDIT rear sear spring not trigger return springs may or may not have enough spring tension in them to accomplish the task of holding the rear sear at full cock. By trimming and bending the 32 DA rear sear spring I was able to provide enough tension that it cannot be pushed off. I find that the 38 DA that I finished a while ago can be pushed off if enough force is applied to the hammer. I'll have to go back and adjust the tension on the 38 DA to fix that now that I know how to do it.

The 44 DA is another story. First off, there aren't any new 44 DA rear sear springs being made. Although the 38 DA rear sear springs look identical, I suspect they impart less force. I managed to get the 44 DA rear sear spring about a strong as I can by bending and still be able to install it but I'm pretty sure the spring that was in the gun when I got it is weakened enough that if I bend it far enough I won't be able to install it. And I'm pretty sure that even though I can bend a spring to impart more force, that additional bend will release the same way I put it in. By bending. I think what I'll have to do it take a new spring, probably a new 38 DA rear sear spring, and anneal it, bend it into the final shape I need it in, harden it and then temper it so it won't break. I've never tried to do anything like this with any spring. So it'll be a learning experience. The tools I have on hand to accomplish this are:

Oxy/Mapp Gas Torch

or

a small jeweler's kiln capable of 1800 degrees F and a thermocouple capable of measuring temperatures up to 3000 degrees F. Any thoughts on the steps to accomplish annealing/hardening/tempering?
 
Last edited:
This is a little bass ackwards. Here is a short video of the hammer catching the front sear when the single action trigger is pulled. If you watch carefully you can see a 'hesitation' or 'stumble' of the hammer.

https://photos.app.goo.gl/PnkfFrNtkw8Jptwc9

In most cases, the front sear is caught and the hammer carries it down pushing the trigger that the front sear is attached to rotate forward.
 
I have made some progress on the 44 DA. I still need to travel/meet with Jackrabbit on the half cock notch and consider his option of just cutting a new half cock notch. I had originally thought it had to be put back the way it was originally, but that isn't necessarily so. We'd certainly have to look at thet onion. But I thought I should address the other shortcomings of the revolver before I did that.

Issue 1 - Will not reliably hold in full cock and can be pushed off when it does hold.
Issue 2 - Sometimes when the single action trigger is pulled, the hammer catches the front sear (double action sear) and carries the trigger with it.
Issue 3 - the afore mentioned missing half cock notch

I've learned a great deal in the past couple of weeks. I have finished the 32 DA and it works perfectly now. It too had the push off and trigger follow issue. In my internet research I found another person who had a similar issue with his 32 DA and have corresponded on the S&W forum with some detailed information. For brevity's sake I'm going to cheat and copy/past my last post on the S&W forum as it really has the information I want to share on this forum.

From my post on the S&W forum

I'll add a little bit to what I learned about the issue of the trigger following the hammer in single action. Although I can't say for sure that the double action sear is engaged while at full cock, it acts as if it is. One thing I am sure of is that the double action sear must move out of the way before the single cock (rear sear) is released. Here is a video of the action as it should happen. Notice how the front sear move forward/away from the hammer before the rear sear is released.

https://photos.app.goo.gl/VDVXzo3KdvnrVFo49

I am learning that the entire system has to be considered when tuning any of the S&W DA's. This includes the mainspring force, trigger return springs and rear sear spring. Each plays a part in both single action and double action trigger pulls.

While tuning a 32 DA I learned that the ability for a revolver to hold at full cock is directly related to how much force the rear sear spring can impart on the rear sear/full cock notch. If it is too little not only will you be able to 'push off' the hammer, the rear sear will release too early and before the double action sear has time to get out of the way. So when tuning these double actions, start with tension on the rear sear spring until it holds at full cock. Notice in the video that the double action sear moves at the first movement of the trigger and before the rear sear is released. It happens quick in the video, but it can be seen.

Here is a lesson I learned on a 44 DA that had the same problem. Function test with the trigger guard/return spring installed! It imparts downward force on the hammer (through the trigger/front sear) just as the mainspring imparts upwards force on the hammer. This is the reason I think the front sear is engaged when at full cock even though the engaging surfaces look to be 'disengaged'. Because the mainspring is located at the back of the hammer and the front sear (double action sear) is located at the front of the hammer, both impart force on the hammer in the same direction and the force of the rear sear spring must be strong enough on the rear sear to overcome both forces and still hold at full cock. I learned that when I thought I had the issue resolved on a 44 DA but when I installed the trigger guard the issue came right back.


Another thing I learned on the 32 DA that I recently completed is that where on the rear sear the rear sear spring imparts its force makes a difference. If the spring is too long and contacts the rear sear near the pivot pin, a lot of the spring force is wasted pushing against the pivot pin. Of course one has to be cautious about not making the spring too short or it will 'slip' off the back of the rear sear. Ask me how I learned this lesson. It should be very difficult to 'push' the rear sear spring down enough to install its retaining pin. Like, it should really hurt your finger to push it down that much. Another ask me how I know.

The blue is the rear sear spring and the red is the rear sear.

View attachment 1155105


And finally, notice the bottom left of the red rear sear and how the trigger has 'come up' to the point of pushing up on that side of the rear sear and releasing the rear sear from the hammer. When you look at the rear sear you will see a little 'nub' on the bottom where the trigger will contact it. This nub is provided so one can trim it and delay when the rear sear is released. But I caution, don't work on this surface until you have the tension on rear sear spring/rear sear correct. The correct amount of tension on the rear sear (so it doesn't push off) actually delays when the rear sear is released. So if you try to correct the issue at the trigger/rear sear surface first and then correct the spring force on the rear sear you will at best cause a bunch of take up in the trigger. It may cause other things that I haven't experienced or figured out.


End of post in S&W Forum

Here is a short video of the now properly functioning 44 DA:

https://photos.app.goo.gl/yit8BgUMJfQi3nyE6

Not in the S&W post is another thing I learned. The trigger return springs may or may not have enough spring tension in them to accomplish the task of holding the rear sear at full cock. By trimming and bending the 32 DA rear sear spring I was able to provide enough tension that it cannot be pushed off. I find that the 38 DA that I finished a while ago can be pushed off if enough force is applied to the hammer. I'll have to go back and adjust the tension on the 38 DA to fix that now that I know how to do it.

The 44 DA is another story. First off, there aren't any new 44 DA rear sear springs being made. Although the 38 DA rear sear springs look identical, I suspect they impart less force. I managed to get the 44 DA rear sear spring about a strong as I can by bending and still be able to install it but I'm pretty sure the spring that was in the gun when I got it is weakened enough that if I bend it far enough I won't be able to install it. And I'm pretty sure that even though I can bend a spring to impart more force, that additional bend will release the same way I put it in. By bending. I think what I'll have to do it take a new spring, probably a new 38 DA rear sear spring, and anneal it, bend it into the final shape I need it in, harden it and then temper it so it won't break. I've never tried to do anything like this with any spring. So it'll be a learning experience. The tools I have on hand to accomplish this are:

Oxy/Mapp Gas Torch

or

a small jeweler's kiln capable of 1800 degrees F and a thermocouple capable of measuring temperatures up to 3000 degrees F. Any thoughts on the steps to accomplish annealing/hardening/tempering?
Having had more experience than I’d like to remember or admit to with springs in the antique S&W guns I would highly caution against trying to heat treat anything that small. They batch treat them in factory settings and that works well because there are so many that the temperatures change more slowly. A single part takes heat very quickly and cools very quickly making the process much more difficult. What I found that worked kinda OK (still not great) was to heat treat a heat sink at the same time. Mine was an old junk sledge/axe head which helped to slow and control the heating and cooling processes by simply adding mass to the situation. The way it was described to me by an engineer over a coil spring and stabilizer bar manufacturing facility was to imagine a hundred jonboats in a lake. Put a 1000 horsepower motor on 1 boat and it’s a death trap. Touch the throttle and it’s uncontrollable, but if you tie all of them together and use the one with a motor kinda like a tugboat then you have a much more forgiving situation even if it does become a lot more bulky and complicated, but it’s now controllable if your careful. Even with the help of that engineer and about 30 tries I never successfully made the spring that I needed. I finally found one on eBay that worked. The ones I made kept either warping or being brittle and breaking, usually both.
 
Yeah, I didn't figure that was going to be an easy task.

Somehow I have to get more force on that spring/rear sear. I can continue to bend the ones I have until either they break or are too short. But I have to believe that the act of over bending a spring weakens the spring and at some point that spring will return to its 'less strong' state.

As it is it functions normally but can be pushed off. It was easy to get enough spring force on the 32 DA. It has a lot less to work against.
 
Here is an interesting repair. I'd call it a bubba job, but bubba can't drill this straight. While I was trying to balance the rear sear spring strength with the trigger release on the rear sear I kept on going from fixed to not fixed. Almost like something was moving. So I did what I do. I stared at the action for a long time as it went from working to not working. And this is what I saw. Look at the hammer pivot pin as I'm pulling the hammer back. I was pretty sure I couldn't do anything with the action until this was fixed.

https://photos.app.goo.gl/nUJX4p1u1exvUTGz5

This is what I found when I looked at the hammer stud up close. Someone had drilled out the stud and tapped the new hole and installed a new stud in the tapped hole.

I'm pretty sure bubba can't do this. The outside threads on the hammer stud and the corresponding threads in the frame of the revolver were untouched. The replacement went in without a hitch.
70737144967__BCF010D1-AF3B-4209-96D8-E1BB6DAB49B1.jpg
New hammer stud installed
Hammer stud parts 1.jpg

Rather than a bubba job, I'm going to call this a field expedient repair before parts were available through the internet or even mail order. So maybe this was done 75 years ago and this is the best that the person could do. It did function well in double action, even loose like it was.
 
Last edited:
Detailed posts are hard to do without a brain fart or two. I corrected this in the above post but figured I'd post the correction for those that have already read the post and were confused.


Not in the S&W post is another thing I learned. The EDIT rear sear spring not trigger return springs may or may not have enough spring tension
 
Hi John, two ways to salvage the hammer come to mind, one is to simply recut the halfcock notch which will move the engagement slightly forward, or weld it up and recut it in the original spot. Since the position of the notch isn't all that critical just recutting it should work just fine.

half Cock notch would need to be put in its correct location. It is used to retract the hammer/firing pin so it is behind the recoil shield.........This curved surface has a specific contour that the rear sear pushes up against to properly function the rear sear and because they are connected, the cylinder stop.

@Jackrabbit1957 's conclusion was spot on. I had not disassembled the revolver when I made the Comment about reaar sear and the cylinder stop being connected. That is true for the 32 and 38 DA's from the third model up. But the 44 DA never went through the 2nd through 5th model changes. The 44 DA uses a double cylinder stop actuated by the trigger only. Neither the cylinder stop or the rear sear have 'legs' and the only function the rear sear has on a 44 DA is to release the rear sear from the full cock notch. So in this often used diagram, the leg on the left side of the rear sear and the leg on the right side of the cylinder stop dont exist.

Parts Diagram.JPG

Below you can see the bottom of the rear sear protruding below the frame. It is positioned to be pushed up by the flange on the trigger. So it doesn't make a difference exactly where the half cock notch is located.
IMG_5827.PNG

The big question is if this is something I can do or if its better left to someone with more exp?
 
EDIT: I tried to access the videos from another device. Apparently the links don’t work. I’ll try to fix that later today.
 
Fixed.

https://photos.app.goo.gl/xrTmYneJizdqZKdf8

Now, back to the technical issue of the missing half cock notch. As I mentioned above, the 44 DA doesn't use the rear sear to position the cylinder stop like the 3rd model and above 32 & 38 DAs. So as I see it the half cock notch can be cut without concern about its exact location. In the picture below the rear sear is pushed up by its spring in the at rest/after being fired position.


IMG_5827.PNG
At this point the firing pin protrudes from the recoil shield. In normal operation the hammer is pulled back a short distance to withdraw the firing pin and the rear sear is pushed up into the missing half cock notch holding the hammer back with the firing pin retracted.

BTW - Jackrabbit1957 suggested this earlier but it seems to have bounced off my thick skull.

Does anybody see a reason why I shouldn't cut a simple notch just a little bit to the rear of where the rear sear is contacting the hammer?

Consider, this is a notch to hold the hammer in place. Not a part of the fire control. It could be as simple as a hook shape to mirror the shape of rear sear. Hear is a picture of a 38 hammer with an in tact half cock notch with a 44 rear sear in approximately the correct orientation.


16873213451226509971170782910246.jpg

If there are no objections, is this something a tinkerer like me could do or should I try to get a professional like @Jackrabbit1957 to do the work?

The only concern I had was if the new half cock notch location will rotate the rear sear so far down that the rear sear would conflict with the trigger guard. I have ruled that out. But I can't show it in a picture due to the location if the rear sear inside the trigger guard.
 
Last edited:
I don't see any reason not to give it a try. I would try to follow the same profile as the one with the notch already cut.
 
I don't see any reason not to give it a try. I would try to follow the same profile as the one with the notch already cut.

I only have hand tools. Files and the dreaded Dremel Tool. Do you have more appropriate tools? More importantly do you have better skill for making this cut?

If I were to travel down to you I think I’d just assume adding material and shaping. That would preserve the geometry of the action. Although I don’t see a drawback to cutting a new notch I really don’t know if the modified geometry might cause a functional issue.

I suppose I could cut it myself and see if it works. If there are issues, like if I butcher the cut, there is always the option to add material later.

Unrelated to the notch, do you have an opinion on hardness for lead projectiles in these double actions? They will all produce about 700 fps or less. My thoughts are a Brinal hardness of about 10. Harder than dead soft but still pretty soft.

Any thoughts?
 
I took some time tonight to layout where I want the new half cock notch to go. As it turns out I can illustrate the potential functional issue with cutting the half cock notch without adding material. In the picture below I have superimposed a spare rear sear on the outside of the frame in the at rest position.

E947646F-79AE-46A9-AFA4-CF932339F801.jpeg What you can’t see is the inside of the trigger guard that is relieved to allow the bottom of the rear sear to travel. This next picture show where the rear sear would be if I cut the notch without adding material.

C3A02952-772A-4887-8E3D-CBE427127911.jpeg

As you can see the the bottom of the rear sear has rotated much closer to the end of the relief in the trigger guard.

For orientation, here is the picture with the trigger guard removed.
312D65EF-EDAB-4175-BA75-9BCC39C68706.png

Now the next picture is difficult to understand. I can tell what things are in the picture and hopefully the above picture helps others understand. But the arrow is pointing to the bottom of the rear sear in the at rest position. As the top of the rear sear goes up into the newly cut half cock notch the bottom would need to rotate down (for lack of a better term) and I’m concerned that the sear would contact the trigger guard before the rear sear fully engaged the new half cock notch.
622BA4B0-BA46-44E2-9E2E-1D1124645724.jpeg
it looks like there is still a little room for the sear to ‘come down’ but there may not be. The rear sear may well be contacting the trigger guard or very close to contacting it but that could be Hidden by the trigger guard.
I would have a little I could trim off the bottom of the rear sear but that is the surface the trigger contacts to release the rear sear in single action. There isn’t a lot of room for error on that surface. The only other option would be to trim the trigger guard to create more room for the sear to travel in. And I’m not real crazy about that option.

Adding material has always been the ‘right’ way to fix this. And maybe I should just bite the bullet and do it that way.

The other side of that coin is that if I cut the notch without adding material and it doesn’t work, the fix for that is to add material. And if it does work, we’re done. Risk/reward.

Thoughts?
 
Last edited:
To add to the issue of cutting the notch without adding material, If I follow the pattern of how the half cock notch is cut, the new notch will be relatively large. In the below picture I have superimposed a 38 DA hammer that has an appropriately cut/shaped half cock notch on top of the hammer in the 44 DA. As you can see the half cock notch is quit large on the 38 and would be proportionately larger to mirror the rear sear.
5B109867-CE3E-49CE-911F-FA448A8A804C.jpeg

Now with the 38 hammer notch in the approximate location where the hammer would be cut. The rear sear is going to come up relatively quite a bit.

1B92AEFD-D89B-4794-BA1B-47A8376AE67F.jpeg
 
After much effort trying to add material by welding and reshape the Hammer I tried to mechanically add material to address both the half cock Notch and the push off issue with the full cock notch. Believe it or not I was successful preventing the push off. It looked like hammered dog poop and a bubba job. That is covered in the thread


As I noted in that thread I found an auction for a parts kit that was misidentified as a new model number 3 in 44 S&W American. I had fully expected to pay about $250 just for the hammer due to the scarcity. I was able to get the entire kit for about $250. It was everything except the frame and the rear sear spring. EDIT it has the rear sear just missing its spring/pin.

pix332320319.jpg

The hammer fit like a glove. Function is nearly perfect. If I push hard enough I can still push off from the full cock notch. But I haven't made an attempt to increase the spring Force on the rear Sear yet. Here is what the action is supposed to do


I still struggle with sharing files using the cloud. So please let me know if that link does not work.

Despite being advertised as a new model number 3 in 44 snw american, the parts kit was for an exact match to my 44 double action in 44 Russian. The barrel/cylinder installs perfectly and times correctly on my frame. Even in blue, the 4-in barrel is just so well proportioned to the frame that I like it much more than the 6-inch barrel that I have. Believe it or not, the hard rubber grips change how the gun fits in your hands. And I like it much better with the hard rubber grips with either the 4-in or 6-in Barrel installed. Here's a comparison of the 6-in barrel with the mother of pearl grips and the 4-in barrel with the hard rubber grips. All I have to do now is get the 4-in barrel/cylinder from Blue to nickel.

20230610_084923.jpg

IMG_5935.jpeg

Needless to say, I am quite happy. There are some drawbacks to the parts I received in the kit. As you can see the barrel/cylinder are blue. That is a reblue. It was done fairly well, with only parts of two letters on the barrel that shows signs of polishing. The hammer and Trigger were also blued in that operation. Those should be case hardened. The rear Sear spring was not in the parts kit. I have the original rear sear spring and the 38 double action Springs are nearly identical in size at least. I may be able to utilize a new 38 double action rear Seer spring to apply more pressure to the rear sear and hopefully cure the push-off issue. Oddly, that worked on the 32 double action. It would take a sledgehammer to push that one off. There aren't many new parts available for the 44 double action series. Fortunately, Jack first produces a new rear Sear. And I have one of those. So I have the ability to Tinker with a new part and see if I can't cure the push off by either increasing the rear Sear spring force or tinkering with the angle on the rear Sear. Work is busy right now and that will take a back seat.

In the video you can hear that the cylinder has some play when at half cock. That is purely a function of the cylinder stop that is attached to the trigger. Basically the movement is due to the cylinder stop being smaller than the slot in the cylinder. On the bright side, the parts kit did come with those parts. That again will be something for the future.
 
Last edited:
Back
Top