NOTE: Listing of step-by-step press set up, operation, enhanced practice for greater consistency and troubleshooting on this post -
https://www.thehighroad.org/index.p...r-oal-consistency.911743/page-9#post-12471889
----------------------------------------------------------------------
NOTE: It needs to be emphasized that the priming system on the Six Pack Pro/Pro 6000 is BRAND NEW and we need to let go of old notions of previous generations of priming system Lee used on other presses.
The new priming system utilizes double-stack feed chute/trough with ribbed slider that ensure movement of next primer to be picked up from right side of chute so the primer guide will readily pick up each and every time. So as long as there are primers in the chute/trough (More than 3 primers for CCI SP), the new priming system will feed primers into station #2 -
https://www.thehighroad.org/index.p...ing-for-oal-consistency.911743/#post-12443415
press offers no large priming rod....claiming one rod fits all. Really? What's your experience? No marks? If so I wonder how they did that????
I wondered too ... used Federal LPP to offer the softest cup ... The priming was very smooth ... 2. No marks on the cup to indicate that a wrong sized ram was used ... 3. Primers all seated below flush ... Interesting side note: ... Lee ACP ... set up for SPP ... case was primed perfectly ... below flush and without any marks/distortion to indicate that the wrong size ram had been used.
I don't know what Lee discovered or how they are doing it, but I'm getting perfect primer seating of LPP using the SPP ram
I was curious too, so decided to take a closer look.
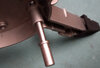
First, I took apart my Auto Prime to compare small and large priming rods/pins diameter:
SPP priming rod on the left measured around .172", same as small priming rod for Auto Prime and consequently, large priming rod measured around .207". But notice Auto Prime's small/large rods have sharp edges but SPP's priming rod has rounded edges.
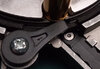
Next I looked at how the priming rod is guided under the shellplate cover. The new priming system uses a snug sleeve cylinder to guide the priming rod to align with the shellplate and shellplate is made captive when index pin goes through the holes in the shellplate. (Priming rod spring removed for the picture to show sleeve cylinder detail)
Unlike Dillon's brass "locator buttons" and Hornady retainer spring ring that have fixed retention of brass case rim, Lee ABLP and SPP use adjustable tension "case retainers" to hold the case rim.
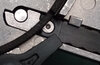
So with priming rod and shellplate captivated by sleeve cylinder and index pin along with case rim held by case retainer; when primer guide enters station #2 with a primer, primer to primer pocket alignment is fairly square and "good enough" to readily prime even slightly larger diameter foreign/metric primers to slightly below flush of .002"-.004" (CCI/PMC/S&B). And with rounded priming rod along with features of new priming system explained above may be reasons why we are not seeing marks on large primer cups, even softer Federal LPP. (Case retainer in the picture moved outward to show primer guide detail in station #2)
And not having to change priming rod between small/large primers will speed up the caliber conversion, which is a plus when loading multiple calibers.

 ) -
) - 

 . They gave me free shipping anyways, I guess their promo code didn't work as it was supposed to so in all fairness they caught us all up.