
Hello.
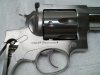
Just picked up a lnib Redhawk with 4" barrel in .44 mag. Small seam between the trigger guard and frame. Gun seems to function OK The Plunger that locks the trigger group to the frame does not seat all the way, any opinions if this could be a possible problem with transfer bar, pawl, or cylinder lock???
THanks.
Jim

") ) just to smooth things out a little! Would you reccomend against this??
) just to smooth things out a little! Would you reccomend against this??