Adventures of a dipstick with a Sig 229, need help

Status
Not open for further replies.

duckslayer

Member
Joined
Jan 29, 2004
Messages
497
OK,

I realize this was a colossal mistake, so no need to tell me not to ever do this again!!!

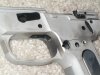
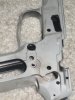
I decided to refinish my Sig 229, so I bead blasted it with Al Oxide, all is well there. I did forget however to remove a few of the pins in the slide, as well as the firing pin and spring. One of the pins that goes through the slide is stuck, presumably with grit in between it and the slide. I have hit it hard with a punch and it will not budge, and the armorers guide does say to punch it out, so it is not held by anything else.

I got the bright ides to boil it in water in hopes that that would loosen the grit and expand the orifice around the pin a little, but it wasn't hot enough to do that. All it did was generate surface rust on the stainless steel.

My next plan is to cook it in the oven in order to expand the metal, does that sound like the best thing to do? Any other ideas on how to get the pin out? Also what about the firing pin, as it is gritty too. Of course i will replace all these with new parts when it goes back together, but I have to get it apart first.

Thanks for any help. I'm not through laughing at myself so feel free to join in:)
 
NO!

Don't bake it or broil it!

Nothing you can do now is going to get sand-blast media out of whatever it got into, short of complete dissembly & cleaning.

The split roll-pins are not / cannot actually be that tight anyway.
The pin through the slide is actually a small pin inside a large pin which helps lock it in place.

Use a small punch and drive out the inside pin first.
Then a larger punch to drive out the outer one.

rcmodel
 
duck,
You 'forgot' to remove the firing pin and spring?
:eek:
And now you seek counsel.
Find a good smith. You will require some assistance.
:cool:
 
OK, overlooked is a better term. This is intended to be an inexpensive project gun (it is an old, relatively cheap police gun), so I was making a project out of it. And now I've made a bigger project out of it. While I value the services of a good smith, I was hoping to make this a DIY project. If this will take specialized tools to do, then I will take it to a smith.
 
I'll look for the small pin tonight. The armorers guide had two numbers for it too, but i didn't put two and two together. Thanks for the help.
 
The stainless slides have a single tapered pin holding the firing pin in (firing pin positioning pin). It is a single use, crush fit, pin. The smaller end is on the ejection port side. If you look closely, you can see the splines on the larger end of the pin on the opposite slide side. You need two cup tip punches (a starter and a longer one) to try and remove it. Drive it out from the ejection port side. Good luck, they can be stubborn. Folks say Sig uses a big press. There is a fellow using an arbor press to do it in this thread on the SIG forums (bottom portion of the page). He says a drill press might work as well.
Regards,
Greg
 
Thanks for the link. Apparently I'm not the only one who has had trouble getting that darn thing out.
 
Whew!!! I got a 1 ton arbor press and finally got the pin out. That sucker was in there:eek:. I didn't booger up the slide very much, but I did put a little nick in it where the pin hole is when the pin finally broke free. I think it will clean up fine, and dura-coat or gunkote should hide it well.

Thank all of you for your help.
 
Will do, if I get to refinish it. The frame broke where the mag catch stop goes, so I don't know if that can be fixed. I will now be taking it to a smith to see what can be done.
 

Attachments

  • sigframe_4.JPG
    sigframe_4.JPG
    131.3 KB · Views: 109
  • sigframe_2.JPG
    sigframe_2.JPG
    128.2 KB · Views: 102
Last edited by a moderator:
That hard pin was in the slide. This happed on the frame when I punched out the mag catch.
 
Punched out the mag catch?

Oh!
I see!

I guess you know about the little spring-loaded plunger you push in with a small pointy screwdriver to release the mag catch now.

rcmodel
 
SIGS have used 2 types of pins for their pistols.

The old style was the "2-pin" type, with a smaller pin nested within a larger pin. I have an 80's vintage 226 with this style pin.

The new style pin is the aforementioned tapered model. I have a new 229 SAS that I cannot get this pin out of. I figured it was pressed in by a machine at the factory. About the only way I can think of getting it out is to find somebody with a press to punch it out for me.

By the way duckslayer, you make it sound as though you are rather brutal to your guns - or at least this one in particular.
 
I have done various home-gunsmithing to my rifles over the years with nary a problem. This is the only time I have put anything more than a scratch on one of my guns, but unfortunately I am pretty sure I killed the frame of what was otherwise a perfectly functioning firearm, which I would like to remind certain non-helpful contributers to this thread that this was MY firearm and they are not out any money whatsoever:rolleyes:

Sir Aardvark, you will have to have the pin pressed out, as it would be risky trying to punch it out with a hammer. It is a tough one. See the link gb6491 posted about it...it is very helpful.

Once again, my thanks to the guys who offered help, and I think I'll keep my fingers. Good idea zespectre.

I think my best option now is to buy a police trade in from CDNN and put a 9mm bbl in my current slide.

I am bummed that I ruined my gun, but it reminds me of the old adage..."Good judgment comes from experience, and experience comes from bad judgment."
 
All might not be lost here, I'm pretty sure you can switch the the magazine release to the other side. It'll make magazine changes awkward for a righty, but what the hey; I've seen some lefties make mighty quick mag swaps using their finger on the release of a 1911. As to the chipped out area: carefully fill it in with some epoxy and clean it up (I doubt it would show after some Gun-Kote or such) or it probably won't affect any thing (other than looks) left as is.
http://www.ar15.com/lite/topic.html?b=5&f=14&t=19231
Little note here: pay attention to the magazine release keeper that you had to push in to remove the release; if you put it in crooked or upside down when reinstalling the release you are in trouble.
Regards,
Greg
 
Last edited:
Yep, move the mag catch, fill the chip with JB weld or whatever. One other note, It appears you have removed the hard anodizing from the frame. This is what gives the frame rails resistance to wear. I know you will be spray and baking this frame, you may find your rails wear much faster now and that you develop some slop in the frame to slide fit.

Sig's are great pistols. Enjoy yours.
 
I didn't think about removing the anodizing. How would one refinish an aluminum frame without blasting it? Would gunkote or duracoat stick to the anodizing?

And on another option for me, are the frames the same for the 229 9mm and .40? If so, I could get a 9mm version and still have my original slide/bbl to shoot .40 also.
 
I tried Gun Kote on my P229's frame without blasting and wasn't satisfied with the results. I switched to Wheeler Cerama Coat and have been very happy with it.
I've no experience with Dura Coat.

As you have already blasted the frame, I see several options open to you;

You could get your frame re-anodized commercially or DIY (there are quite a number of on-line resources). I have no idea what type/level/hardness anodizing SIG does and if it is even achievable DIY. I'm pretty sure they (SIG) will not re-anodize a frame, but it never hurts to ask.

Paint it and shoot it; see if it makes that big of difference. Some levels/types of anodizing are just not that hard. Monitor the wear, see how the paint is holding up. If you get concerned about the wear, stop shooting and reconsider other options. If you do paint it, Caswell Inc.recommends priming alloy with some zinc chromate first. Aluminum alloys start oxidizing the minute they are exposed to air and the zinc chromate helps the paint adhere better. PLUG ANY HOLES IN THE FRAME PRIOR TO PAINTING. The tolerances on the holes and pins are too tight; if you get paint in there you will have to ream them out before you can reassemble the pistol.

A note about the Wheeler product I mentioned:
I applied it over an anodized frame and it has held up quite well. I tried to keep the spray to a minimum near the rails, but ended up with some on the front rails and just decided to go with it (it can be cleaned up before baking). My thought was it would wear off; so far it has held up to some use (approx 400rds). The stuff is supposed to contain ceramic particles and may be hard enough to resist wear well. This just conjecture on my part (you can look for yourself in the photos I'll attach). The Cerama Coat is about $20 a can. Someone posted in this forum about using a similar bake on, ceramic particle, high heat, automotive paint with good results. The Dupli-Color High Heat is about $6 a can. I just put some on an old Marlin 75 receiver and like the look, but I have no idea how it will hold up yet.

Here are some photos.
Rails:
2dl6gd5.jpg
zk1md4.jpg
taltaa.jpg
SIG:
2cfcqj4.jpg
Marlin 75 with Dupli-Color:
140x89g.jpg

Regards,
Greg

After looking at the photos, I may need to look at the rails without the grease on them, but the cerama coat still looks to be there and I going shooting later.
 
Status
Not open for further replies.
Back
Top