benEzra
Moderator Emeritus
(OK, well, it's not official. But it is a how-to-fix-a-Kobra thread, anyway.)
The Kobra is an excellent way to get a good optic on an AK-pattern rifle without spending a ton of money. When I bought mine, they were less than $200 and they slide right on the built-in Warsaw Pact style optics siderail.

They were designed for the Russian military, and were engineered to be weatherproof and relatively shockproof. Unfortunately, the design---at least the EKP-8-02 "Gen 2", anyway---does seem to have one weak point. The rotary on/off switch is rather delicate, and this combined with a very tight shaft-to-housing fit can cause metal fatigue and eventual shaft breakage if it's not kept well lubricated.
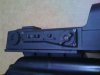
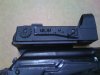
Here's the sight. The on/off switch is the one just behind the lens on the right side of the sight.

Well, after I had had mine for a year or so, the on/off switch started getting really hard to turn, and (stupidly) instead of trying to diagnose the problem, I took the Cro-Magnon approach and applied More Force. The required force to turn the switch kept escalating for a couple of months, until I was getting my gear together for a carbine match one morning and broke the knob off in my hand. Dang.
The good news is, I was able to take the sight apart, ream out the switch shaft hole a little until the cam turned freely, lubricated and reattached the handle to the cam and remaining part of the switch shaft with a longer screw, and it now works again. Unfortunately, the spring-loaded detent ball flew across my garage when the handle first came off (haven't found it yet, it's tiny) but the switch works just fine and holds position without it.
The moral of THAT story is that if your on/off switch gets hard to turn, take it apart and lubricate the dang thing before metal fatigue sets in. And if heaven forbid it should ever break off, all is not lost; it can be fixed.
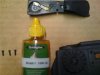
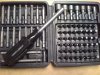
So, on to the walkthrough. First, tools. Basically, the only tool you need is one of these:

and something skinny and sharp to scrape the paint out of the screw head slots so that the screwdriver bit will fit.
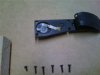
OK, take a look at the sideplate on the right hand side of the optic:

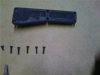
Notice there are six screws around the perimeter of the sideplate that hold it on. These are really small, fine-pitch screws. You need to take a sharp object (straight pin, needle, etc.) and scrape ALL the paint from the screw head slots and around the screw heads inside their little recesses; the screwdriver needs to fit the screw heads EXACTLY since those little suckers are painted in place pretty good. I used a 5/32 hollow ground common screwdriver bit, but the 1/4 may be a better fit on yours, depending on how the blade is cut. But it needs to go full depth into the screw and fill the slot pretty well.
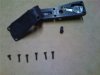
Remove all 6 screws (NOT the one from the knob yet, just the ones securing the sideplate---top and bottom left, top and bottom center, top and bottom right). Take your time, make sure the screwdriver is firmly in the slot, and don't strip the screw heads; if you do, you'll have to drill the screw head, and you don't want that.
Once the six screws are out, gently pull the sideplate off. There is a rubber gasket that may make it stick to the sight body a little.

(continued next post)
The Kobra is an excellent way to get a good optic on an AK-pattern rifle without spending a ton of money. When I bought mine, they were less than $200 and they slide right on the built-in Warsaw Pact style optics siderail.
They were designed for the Russian military, and were engineered to be weatherproof and relatively shockproof. Unfortunately, the design---at least the EKP-8-02 "Gen 2", anyway---does seem to have one weak point. The rotary on/off switch is rather delicate, and this combined with a very tight shaft-to-housing fit can cause metal fatigue and eventual shaft breakage if it's not kept well lubricated.
Here's the sight. The on/off switch is the one just behind the lens on the right side of the sight.
Well, after I had had mine for a year or so, the on/off switch started getting really hard to turn, and (stupidly) instead of trying to diagnose the problem, I took the Cro-Magnon approach and applied More Force. The required force to turn the switch kept escalating for a couple of months, until I was getting my gear together for a carbine match one morning and broke the knob off in my hand. Dang.
The good news is, I was able to take the sight apart, ream out the switch shaft hole a little until the cam turned freely, lubricated and reattached the handle to the cam and remaining part of the switch shaft with a longer screw, and it now works again. Unfortunately, the spring-loaded detent ball flew across my garage when the handle first came off (haven't found it yet, it's tiny) but the switch works just fine and holds position without it.
The moral of THAT story is that if your on/off switch gets hard to turn, take it apart and lubricate the dang thing before metal fatigue sets in. And if heaven forbid it should ever break off, all is not lost; it can be fixed.
So, on to the walkthrough. First, tools. Basically, the only tool you need is one of these:
and something skinny and sharp to scrape the paint out of the screw head slots so that the screwdriver bit will fit.
OK, take a look at the sideplate on the right hand side of the optic:
Notice there are six screws around the perimeter of the sideplate that hold it on. These are really small, fine-pitch screws. You need to take a sharp object (straight pin, needle, etc.) and scrape ALL the paint from the screw head slots and around the screw heads inside their little recesses; the screwdriver needs to fit the screw heads EXACTLY since those little suckers are painted in place pretty good. I used a 5/32 hollow ground common screwdriver bit, but the 1/4 may be a better fit on yours, depending on how the blade is cut. But it needs to go full depth into the screw and fill the slot pretty well.
Remove all 6 screws (NOT the one from the knob yet, just the ones securing the sideplate---top and bottom left, top and bottom center, top and bottom right). Take your time, make sure the screwdriver is firmly in the slot, and don't strip the screw heads; if you do, you'll have to drill the screw head, and you don't want that.
Once the six screws are out, gently pull the sideplate off. There is a rubber gasket that may make it stick to the sight body a little.
(continued next post)
Attachments

Last edited: