Another BP Project

windini

Member
Joined
Sep 4, 2020
Messages
178
I didn't think I had too much time on my hands, but apparently... Some part of me decided to get moving on turning my brass framed FIE 1858 into a snub-snouted Bulldog.

Bought it well used some time ago; loading lever did not move well, but I test fired it and it didn't blow me up. Rather than order a new lever, link pin, and rammer, I decided to chop it up.
FIE 1858 Start.jpg


Cut the BBL to 3-1/2"
FIE 1858 BBL Cut.jpg


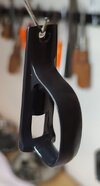
Then I deployed my homemade "Frame Wrench!" :D Don't laugh; it worked! After lots of Kroil and a butane chef's torch, it did.

The barrel is tapered, so clamping it was challenging. You can't see them, but there are 2 homemade copper sheet vise jaw pads btw the barrel and the jaws. They are just malleable enough to conform to the bbl taper and get a solid grip. I think the copper shim stock was .010" thick.
FIE 1858 Home Made Frame Wrench.jpg


I'm ditching the lever/arbor pin retainer in favor of a quick-release to be modeled after the commercially available one. I'm going to (try to) make mine out of brass so it'll match the frame (which I plan to blacken or darken significantly).
FIE 1858 New Config Parts.jpg


Started rounding off the grip grame. I'll strip the walnut panels that came on it, then shape them to fit. If I decide to round the backside enough to tag the grip panel retainer posts, I'll drill a hole farther in, add a new cross pin, then make a new set of grip panels.
FIE 1858 Rounding of Grip Frame.jpg

The "plan," such as it is at present, is to blacken the brass, bring all the steel back to white, then rust blue the barrel & cylinder and put a faux color case hardening on the hammer & trigger. I tried using some Super Blue to blacken some brass bits I had lying around, but found it works decently on some things but abysmally on others. I'll get some Brass Black & see if it's noticeably better, and I've got a buddy looking for some Pro-level brass blackener for me as well.

So far, so fun!
 
Last edited:
I tried using some Super Blue to blacken some brass bits I had lying around, but found it works decently on some things but abysmally on others. I'll get some Brass Black & see if it's noticeably better, and I've got a buddy looking for some Pro-level brass blackener for me as well.
Make a slurry (paste) out of powdered sulfur and oil, and apply to the brass while heating gently. This should blacken the brass nicely.

Casey's Brass Black also works. Their Super Blue is designed for ferrous metals only.
 
Make a slurry (paste) out of powdered sulfur and oil, and apply to the brass while heating gently
Thanks for the recipe & tip!

Does "Heating gently" mean preheat brass in an oven at, say 350F, then apply slurry? Or waft with a propane torch while applying the slurry?

I wonder about applying flame to oil-based mix - not the danger of fire but the boiling off of the carrier or otherwise affecting the effect.
 
Pluggin' away!

Worked on some of the steel parts today.

Smoothed the cut end of the barrel, cut the crown, took down the interior & exterior burrs, and "polished" the muzzle - to 600 grit, plenty fine enough for this.

FIE 1858 BBL Crown 600g.jpg

Found out the arbor pin was slightly bent.
FIE 1858 Bent Arbor Pin.jpg

I think this explains why the cylinder face bound against a 0.011" feeler gauge on two chambers. A few taps with a plastic-faced mallet made short work of that issue.

also noticed some gas cutting at the spot just under the cylinder gap. Not enough to worry about.
FIE 1858 Arbor Pin Gas Cutting.jpg

The coarseness of the hammer is a tell! QC at Italian replica parts maker facilities was somewhat lacking in 1973...
FIE 1858 Hammer Coarse Machining.jpg

It's hard to see in this picture, but I filed & stoned off some of the more offensive burrs and peened edges, while being carefull not to alter the notch geometry, of course. Or should I say: of Coarse? :)

The rough texture of the hammer has me re-thinking the faux case color idea. I'll decide after everything gets degreased and brought back to white. If the coloring doesn't hide the milling marks, it might be better to just blue it dark.
 
Ammonia blackens brass instantly, in case you feel like experimenting. Dab some household ammonia on a hidden spot with a Q-tip and see what you think. Nice work on your remodeling job!
 
Last edited:
Chippin' away at it...

"Refining" the grip alteration. There was a slight arc across the width of the backstrap that was compromised by the filing & sanding to round the grip frame. I'm gradually getting it back to shape and will continue polishing without the grip panels once there.
FIE Bulldog Grip refining 1.jpg

I took the steel parts out of their Evaporust bath...
FIE Steel Parts After Evporust.jpg

Then took 'em for a spin on the wire wheel.
FIE Bulldog Steel Parts After Wire Wheel.jpg

Shiny! The hammer came out better than expected, so I'll go ahead and try the faux color case hardening finish on it.
FIE Bulldog Hammer Better Than Expected.jpg

Started rust bluing the barrel & cylinder. The screws - seen soaking in degreasifier (alcohol) above - will get cold-blued.
FIE Bulldog Cylinder & Barrel Bluing 1.jpg
 
Wood receiver blocks were used in the old days but they used hardwood. Well done.
 
I did a very similar project several years ago.
Seemed like the best use of a brass framed new army.
I didn't bother pulling the barrel though.
Just curious why you wanted to go through the hassle to reblue the barrel. (Maybe I missed it?)
Again, just curious.
 
I did a very similar project several years ago.
Seemed like the best use of a brass framed new army.
I didn't bother pulling the barrel though.
Just curious why you wanted to go through the hassle to reblue the barrel. (Maybe I missed it?)
Again, just curious.
The whole revolver was a little worse for the wear, and I marred the bluing even more trying to free the barrel. I've reblued several barrels and parts already, and actually enjoy the process as well as the results.
 
The whole revolver was a little worse for the wear, and I marred the bluing even more trying to free the barrel. I've reblued several barrels and parts already, and actually enjoy the process as well as the results.
Looks like you know what you’re doing. Nice,
 
I (tried to) make some progress during the run-up to Thanksgiving, but had a little setback. Apparently I failed Degreasing 101!

FIE 1858 Barrel Blight.jpg

Didn't think that was gonna blend out with subsequent coats...

How 'bout the cylinder? Yike.
FIE 1858 Cylinder Blues.jpg

Well, at least I could cold blue the screws so I'd feel like I made some headway...

Nope. I guess alcohol evaporates a tad faster than I expected!
FIE 1858 Red Threads.jpg

Well, back to the drawing board bath:
FIE 1858 Back to the Bath.jpg

After the re-wire-wheeling, it was time to revisit degreasing.

Some feller on the internet said he heard about another guy who degreased the old-fashioned way. What did I have to lose?
FIE 1858 ReDeGreasery.jpg

That went well! Much better second first coat results...
FIE 1858 Better Blue.jpg

Now for a good boiling.
FIE 1858 Steel Sauna.jpg

Hot Fuzz! (I did degrease the #0000 steel wool and carding brush bristles! I used acetone for that so the workin' steel wouldn't rust.)
FIE 1858 Cyl Carding 1st Boil.jpg

Got a nice base color. (whew!)
FIE 1858 Cylinder Bluing 1.jpg

Second coat & rusting in progress!

FIE 1858 Cyl & BBL Round 2.jpg

This was my worst start to a rust blue ever. Though the initial results were embarrasing, I decided to post about it anyhow - not like my ego isn't used to a tumble every so often! I hope it encourages anyone who's sitting on the fence about trying something new. Mistakes happen all the time; might as well show how we overcome them. There's a lot to be learned from our failures.

:) I get more learn-y every project!
 
Managed to spend a few hours with the Bulldog-to-be this last week.

First of all, not gonna lie: this was the clunkiest rust bluing job I've done. Something(s) just weren't right - I suspect I may have contaminated my solution or it simply aged out. Maybe the old, multiple-parts-house steel parts were wonky. Or it was me! Jury's out. In any case, though I strove for care & cleanliness, the rusting was no where near as uniform as it has been on other parts (90% long gun barrels). The intricacy of the cylinder was a challenge.

So I gave up after 3 treatments and decided I would strip it & start over with a new batch of solution. In the meantime, thought I, better oil it to stop the rust process.

Lo! and Behold! They both turned out OK.
FIE 1858 BBL & Cyl Bluing Results OK.jpg

Certainly not my best work, but the splotches & streaks blended miraculously well with the last carding and a thick coat of oil left overnight.

So I deburred some of the rough and damaged edges on the brass frame.
FIE 1858 Brass Frame Smooth Burrs & Edges.jpg

I took it off site to my bench grinder & wire wheeled it (no pics); the wheel I have is too coarse to be a final finish, so I'll have to get a .008" or .006" wire wheel to dress it. Since the plan is to blacken it, I don't want a 1965 bath faucet-bling polished surface! The idea is for it to be a bit subdued.

I spent a little time with some sandpaper on the walnut grip panels (left the the stripper in storage*); I stopped when I saw I had barely broken through to one of the frame post holes. You can see it in the lower right corner of the right grip if you look close.
FIE 1858 Grip Panel Work.jpg

It's not a major problem at this point. After I chemical strip the rest of the finish off, I'll pack some Aussie wood filler into it from the back side 'til it oozes out the top. When it dries, I'll gently sand it to shape, then fine sand, raise grain, finer sand, dye, and ... oil? Varnish? TBD.

Next up is getting the fine wire wheel & cleaning up the brass bits. Oh - and I can work on the faux color case hardening on the hammer, arbor pin, & trigger.

And I suppose I need to pick up some brass bar stock & start whittling out my new arbor retainer device.

Then there's the front sight figuring...


____________________________________________________
*Boy, was she pissed! :)
 
So I went looking for 3/16" brass bar stock to make the cylinder quick-release out of. No luck. Grainger had it, for a great price! (< $9) But they have to deliver it to my local store & estimated ETA is Dec 20. :( It's on its way, but I wanted to work on it sooner.

So I got a 3' piece of 3/16" x 1" mild steel at Lowe's and got to it!

I made a pattern out of carboard (back of a used up legal pad) from the Taylor's one I had, then traced that onto the steel with a fine point blue Sharpie.

I cut out the rough profile with a mini hacksaw:
FIE 1858 Cyl Release Steel 1st Attempt.jpg

Then I got out the files and started shaping to the lines and flattening the edges.
FIE 1858 Cyl Release Steel & Pattern.jpg

I use the blue chalk to "lube" the file teeth & reduce chip clogging. I do use a file card; the toothbrush was for dusting away chips from the surface of the metal part so I could see the lines better.

I will get the profile close, drill the retaining screw hole and shape the arbor pin retention hook, then try it in the frame. I expect this is a prototype and I will have to refine it on another attempt, but that's part of the learning curve.

If I get one that functions well and looks good enough, I'll probably polish up to white, then do the faux color case harden finish on it like the hammer, trigger, and arbor pin are going to get. Or I may try to heat blue it. I kinda think that will be a nice color enhancement against the blued cylinder & barrel and the blackened brass frame & trigger guard.

Still imagining up a front sight idea...
 
Guess it's been a while since I posted an update. Well, here goes.

As mentioned upthread, I want to blacken the brass frame and trigger guard. A friend in the piedmont (NC, not Italy!) happened to have some real brass blackening solution from his family's foundry, and said he'd let me have some.

So I took the frame & guard to the wire wheel, then degreased them. Degreasing was hot water, dish soap, and a good scrubbing & brushing with Bon Ami.
FIE 1858 Frame & Trigger Guard Wire Wheeled.jpg

I used a Sterilite plastic shoebox for a dip tank, and measured out enough clear water to cover the parts.
FIE 1858 Blackening Bath Measure.jpg

It turned out to be 4 pints. The usage guide suggested a 20% solution, so I measured out another pint of blackening solution concentrate.
Brass Blackening Solution Prep 20% Ratio.jpg

Bathtime! Recommendation was for 3-5 minutes.
FIE 1858 Blackening Fast Action.jpg

You can see how fast it works! I took this pic as soons as I could deploy the camera after gently laying the frame in. The trigger guard went in first and was already blacker by a good bit.

After around 5 minutes, it was looking pretty good.
FIE 1858 1st Blackening Promising Results.jpg

But ... wait ... drat. As soon as I touched the trigger guard, the blackening wiped right off.
FIE 1858 1st Blackening Trigger Guard Interior.jpg

Well, back to the drawing board. It didn't take much to clean both parts; the black just wasn't deep or durable.

One thing I noticed was that some of the interior surfaces, like the inside of the trigger guard shown above, held the color much better than the outside areas. I did the outer surfaces on a wire wheel mounted on a bench grinder; the inside areas were done with a rather worn brass-plated steel wire brush in a Dremel tool. Apparently the wee brush was sharper or coarser than the larger wheel, and that texture helped hold the black.

Texture matters.

After cleaning - and a little more reading & pondering - I decided to try and etch the brass surface somewhat. It is written that that will make the brass more susceptible to oxidation, to allow for a deeper penetration. So I put them in a vinegar bath. The vinegar was plain ol' Cuisine de Leon white vinegar, only 5% acidity, so I knew it would take some time. I left them soaking for about 7 hours.

I saved & reused the 20% solution, though I didn't know for sure if it would still work after having been used once, then stored for hours. But, nothing like a real-world experiment to answer a question!

Back in da bath.
FIE 1858 2nd Blackening Ready.jpg

To be continued...
 
Last edited:
The Blackening; Part Deux:

The results of the 2nd blackening, after etching, were...

Outstanding!
FIE 1858 Blackening Results 2.jpg

This time, I did not handle them while wet. I used aluminum wire to pick them out of the solution and hang them up, then let them dry overnight.

When dry, they still looked good, but were kinda fuzzy. I wiped the inside surface of the back strap, then hit it with some degreased 0000 steel wool, and even scrubbed lightly with a carding brush.
FIE 1858 2nd Blackening Hmmm.jpg

That skeleton-y part was no longer yellow brass-colored under the fuzz! In fact, it looked like steel does after a rust blue treatment + boiling. It looked like the parts needed carding.

I gently brushed the top/hidden area of the trigger guard to see how durable the black was this time.
FIE 1858 2nd Blk Test Carding.jpg

Not bad, so I switched to the showy part.
FIE 1858 2nd Blk Trigger Guard Carded.jpg

It's actually quite nice, very "oil-rubbed bronze" looking. But it wasn't the goal, so I decided to keep going. I figured, if it was going to act like rust bluing, I would treat it like rust bluing. I also decided to limit my testing to the trigger guard until I determined if this would work or I was barking up a faux tree...

Back in the bath! But on a smaller scale for a smaller part.
FIE 1858 2nd Blk Fine Pickle.jpg

Heck yeah! I like the way this is going.
FIE 1858 2nd Blk TG Heck Yeah.jpg

The bronze-y areas all went to black again. After drying, the trigger guard looked great.
FIE 1858 2nd Blk TG On to Something.jpg

The black is very uniform, and the fuzz is not as deep or loose.

That's where things stand now. I will card the TG again, and keep dunking it until it stays black or I decide it ain't gonna. Afterwards, I'll try the oil soaking like you do for rust bluing. I hope an oiling will make the finish durable enough for handling. If not, I'll have to degrease it and - if that doesn't destroy the blackened finish, apply a topcoat of some kind.

Once I know what works (or not) on the TG, I can do the more complicated frame.
 

Attachments

  • FIE 1858 2nd Blk TG Heck Yeah.jpg
    FIE 1858 2nd Blk TG Heck Yeah.jpg
    38.4 KB · Views: 0
FYI, Birchwood Casey makes, or made, a brass blackening agent. I used it on the grip frame in Post #2 of this thread, 50 years ago.


It has held up well but needs to be retouched, or maybe not.

Kevin
 
Good job!
Thank you!

. I used it on the grip frame in Post #2 of this thread
Do you have recent pics of it? I'd love to see how it's held up.

I considered the Birchwood Casey product... but I'd'a had to pay for that! Got this stuff free. 😎 And when I went to pick it up, I got there just in time for some hot action!

The Pour Venting.jpg

EDIT: Hey @StrawHat , I see your post was from yesterday; I misread it. Guess that is a recent pic! (Looks good)
 
Back
Top