First Experience With Combustible Paper Cartridges

Status
Not open for further replies.

tpelle

Member
Joined
Dec 29, 2003
Messages
455
Location
Northern Kentucky
I've become interested in making combustible paper cartridges for my 1860 Army. I looked at just about every YouTube video on the subject that I could find, and the one that most impressed me was the one by that guy in Hungary that posts as "capandball.eu". That was the set of instructions I followed, but with one exception - he cast "Johnson & Dow" heeled bullets, but due to not being set up for doing any bullet casting I was going to have to use .454 round balls.

I used curler paper for the main tapered tube, and a single ply of facial tissue on the bottom, as on the capandball video. I have a spout on my Colt-type powder flask that throws 27 grains of Pyrodex P, which filled the paper tubes to within about 5/16" of the top.

I took the round ball and smeared the bottom half around on my glue stick, then inserted it into the filled tube and sort of "massaged" the tube so as to get it to stick to the ball.

I had made up six paper tubes to try out. The first ball I "seated" I pushed down the tube to the powder, but I felt this was too deep - there was a lot of paper tube still above the ball. I had it in my head that I wanted the paper tube glued to the ball in it's "southern hemisphere", so to speak, so that the lead ball itself would contact the chamber wall when pressed in by the rammer. The second tube was defective, and split open during handling, so I deep-sixed it. The remaining four I poured a little bit of Cream-of-Wheat filler on top of the charge, up to within about 1/8" to 3/16" of the top. this left just a slight bit of paper to glue to the bottom of the ball so that better than half of it was exposed.

How did they fire? Pretty good, actually. All five completed cartridges pressed into the chamber just fine, except I did end up with some paper exposed at the cylinder mouth. I capped the five chambers, walked out into the back yard and down to the creek, where there's an old dead locust tree to use as a backstop, and let fly. (The beauty of living in the country!)

All five cartridges fired with a satisfying throaty boom and a cloud of smoke. I did have a problem with the last chamber, as it appeared that the cap fired properly, but the nipple may have been plugged and the cartridge didn't fire. I admit that I did not fire a cap on each empty chamber before loading - totally slipped my mind. I'll put it down to a senior moment. I pulled the barrel and made sure that there was no obstruction, then decided that it appeared that the ball hadn't moved at all in the chamber. I re-capped it and it fired just like the rest, with pretty much the same sound and recoil.

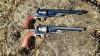
Unfortunately I didn't take any pics of the cartridges - envision a tadpole with a serious weight issue - but I do have a picture of my home-molested Pietta:

VyEI2a3.jpg

RMR3uyc.jpg

Over the years I've had it I've refitted the wedge and the bolt, corrected the bolt timing, polished and de-fanged the hammer face, swapped the stock nipples with Treso's, re-contoured the back of the barrel where Pietta got the shape wrong, and aged the finish.

I'm retiring at the end of the year, and I think I'm going to enjoy messing around with my percussion revolvers.
 
Last edited:
You did a great, I mean "bang up job" on that 1860 Army!!! I like it. :thumbup:

Do your cartridges look like these?
index.php
 
Tpelle there are as you found out numerous ways to make cartridges
I use cigarette papers, I roll on a dowels that has a slight taper but I don't attach the projectile to the cartridge.
I leave just enough paper hanging over end of dowel to fold closed and use the glue strip on paper to seal closed
fill with 30 to 35 grains powder. then tie the open end shut.
hold the tied end and drop the glued end in first. press my projectile down onto the powder cap and boom.
my cartridges aren't as neat as some others, but as long as they don't split open and hold the powder in I don't care.
even after sitting a couple years they have always gone off.
I use a 190 gr heeled conical I had accurate make the mould for.
190 is about 50 gr heavier than a round ball
I use a homemade lube that sets up firm but pliable fill in the grease grooves of the bullet no wads needed
 
You did a great, I mean "bang up job" on that 1860 Army!!! I like it. :thumbup:

Do your cartridges look like these?
index.php

Actually not far off. Where the originals appear to the be somehow folded over or twisted on the bottom, mine are sort of squared off, with the main body of the tube tapered and made of hair curler paper and the bottom piece of one ply of facial tissue paper, cut larger than the end of the dowel and crimped over the end, The main body is actually rolled and glued over the end paper. Watch the "capandball" video on how he makes his cartridges, and you'll see how the cartridge is formed.

My deviation from the capandball cartridge is the substitution of a round ball in lieu of the Johnson and Dow conical.

I do like the way the ball is glued into the original cartridge that you show, though, and to come up with something like that was my goal.

I think I just have to get better at it.

The folks that run the capandball site in Budapest make a wooden cartridge box with six holes bored into it to accept .44 cartridges, and a lid formed by simply table-sawing the top of the block off and attaching it to the main part by means of a cloth (what my seamstress wife would call bias tape, I think) "hinge". they are packaged in a cardboard sleeve, printed in a similar manner to the box that you show, to make them reusable. I bought two of them, and the service from Hungary was pretty quick - maybe about three weeks. Only one of these cartridge boxes will fit into a reproduction leather pistol cartridge box, though.
 
You did a great, I mean "bang up job" on that 1860 Army!!! I like it. :thumbup:

Do your cartridges look like these?
index.php

Oh, I forgot. Thanks for the complement on my work on my 1860! I'm particularly pleased with the way the recontouring of the barrel lug looks. Overall I'm happy with the Piettas, and the new ones are so much better than the early ones since they converted to CNC machining. At least they bore the arbor hole in the barrel lug to the correct depth (unlike brand "U"). But every time I looked at mine, my eye went straight to the squared-off rear end of that barrel lug. I finally couldn't stand it any more and broke out a medium size single-cut bastard file and went at it. I guess the steel of these barrels is pretty soft, as it only took about 30 minutes to re-contour it with the file, polish the tool marks away with emery paper, and cold-blue it.

Here is a pic of my first "recontoured and aged" 1860 with it's younger brother which is still in unmolested condition. If you look close you can see what I'm talking about at the rear of the barrel lug.

42Ypkqc.jpg

Little brother has now had the same treatment performed on it.

My goal was to make these revolvers look as if the were carried and used through the civil war, then passed into civilian life for a second career in the holster of someone such as a U.S. Marshall or a lawman in a frontier town, and would show the effects of 20 or so years of holster wear and occasional banging around.

My inspiration for the "look" I was aiming for is my FEG Hi-Power, which was originally purchased and placed in service by the Israeli National Police, where it spent probably 20 or so years in some Israeli cop's holster. It's currently my EDC handgun.

ENzOcOt.jpg

Oozes street cred, doesn't it? Shoots great, though, and even feeds hollowpoints despite the old-fashioned humped feed ramp. But we digress.
 

Attachments

  • 42Ypkqc.jpg
    42Ypkqc.jpg
    185.6 KB · Views: 8
Last edited:
I had a little time before lunch today, so I thought that, using the combustible cartridge picture that Crawdad1 posted as inspiration, I'd make up some more cartridges. These are made using the paper tube construction from the capandball video, but then gluing the charged tube to a round ball. The cartridge consists of a tapered body rolled from a piece of hair curler paper glued over a single ply piece of facial tissue, charged with approximately 27 grains of Pyrodex P, then enough Cream of Wheat (Did you know that there are actually people who EAT that stuff?) to bring the level up to within about 1/8" to 3/16" of the top of the paper, Then a rubbed 1/2 of a round ball in Glue Stick, inserted the ball on top of the Cream of Wheat, then rolled the remaining paper on to the ball.

The thing I like about this cartridge design is the tissue paper cap on the end. I would expect that this gets burst open during loading, but if not, then the jet of flame from the nipple should cut right through it.

gjmbvlm.jpg

G4MAuEV.jpg

By the way, when I fired off the previous version of the cartridge yesterday, I did not find any unburned or still smoldering paper in the cylinder chambers. The only thing that I am a bit concerned about is the little bit of paper that is exposed in the chamber mouth after pressing in the ball/cartridge, and if this could induct a chain fire. But I'm thinking that the layer of cream of wheat should help prevent that.
 
It turns out that the cartridge boxes that I bought from capandball are drilled slightly too shallow to accept the above cartridges that I made. Still looking for a solution to carrying them, so after exercising my Google-Fu I found these:

clid=EAIaIQobChMI2dya0I-o1wIVCC9pCh139gXREAQYASABEgKXMfD_BwE

They're pretty much the same size as the wooden ones from Budapest, but are made of tin (according to the description). I should be able to fit upwards of a dozen of my cartridges in one, I think. I may try to come up with some sort of "synthetic wool" to glue inside to keep the cartridges from bouncing around against each other and breaking open. I don't need any way to store caps, as I use a Ted Cash snail capper which just fits in the Civil War cap box on my belt rig. I know the snail capper isn't "authentic" Civil War issue, AFAIK, but I'm sure that I've seen presentation cases from the era where the revolver was packed with it's accessories, including a snail capper. (But I just looked through my copy of "Colt Single Action" by Dennis Adler, and all I see are cap tins. Must have been hallucinating again.)
 
Would seem the paper cartridge making process becomes a hobby in to its self. With three young sons shooting I took up hand loading in the late seventies, it became a question of do we shoot a lot because we hand load or hand load because we shoot a lot. Today I I still hand load pistol, but the bullet casting, lubing and sizing became so tedious I switched to black powder, was always partial to revolvers anyway, and as its turned out something about the style of grip on the 19th century designs is a perfect fit for me. The metallic ammo is reserved for rainy day, cold weather indoor shooting.

Tried the paper cartridge thing, old arthritic fingers just weren't up to the task. Those are fine looking hand crafted "bullets" tpelle. You can roll those you could make your own boxes with nothing more than a table saw and drill press.

BTW Cream of Wheat is a favorite breakfast item, along with grits, also a great filler material.
 
Last edited:
Please forgive my ignorance, but what is the barrel-lug? The loading lever latch? The piece below the rammer hole that has the holes for the frame's pins? Thank you.
 
I believe that Colt's referred to the "big end" of the barrel, where the wedge passed through and the loading lever mounts, as the barrel lug. (But I could be wrong.)
 
I used to use Zig Zag rolling papers to make my paper cartridges. Got the tip out of a Dixie Gun Works Catalog. Never had any paper left in the chamber after firing. Of course I'm talking about plain, not the flavored ones. Used to get funny looks when I was in uniform at the local 7-11 and asked for four packs of rolling paper. I was never asked about it, just got funny looks. :cool:
 
Light thin nitrated wrap paper is also good and far stronger than OCB, Zig Zag and other cigarettes paper (we can buy the OCB in roller where I live). The tissue paper nitrated is a very good stuff too and people can get it for cheap.
I make my pistol cartridges with the rest when I make my Sharps cartridges and it works pretty fine with a bit of collodion varnish to preserve from moisture and accélérate the combustion...
I do my Sharps cartridges mostly in linen but when I make it in paper for the fun I always save the littles parts for cartridges cal. .36 and .44.
 
Status
Not open for further replies.
Back
Top