Harpers Ferry Pistol Questions

Status
Not open for further replies.

RecoilRob

Member
Joined
Sep 30, 2003
Messages
2,009
Location
Pennsylvania
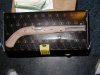
Ordered Sunday night from Dixie Gun Works and it was on my doorstep Wed. afternoon! Great service from DGW.

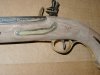
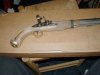
As I wish to complete this in a fairly authentic manner, was the barrel browned? Pietta's finished pistol has a chromed barrel while Navy Arms' version is browned. An original I found online looked to be nearly 'in the white' but I find it difficult to believe any Martial pistol would have been issued without some corrosion protection other than just being oiled. Anyone know how they were finished?

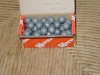
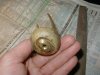
Also, when finished it will (of course) be fired and there is a question about the proper military powder charge.

Paper from Dixie says 30grs and searching the net found 50grs about the highest recommended in late manuals. But, what did the guys back in 1806 actually use?

Seems pretty cool to be finishing a pistol design first adopted 200 years ago! This should be fun!
 

Attachments

  • HarperFerry.JPG
    HarperFerry.JPG
    69.9 KB · Views: 127
  • Down barrel.JPG
    Down barrel.JPG
    44.4 KB · Views: 129
  • Big Balls.JPG
    Big Balls.JPG
    61.5 KB · Views: 54
That should be a very good pistol. As to finish, I'm not sure which is most authentic but believe that they were left in the white. Before and during the Civil war, they went both ways. the Enfields and Mississippis were browned while the springfield 61&63 were left in the white. the explaination for this was that it was easier to see rust starting on the shiny barrels. soldiers were expected to sit around constantly burnishing their rifled muskets to keep them bright and rust free and to give the officers something to yell about when they didn't.

I recently photographed a springfield 61 that was browned by time- pretty good job too. With it was a picture of the soldier who carried it in the war and it was bright and shiny then. In any case, the pedersoli chromed finish would look like it was in the white while the already browned one would look like it's seen a bit of service. A person could be happy with either. Dont know the correct power charge but we have found that it might take 45-50 grains of 2f to get the same velocity as 30 grains of 3f with some similar sized smooth bores. Rifled guns generally get a bit more velocity- i think.
 
That's a neat picture looking down the bore. How'd you do that?

I've always had good turn around time with Dixie. The third day after I place the order generally sees a package on my porch.

Steve
 
I believe the finish is 'german silver' (nickel) rather than chrome. You are probably an experienced flint shooter but here are a few suggestions just in case this is new to you. I'd get a longer ramrod than the one provided. They are more decorative than functional and seating a .58 cal ball takes some leverage after two or three shots and the tube begins to foul. Notch the rammer so you have a visual indicator that the ball is completely down the tube. Make sure that the frizzen face has been properly hardened and that it lines up with the jaws at the right angle. It should open fairly easy when struck by the flint. If it only opens half way and the flint is resting on the frizzen loosen the frizzen screw a bit until it opens completely when struck. Make sure that it holds on half cock. Check that the touch hole is in the right place just above the flash pan. Some folks use a piece of lead to hold the flint in the jaws and others use a scrap of leather. I've used both at times and I prefer leather. The flint that comes with the gun is most likely a composite manufactured flint rather than an actual knapped stone flint. It'll work just fine with the composite but I prefer the hand made kind. They seem to last longer.

Of course, usually all these things are OK but on rare occasions mistakes can get out of the factory and lock mechanisms while being a fine example of simplicity in function can also be tricky. No two are exactly alike. Tumblers and bridles along with springs and notches will have very slight differences. Enjoy shooting your new pistol. When others hear that 'KA-BOOM!' and see the fire leaping through the smoke you'll get some attention. Don't forget to wet down the lane your shooting in. Setting the floor on fire is considered bad form.
 
Last edited:
Actually, the finish is "in the white". Not chromed, and certainly not nickel silver. Nickel furniture (trigger guards, butt caps, side plates) was not too common on civilian arms, and non-existent on military weapons. The barrels were steel (okay, iron) and not nickel or even nickel plated. In later years, it was not unusual to see some naval weapons issued with a tin plating to resist corrosion!

Many military arms were issued in the white. Besides the fact that it was cheap (no finish=less manufacturing), the thought may have been to create intimidation when massed in ranks. Remember, troops fought in ordered ranks, not taking cover. The flash of sunshine on all those barrels and bayonets would have been a bit awe inspiring, to say the least. Plus, those early GI's needed work to keep them busy, and scrubbing a barrel is surely busy work.

It is not actually too difficult a finish to maintain. I have an English Officer's Fusil that has the barrel and lock in the white. I simply wipe it down after shooting, and keep it well lubed in between.

I use RIG (Rust Inhibiting Grease) on the exterior, which works very well. A lot of it has to do with how well the metal is polished. While you want more of a satin finish than a high polish, the smoother it is, the slower corrosion will have a chance to appear.

Hope that helps!
 
Actually I was simply refering to what the Dixie Gun Works says about the pistol. I should have been more specific. Thanks for the correction.

"Made from 1806 to 1808. The Model 1805 was the first military handgun made at a national armory. It is significant that this pistol is used today on the insiginia of the U.S. Army military police. Pistol kit is a .58 caliber flintlock. Has a European walnut halfstock. Barrel is polished steel, German silver color.Lockplate is engraved "Harpers Ferry 1807" on tail w/eagle over "US" ahead of hammer. Front sight consists of a brass blade. This kit comes with a color casehardend lock and is considered skill level 1. Manufactured by Pedersoli/Italy."
 
Here is what pedersoli says about them- whatever it means:

"Harper’s Ferry
» Welcome » Pistols » Harper’s Ferry
The Harper’s Ferry was the first flintlock pistol requested by the American Government to equip the Navy. It is named after one of the most picturesque villages in Virginia, where an armoury and an arsenal were built, then destroyed during the Civil War, without ever being rebuilt. The stock is made from select walnut with brass hardware. The barrel is chromed and glazed outside. Case hardened lock.

S.320 Harper’s Ferry Flintlock model"


http://www.davide-pedersoli.com/ArmiCategoria.aspx?CategoriaId=100&lang=en
 
Well, I offer my apologies to all.

I think that the Dixie catalog reference is meant to describe the color only, as Cap n Ball wrote.

However, I am tee-totally surprised by what Mr Cumpston dug up from Pedersoli! Who woulda thunk it? I wonder if that is an error in translation?

Just so know one is too confused (including me), Pedersoli may chrome 'em, but originals were "in the white".
 
Last edited:
In researching the available H-F pistols one website mentioned the chromed Piettas' as being done to replicate the original color while providing corrosion protection for the modern shooter.

Looks like I'll do a polish job on the barrel and keep it 'in the white' as per the originals. If it gets to be troublesome keeping it looking nice I can always brown it. Thanks all for the input!

Oh, Steve499, the pic down the bore was taken with an Olympus D-460 and I think it came out looking neat like that because the brand new breech face is shiny like a mirror and reflected the flash enough to illuminate the rifling.

And, to Cap n Ball, thank you for your flintlock tips. I am an 'advanced hobbyist' shooter and own 4 cap'n ball weapons but must confess to never having fired a flintlock! This is to be remedied by the Harpers Ferry when it is finished.

I didn't see any flint in the package but did get several English flints for the pistol from Dixie. Three seem to be already knapped while one is blunt on both ends so I will get to try my hand at forming the edge someday.

That brings up another question about the flint and the relationship with the frizzen. I have some nice leather to hold them in the hammer but am uncertain about how far they should protrude from it? If too far, will they shatter when the gun is fired? Any flint tips would be most appreciated...and thanks again to all who commented on my questions.
 
The standard advise on flint position is as close to the frizzen as you can get it with the cock at half stand. One guy said "the thickness of a sheet of paper" and he must really be coordinated to get it that precise. close to touching at half cock is a good place to start though results may vary.

As to bevel up or bevel down- that depends too.
 
Just to be a nit-picker, the original pistols were .54 caliber and I believe they were browned. The crossed flintlock pistols on US Army military police insignia are these.
 
Thanks Mec for the flint info. Your advise seems intuitively correct so it must be. The ancients were great mechanics and rarely overcomplicated things and the half-cock adjustment of the flint to frizzen seems perfect. I'll give it a try when the time comes.

Plenty of pics are going to be taken as I go step by step through the finishing process and I'll happily post some when completed.

So, tonight I begin taking off wood and metal that doesn't belong on the pistol and will ask further questions of you all as they pop up. Thanks!
 
You may find that some other flint placement actually works better but the close-to at half cock is a good place to start.

I'm looking forward to your project and the reports. I see one of those pistols in my future if I don't croak first. One reviewer said that his was pretty accurate even without a rear sight.
 
I have a Pedersoli made Harpers Ferry and the lock is marked 1807, browned. My Dad bought it to show his history class students the different firearms used in America, along with a '51 Navy, 1850 Foot Officers sword. I made a pommel holster for it with bag on the R/S to carry on an English flat saddle.

I understood that the military practice of the times, up past the Civil War, was for the soldier to polish their weapons till they were white. Even if they came with a finish, NCO'c and officers wanted the rifle/muskets white because it was then obviously clean.
 
Well, I am calling it quits for the night and am pleased with the progress of 4 hrs work.

The castings look crappy in the raw but don't take a whole lot of filing to clean up. I am not going to show polish things....trying for a matt and (hopefully) more authentic kind of finish. Doesn't seem that the guys at the Arsenal would mirror polish things so I am going to file the rough castings and then sand them smooth.

First impression of the Pietta Works is positive. The inletting seems to be accurate with the touch hole positioned properly to the flash pan and the trigger assembly and left side plate also accurately done. Very nice so far!

Some amount of metal needed to be removed from the butt cap prongs to get them to seat in the inletting. It seemed easier to file some metal off of them than to try to deepen the inletting in the wood. A comparison to pics of a real H-F showed the inletting to be really close and the buttcap to be long....so the files made it fit.

Trigger guard fit well into the inletting with just a bit of filing on the butt end and some flexing to get it into the wood.

The stock contours are close to final but still need some material removal before sanding and finishing. It is amazing how much wood I filed off to get to this point. Probably a double hand-full of fine walnut dust so far but, to the guns credit, the wood seems of high quality and it files cleanly with absolutely no tendency to chip. Also, the grain and figure should be pleasing once the sanding, staining and finishing are done.

Very pleased with the first few hours of work. Looks like the total time involved to build this pistol is not going to be excessive.

Will post updates as they happen.
 

Attachments

  • Butt cap.JPG
    Butt cap.JPG
    63.4 KB · Views: 53
  • left side.JPG
    left side.JPG
    60.5 KB · Views: 52
  • semifinish.JPG
    semifinish.JPG
    57.5 KB · Views: 64
Status
Not open for further replies.
Back
Top