Hornady Pistol Bullet Feeder: Big Performance Mod How To

Status
Not open for further replies.

GW Staar

Member
Joined
Feb 26, 2009
Messages
3,723
Hornady Bullet Feeder "slightly" modified to flip bullets and triple production! Very little cost to do it. So why go to the trouble? Four reasons come to mind:
1.Nearly zero pistol bullet caliber change hassle
2. Not only faster but much more efficient.
3. negligible cost
4. Much quieter

I pulled the idler sprocket so I could hand turn the plate during the testing…..this little video of my Prototype hand turned proves the concept. (btw, the Video can be seen full screen by clicking on the Vimeo name, then on the full screen icon on the resulting screen.)


The old turn down is still used, just not connected to the top. It serves as the needed ramp to flip bullets! ....so the top is cut out some....also there is a half moon grind where the outlet hole is.....which also serves as a locator.
Then the bullet disk is dropped in.....then the center piece.
Hornady's center piece has a hole in it where the bullet tubing used to go.......so I covered it with a piece of 1/16" thick hobby foam from Hobby Lobby......red of course!
It fits tight around the spindle...requires no glue...sits there fine and perfect.

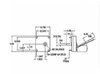
You will notice no fancy material or hardware, just some scroll sawing on a little piece of ¼” hard board melamine and surgery scroll saw surgery on the Hornady bullet turning plate…. separating the top from the turn-down-edge.

IMG-2986.jpg
Pattern to the right the main plate is marked to be scrolled. This one will be screwed to bucket over 1/2" stand-off nuts.

IMG-2985.jpg
This one is the one I glued to the bottom of Hornady's de-edged plate. Glue? Contact cement applied to both surfaces, tack dry, then pressed together. That stuff holds.

IMG-2989.jpg
The separated edge above will be dropped into the bucket where it normally goes, but raised 1/8" (I used pieces of a paint stirring stick and epoxy to make standoffs). but first it will be shaped.... 12 O Clock high is cut out the same height as the base plate's bullet drop area to allow bullets to fall over sideways. At 12:30 the ramp slopes upward to flip the bullets. Also a recess is sanded with a Dremel where the bullet outlet tube comes up.

In the same picture above you see that I used the existing threaded plate removal holes in the bullet turning plate to fasten the subplate to the plate temporarily so it can match the final shape of the plate. Below: sandwich complete.

IMG-2988.jpg

Another view top to bottom: Hornady edge-less plate glued to thickening ring, screwed to the subplate.

IMG-2987.jpg

Then I took the sandwich to my shop and used the wheel sander to smooth up and make all three the same diameter. One could use a hand belt sander turned sideways and placed on a bench to do the same thing....just back it to something immovable.

I made a router jig to modify the top plate (with the lower disk glued to it). Together they give me the depth I need for a bullet flipping rotating bullet plate.

Bullet-feeder-1.jpg

Bullet-feeder-2.jpg

Board is just there to prop up the jig so you can see the little white disk beneath and how the divet in the top of the jig was made to rotate the Hornady top. All I had to do is lower the plate to that stop, pull it out rotate to the next one and lower into the blade again. Adding parallel lines in the jig matching the depression in Hornady's plate made it easy to center each hole at each depression. Used a 1/2" router bit.

Result below.

Bullet-feeder-4.jpg

The sub-plate disk was made to fasten to the Hornady bucket with 4 f'lat head 10-32 bolts ½” long….it also has the hole for bullets to drop in…….of course the Hornady had to be drilled below it…..and the original “outlet” was filled. Getting the outlet hole in the right place at the right size was the hard part for me. I envisioned a big hole was better than a small one and made a funnel to make it drop into the tube. What I didn't have is the distance below to do that right. Turns out that dropping it directly into the 5/8" clear tubing was better, faster. The funnel was too slow and make the plate hang on a bullet that didn't drop fast enough. Surprisingly, the heavy 230 grain .45 were the worst offenders......inertia I guess.

Hornady already uses bolts in the bucket bottom that penetrates the bucket cavity……so I just bought extension nuts, (had to use a grinder to make them shorter) then screwed on the extension nuts, added the plate (with outlet hole and bullet flipper built in).

A simple cut out at 12 O' clock on that the disk makes the bullets flip. So far it works fine for 9mm, 357, 40sw, and 45 acp.

I’m using only one of the original Hornady spring sweepers to knock bullets that don’t find a hole in the bottom, back to the bucket bottom. That used to be a the loud main feature of the Hornady....now it's minor ....much quieter thanks to not so many bullets falling back, and also thanks to a 1/4" thick rubber baffle I show in the video. The baffle also necessary to cover the bottom edge where the bullets are poured in, since without it many bullets can just lie there. I made the rubber baffle out of concrete block (CMU) expansion joint.....just happen to have some. ;)

I don't show the bullet outlet in the video, but a search of Hornady Bullet Feeder and my name will show you what I use and how. That hasn't changed.

IMG-2993.jpg
IMG-2994.jpg
 

Attachments

  • IMG-0854.jpg
    IMG-0854.jpg
    89.7 KB · Views: 8
Last edited:
Wow that is an impressive conversion. Looks to need some fine tuning, but bravo for outside the box thinking.
 
Fine tuning yes.....that's part of the process. But I'm ecstatic with the result....no remorse anywhere! The hard part was the decision to cut up the original bullet feeding disk. I don't usually desecrate my tools to mod them, this is an exception.;) Where am I today? The base plate has been "tuned" and re-tuned to the point where it flips all the pistol bullets I use without having to make a separate sub-plate for each. Tuning in this case means shaping the bullet drop and rotate gouge area, slight filing on a few of the routered cubbie holes on the bullet feeding disk, and redoing the bullet outlet to work equally well for all calibers...

What's interesting is that the metal sensing switch used instead of the usual micro-switch as part of the outlet, is so sensitive that it works equally well on 9mm, 357, .40, and .45! No change in the tubing is necessary until you get to the factory metal flex below the feeder and switch...so to guide into the Hornady or MBF feed dies you might use on your press. Those transition pieces take 5 seconds to change out.

I will post another "finished" video of the feeder powered.....with portions in all four calibers in a week or so.

All this happened due to the recent thread on feeders, where jmorris talked about his 3D printed feeder. The cost of those printers are minimal....as is the plastic spools needed to make one......so I got brave thinking I'd buy a printer and make one and the possibility of ruining my Hornady was no longer that worrisome.:) You know, at the least, I hated the thought of mothballing a perfectly good motor.

Another result of the conversation with jmorris about 3D printers, (talking about the limited diameter of parts) was that I realized I did not need the full size bucket on the Hornady.....so came the idea of scrolling the disk and using the turn-down as the ramp....and all inside of the existing ample large bucket.

Now....wheels are already turning on making another disk to lie over the other one giving more support for RIFLE ..... then......I'd want to go ahead and cut the back out of Hornady's bucket so long bullets could be flipped.....

BTW, down the road, I will replace my hard board sub-plate with one made of 1/4" HDPE or UHMW plastic sheet, for the decrease in friction and increase in wearability.
 
Last edited:
Well, that's alot of impressive modding to only get one reply. I'm a big fan of people who can pull off stuff like this. Me, I went and did just what Jmorris did.. buy a printer and make my own. Works waaaaayyy better than the stock Hornady one does.


BTW, what are the dimensions of that inner wheel now?
 
One reply? Well thanks for that one reply! The rest of my friends here must be tired of my modding....and tireder of me......I am getting more annoying in my old age.;)......or it could be timing....daylight savings time always does a number on me, for sure.

I posted this on Saturday nite/Sunday morning.....and finally got to bed at 2am....then I looked and realized it was really 3am......and I had a meeting at 8. ugh.

As for what you did (the 3d printed version), yes it does work way better than the stock Hornady, or the RCBS one for that matter. Was I ever pleased when only 3 manual turns of the disk emptied and flipped 30 to 35 9mm bullets.......took 22 seconds by hand, powered up it took a whole 10 seconds.....stock that would have taken minutes.
 
I like it, I was going to reply earlier but I wasn’t exactly sure what you did or I couldn’t remember how they were designed to work.

They were a 12:00 +/- drop and only the square base of a bullet could make it to that point. You pretty much converted it to a MBF/KISS style collator.

The “flips bullet” part had me thinking nose down vs base down, I understand now and it looks like a winner!

What are the advantages/disadvantages you see between the two different designs?
 
As for what you did (the 3d printed version), yes it does work way better than the stock Hornady, or the RCBS one for that matter. Was I ever pleased when only 3 manual turns of the disk emptied and flipped 30 to 35 9mm bullets.......took 22 seconds by hand, powered up it took a whole 10 seconds.....stock that would have taken minutes.

Yeah I noticed your design gets it done fast!!
One advantage of a 12volt system is the speed control. If you feel a heavy bullet needs more time to drop.. slow it down.
 
I like it, I was going to reply earlier but I wasn’t exactly sure what you did or I couldn’t remember how they were designed to work.

They were a 12:00 +/- drop and only the square base of a bullet could make it to that point. You pretty much converted it to a MBF/KISS style collator.

The “flips bullet” part had me thinking nose down vs base down, I understand now and it looks like a winner!

What are the advantages/disadvantages you see between the two different designs?

Any chance you seen some information somewhere.... I'm not sure where.. but they were talking about turning the Hornady pistol bullet feeder into a nose down.. which makes sense since all you do is block off the 12:00 opening and make the other opening further along.. say 4-6 and the bullet would slide out nose first... right?
 
The nose down ones slide off before reaching 12:00, the base sitting on the ledge is what let’s them ride that high.

Ammomikes 3D printed collator does have nose-down files though.

For my PVC collators I just built “flippers”, thus my confusion earlier, and so I can use the same collators for sizing that I do on the reloading machine.


Before the day a stupid simple method of getting the same result came to me.


And it doesn’t even require a specific length.


Think GW’s creation was to mimic the MBF in that it doesn’t just drop out nose down bullets, making a bunch of noise, rather flip them so they are all base down, no “rejects” that way.
 
The “flips bullet” part had me thinking nose down vs base down, I understand now and it looks like a winner!

What are the advantages/disadvantages you see between the two different designs?

Wording the title of a thread is a weakness of mine, sorry for this misundertanding......I probably will never size bullets in my lifetime....too much time already under the bridge.....so yes this is about flipping nose up for seating cases.

As to advantages and disadvantages. The only advantage I see to the Hornady original design is that you can mount the bullet feeder way lower than one that drops bullets out the bottom. That being the case, I will have to mount an extension to the mounting pipe to get it high enough to feed into the top of my presses...........there is no other advantages. The biggest disadvantage for Hornady is the patent their competition has, for which they probably have years to wait on.

Yeah I noticed your design gets it done fast!!
One advantage of a 12volt system is the speed control. If you feel a heavy bullet needs more time to drop.. slow it down.

Yes, I was surprised at the speed increase....faster than my expectations....even knowing that there should be a big improvement, I wasn't prepared for that much.

Hornady's rifle bullet feeder has such a 12v DC motor....the pistol version is unfortunately not.......I will say that the torque and power of the AC motor beats anything I've seen in bullet feeders....too much. I broke the idler wheel....disintegrated it....while trying to "tune" the .40s&w Gold Dots....they have special problems...more than one. :confused: Hornady is sending me a replacement so I'll be back to hot testing next week.....I just couldn't turn it off fast enough. Tuning this without power has been way better.....I can catch everything with a fine feel....and even turn it faster than the motor would to catch potential problems.
IMG_3021.JPG

Still working on the Gold Dots, but I got the .45 230grains smooth as a baby's butt finally...even turning faster than the motor will.


Think GW’s creation was to mimic the MBF in that it doesn’t just drop out nose down bullets, making a bunch of noise, rather flip them so they are all base down, no “rejects” that way.

Yes, the noise reduction is amazing.....I'm going to really like that. When you get to be my age you will find your noise tolerance goes way down....even as your hearing gets lousy. Go figure....maybe that's a failsafe to keep us sane.
 
Last edited:
Looks like you have it working very well. I know some of the ones I have made, with certain bullets prefer a very specific speed, if you can run them at different rates over the flip plate by hand, you will be really happy once motorized and things are more consistent.
 
I just posted an answer in the last post to your question about advantages....I made it bold for a reason. (forgot to address that)

On the .45 acp, the answer was to let the bullet drop 1/4" just before it came to the outlet tube. I accomplished that by widening the drop hole back a 1/4" then screwing a thin aluminum plate to the bottom of the sub-plate shaping it to the plate and the outlet tube. Then reduced the height of the tube to wipe the plate just below the aluminum. That worked too slick! I'll take a couple of pictures of it.
 
That's funny because I blew up a gear as well messing around and a 45 got caught in the downtube and jammed the whole mess up and then "bang".. that was all she wrote. I did piece it together for a little bit by gluing it to a washer that was about the same size then it jammed again and blew it apart. I stopped my experimenting and just used the stock stuff at that point.
 
@jmorris -- Do you know if that motor in GW's base can be switched out to a 12v version either the MBF or Dayton? I think you were talking about it in the castboolits collator thread.

I wonder if Hornady would sell you a rifle bullet feeder motor?
 
Here's the pictures of the alum piece I cut for to allow bullets to drop the thickness of the sub-plate (1/4") just before it reached the outlet hole. (It's a little rough as it was just a test :p) However rough it is, it worked...perfectly!!! Allows the bullets to drop enough before they drop out to clear the far edge of the hole at speed! I'll work on my finish skills for the finished plate made of high density poly.

IMG_3021.JPG
There's plenty of room under this sub-plate (1/2") so there no worries that the screw and washer are in the way of anything. BTW.....the patch closing my original too big hole that didn't work, was glued with Roo Glue.....an Australian secret....way superior to white glue. Don't have to worry about the patch falling out.
IMG_3023.JPG
I beveled the right side away on top so .45's don't get stuck on the tilt. Don't even think I need that now with the aluminum piece.
And guess what, I just retried all four calibers........and they all now work 100%.....no hangs....no non-fips.....I admit pure luck! Yes, even the Gold Dots work now! Going to bed happy.....:) Now if Hornady will just get my gear order out fast.
 
Last edited:
New
@jmorris -- Do you know if that motor in GW's base can be switched out to a 12v version either the MBF or Dayton? I think you were talking about it in the castboolits collator thread.

I have never messed with the Hornady collator so you guys know more about them than me.

The MBF uses gear motors that are physically the same as the Dayton 2L007, 2L008 & 2L009
 

Attachments

  • 7F953D14-6796-47FD-9F4C-E9E42D5EAE36.jpeg
    7F953D14-6796-47FD-9F4C-E9E42D5EAE36.jpeg
    66.9 KB · Views: 6
I bought the Hornady new just after they came out. They were so much less expensive than either MBF or that made for Dillon only Brand you have (forgot the name)......and they work....just not as fast. Woefully inefficient. But it does work....loudly.

One big difference between it and the other designs is the gear on the plate bottom and the two gears under the plate rather than all in the motor. In fact, the AC motor on the Hornady is a big difference.

jmorris: To use one of those DC motors, you obviously have to remove the two gears illustrated in one of the pictures below and mount the motor with new mounts. Could ignor the molded in gear on the plate.....but you'd have to make a new center. Could be done....not real sure there is a need yet.....unless I make a habit of blowing out the gears....one more time would do it, actually. ;)

In your schematic a critical measurement is not there....the depth of the motor and gearbox? You know that by heart, right? :)

I'm going to post more pictures for anyone mad enough to duplicate this project......to ease visualization of what I did with enough details to make it easier: IMG_2997.JPG
Once cut apart the remaining center plate is 8 1/2" Diameter.
IMG_2998.JPG
I used embossing tape around the turn down to keep it centered....a single pan head screw once orientated is enough to secure it....in fact for testing it just lies loose in the box. Notice the notch at the base of the ramp....that is an angled extension of the angle on the bullet drop/laydown cutout on the subplate. The lowest cut in front of it is at the same level as the bottom of said cutout on the subplate.
IMG_3000.JPG IMG_3001.JPG
The above pictures show the recessed ground out portion of the cut turn-down so the outlet tube recessed into it a little to center the tube for a clean bullet drop to the press.
IMG_3005.JPG
As you can see, my first attempt at drilling a hole in the 1/4" thick Hornady alum. plate was not well enough thought out. It was big for a "funnel" I thought would work best.....it didn't work at all....so I had to enlarge it toward and into the turn-down piece around the edge of the bucket.....this picture will save others the pain. I used 5/8 clear tubing as the outlet which also works for my outside switch.
IMG_3004.JPG
Stand offs for the Subplate screwed to Hornady's existing 10-32 screws. They have to be ground shorter to 1/2 inches high
IMG_3002.JPG
This is the shape of the bullet-drop-and-turn. Left side is cut straight down. Depth straight down is is 3/16" into the 1/4" plate. Depth towards the center should leave a 1/16" ledge for flat base pistol bullets to ride across on top of the drop...undropped! Right angle pushes bullet tips toward the out side to go up the ramp on the outer piece. Also shown is the 1/2 10-32 flat head screws to fasten the subplate to its standoff extension nuts.
IMG_3006.JPG
Another view of the ramp, the 1/8" paint stirring stick standoffs under it, and the 1/2" 10-32 extension nut standoffs for my subplate screwed into existing bolts.
IMG_3007.JPG
Hornady's center piece which once held the bullet drop tube....now has to be covered up. I used red craft foam from Hobby Lobby....1/16" thick....pencil to mark and scissors cut it out.
IMG_3008.JPG
It's friction fit...no glue no fasteners.....and it's sound deadening.
 
Last edited:
One last problem to fix.....well two, but I killed two birds with one stone.
IMG_3012.JPG
You see bullets can fall and stay on the outer turn-down rim.....can't have that.....and bullets falling to the bottom are loud....can't have that either.
IMG_3013.JPG
This is cut off a piece of rubber expansion joint used in concrete block walls. Easy to cut with a utility knife....I just cut a piece to fit at the bottom of the bucket about a foot long....and beveled both ends and the top.
IMG_3014.JPG
Actually it isn't quite thick enough (for 357 and 9mm) so I glued another 1/16" to the back using another piece of craft foam...but grey not red. Clear 5 minute epoxy was used...don't know why I didn't use the contact cement I used on the plate....that would work better....will redo that.
IMG_3015.JPG
Done! It's held in by two screws on each beveled end. I just left the screws out enough to slip the rubber beveled ends under the heads....it holds it just right and is a breeze to remove.
 
Last edited:
Tuned pretty good now....one bullet drop setting, one sweeper setting, one bullet outlet adjustment, four calibers..........

The old Factory setup gone forever.....but here's a video in .45acp for the memory....even with improved bullet stops......slow....


Now the four calibers in the new improved Hornady....each with 35 bullets. Worst time? 20 seconds....yes still hand turning....last time hand turning!


Still waiting on a gear from Hornady.....they were magnanimous with their support.....said they usually required the feeder to be sent back for such an operation!?! But that they would send the gear out for me this one time??????? Geez, the gears are drop in......

Being the nervous type I am, I've been looking for a future outside source of the gears....think I'll found it......in case I ever screw up again and destroy another gear.

Can you imagine me sending them my slightly modified bullet feeder in for a new gear???:D
What would they do send it back in a huff....or steal the design fix?(which would be fine) or put a contract out on me......patronizing .... from a lady who's obviously never seen one with the turning disc removed.

The biggest surprise with this thread for me at least, has become obvious. Not many people bought this product. Very little interest here. But then I always seem to be the odd man out.
 
Last edited:
I'd probably just BUY the gear from Hornady and not deal with the hoop jumping/tongue lashing getting one for "free" under warrantee.
Once I got rolling again, like you, I'd be looking for another source, maybe a metal gear.
just me though,
Have you considered a friction clutch or shear pin to protect the gear when it jams?
That seems like something you could whip-up in your spare time.

I'm always interested in mechanical stuff related to reloading and enjoy your threads/posts, but don't post in them because I really don't have much to add.
Your stuff is well thought out, executed, and explained that there's rarely a need to ask questions.
Just because you don't get many posts in threads like this doesn't mean no one's viewing them...keep posting about "things you have done".
:D
 
Last edited:
I'd probably just BUY the gear from Hornady and not deal with the hoop jumping/tongue lashing getting one for "free" under warrantee.
Once I got rolling again, like you, I'd be looking for another source, maybe a metal gear.

I was "trying" to buy the gear......that didn't seem to be an option.:confused: What I wasn't trying to do is get a freebie......they didn't have any fault there....just a product that needs speeded up! What I didn't want to do is send my unit back.....modified or not. ;) Maybe I should've tried buying 4 gears......hmmm.....

And BTW, don't anyone try to order parts by Email....that doesn't work like it does with RCBS. This was the reply to the Email I attempted first.....

"we are very sorry to hear about this issue. While we are unable to ship replacement gears, we can assist you in making arrangements to return the unit for repair. Please give our customer service department a call at 1-800-338-3220 at your earliest convenience. We appreciate your patience in this matter. Thank you" .... er what?........so I called......

Thanks for the reply Tilos......somebody was listening after all besides jmorris and AR-bossman. :)

BTW, I will post a couple more pictures this afternoon.....to show how I made the outlet to the die work better....no more bullet hangs there....uh, ah....that might break gears.:oops: Geeze that's a fickle spot....too big and it doesn't work...too small and it doesn't work.....reminds me of the story of the 3 bears....
 
Last edited:
I was "trying" to buy the gear......that didn't seem to be an option.:confused: What I wasn't trying to do is get a freebie......they didn't have any fault there....just a product that needs speeded up! What I didn't want to do is send my unit back.....modified or not. ;) Maybe I should've tried buying 4 gears......hmmm.....

And BTW, don't anyone try order by Email....that doesn't work like it does with RCBS. This was the reply to the Email I attempted first.....

"we are very sorry to hear about this issue. While we are unable to ship replacement gears, we can assist you in making arrangements to return the unit for repair. Please give our customer service department a call at 1-800-338-3220 at your earliest convenience. We appreciate your patience in this matter. Thank you" er what?........so I called......

Thanks for the reply Tilos......somebody was listening after all......:)
Ah, the golden gear...
probably something that could be "printed"
:scrutiny:
 
I thought about what it would take to print that gear, and I don't think PLA would hold up. PLA is the most common of the plastics. I think you would have to go with Nylon which I have never tried because it is a temperamental beast and is expensive (compared to PLA)
 
I really think the gears were made to be the "shear-pin" to prevent motor damage.....so metal replacements may not be that wise....so maybe PLA is good enough....yet I'm not convinced 3d printing would make accurate enough gears that would keep going. RushGears.com have stock Delrin gears that are exact in every way except that the drive gear on the Hornady is bored smaller than the other gear.....smaller shaft. The idler gear is exact, even the bore.....was wondering if someone makes sleeves to go from one bore size to the another.....that could be easily "printed". I printed RushGears cad drawing of the two gears on Autocad, printed them out 1:1 and they fit Hornady's gears perfectly. Even sprocket pin angles were exact.

The Hornady drive gear is "keyed" by a horizontal pin....which would have to be routed into a non OEM replacement gear....the idler just has to be retained....it spins on the shaft, a nut screws over the top.

I'm replacing both, since I discovered a missing spoke on the drive gear.....

RushGears will make a custom version of the drive gear....new bore and maybe even the horizontal key slot......just don't know how expensive that gets....haven't priced anything. Hopefully this is all moot with gears supposedly on the way from Hornady.
 
Last edited:
Do you have a link to the cad for that gear? Maybe I'll try to model one up. I'm still learning so it might not work out.
 
Status
Not open for further replies.
Back
Top