I had a lot of fun learning about the 7.62x54R (rimmed) caliber, the longest continuously utilized military round.
1. Mosin Nagant rifle (in cosmoline!) $129 + tax [included bayonet, tool kit, sling etc! ]
2. $10 to buy mineral spirits; disassemble everything and clean; reassemble. [read directions, youtube is a big help] A little gun grease around the trigger assembly makes it a nicer feel.
3. Bought one box of S&B 180grain ammo; dies from Lee.
4. As expected, front sight post is low, rifle shoots high at 100 yards. Also, realized that with my eyes and thick lenses, I can't SEE a 3" target at 100 yards in the position needed to use iron sights -- varilux eyeglass lenses induce distortion due to angles involved. A bit of wire-insulation over the front post solves the elevation but not the eyeglass problem.
5. An excellent scope mount kit that requires no receiver drilling is available (using a band around the receiver) -- but it is pricey.
6. Also excellent bolt handle replacements are available to get the handle out of the way of the scope -- but again, $ involved.
7. This is the largest caliber I've every shot and it does have a kick!
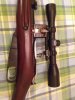
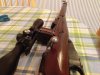
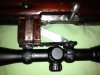
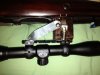
8. Elected to fashion a scope mount out of relatively hard 2x4 wood. Cut 1.25" hole with hole cutter, then bisected that hole to create a rounded edge that would fit the receiver. Drilled another hole to allow me to still see the iron sights if desired. Set height as desired, rounded top edge. Double stick tape on the inside of the round to better match receiver, and then an auto hose clamp fitted with a rubber hammer helping to make band fit the bottom of receiver. Note that I'm LEFT handed, so I put the hose clamp screw mechanism on the 'far' side for me. Then a short piece of scope rail on top with wood screws, short rings.
9. I didn't get the scope rail just perfect, so I compensated for left-right and up-down angular errors by inserting layers of aluminum ductwork tape on applicable edges of the ring attachments and also inside the rings as needed to get the scope within its adjustment range -- being able to see the already-sighted in iron sights was a big help here. You could also use thin brass shimming (I didn't have any). Or just drill/cut straighter than me. The scope mount actually feels pretty solid. Lightweight 4x cheap scope. This is not a fancy set up, so I didn't bother to ream the insides of the rings.
10. Fired up the oxyacetylene torch after re-disassembling the bolt so I can work on just the handle portion without messing with the hardened portions. Clamp applicable bolt portion in vise in safe area, heat portion of stemp to red hot while pulling with set of pliers on knob -- took three tries to get it where I wanted it. You can easily clean up the surface with 400 grit wet-to-dry sanding paper afterwards. Gets rid of the discoloration induced by the torch. Careful -- HOT. Also file/grind as desired.
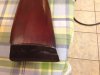
11. Walmart has really inexpensive flipflops for the summer season, $2 got me a pair. Outlined stock but, cut out two thicknesses. Contact Cement seems to do the best job gluing these and also to the steel butt end. Wow, what a reduction in perceived Kick!
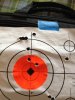
12. Target is from my first efforts at zeroing at 100 yards in a downpour from Tropical Storm Beryl. Ammo is reloaded (full length, then neck sized to be certain not to have crooked necks); mild load Varget 41.5 grains, 180 grain Sierra. This is way way better than I can do with iron sights. [The two far right shots are wild shots early in process; you can see my trek adjusting the zero downwards.]
Tons of fun for very little outlay. I may add a 45 degree support bar to better hold the rear of the scope rail, away from the bolt handle, if that seems necessary, later.
1. Mosin Nagant rifle (in cosmoline!) $129 + tax [included bayonet, tool kit, sling etc! ]
2. $10 to buy mineral spirits; disassemble everything and clean; reassemble. [read directions, youtube is a big help] A little gun grease around the trigger assembly makes it a nicer feel.
3. Bought one box of S&B 180grain ammo; dies from Lee.
4. As expected, front sight post is low, rifle shoots high at 100 yards. Also, realized that with my eyes and thick lenses, I can't SEE a 3" target at 100 yards in the position needed to use iron sights -- varilux eyeglass lenses induce distortion due to angles involved. A bit of wire-insulation over the front post solves the elevation but not the eyeglass problem.
5. An excellent scope mount kit that requires no receiver drilling is available (using a band around the receiver) -- but it is pricey.
6. Also excellent bolt handle replacements are available to get the handle out of the way of the scope -- but again, $ involved.
7. This is the largest caliber I've every shot and it does have a kick!
8. Elected to fashion a scope mount out of relatively hard 2x4 wood. Cut 1.25" hole with hole cutter, then bisected that hole to create a rounded edge that would fit the receiver. Drilled another hole to allow me to still see the iron sights if desired. Set height as desired, rounded top edge. Double stick tape on the inside of the round to better match receiver, and then an auto hose clamp fitted with a rubber hammer helping to make band fit the bottom of receiver. Note that I'm LEFT handed, so I put the hose clamp screw mechanism on the 'far' side for me. Then a short piece of scope rail on top with wood screws, short rings.
9. I didn't get the scope rail just perfect, so I compensated for left-right and up-down angular errors by inserting layers of aluminum ductwork tape on applicable edges of the ring attachments and also inside the rings as needed to get the scope within its adjustment range -- being able to see the already-sighted in iron sights was a big help here. You could also use thin brass shimming (I didn't have any). Or just drill/cut straighter than me. The scope mount actually feels pretty solid. Lightweight 4x cheap scope. This is not a fancy set up, so I didn't bother to ream the insides of the rings.
10. Fired up the oxyacetylene torch after re-disassembling the bolt so I can work on just the handle portion without messing with the hardened portions. Clamp applicable bolt portion in vise in safe area, heat portion of stemp to red hot while pulling with set of pliers on knob -- took three tries to get it where I wanted it. You can easily clean up the surface with 400 grit wet-to-dry sanding paper afterwards. Gets rid of the discoloration induced by the torch. Careful -- HOT. Also file/grind as desired.
11. Walmart has really inexpensive flipflops for the summer season, $2 got me a pair. Outlined stock but, cut out two thicknesses. Contact Cement seems to do the best job gluing these and also to the steel butt end. Wow, what a reduction in perceived Kick!
12. Target is from my first efforts at zeroing at 100 yards in a downpour from Tropical Storm Beryl. Ammo is reloaded (full length, then neck sized to be certain not to have crooked necks); mild load Varget 41.5 grains, 180 grain Sierra. This is way way better than I can do with iron sights. [The two far right shots are wild shots early in process; you can see my trek adjusting the zero downwards.]
Tons of fun for very little outlay. I may add a 45 degree support bar to better hold the rear of the scope rail, away from the bolt handle, if that seems necessary, later.