Hey all-
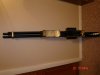
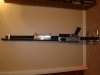
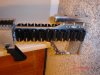
I saw Deerhunter's Rem 1740 a year or so ago (search THR for it) and wanted to build one myself. The hardware (stock, rear block, receiver covers, forend and front clamp) are all CNC machined 6061 aluminum made on an EZ Trak Bridgeport mill at my local community college (yay for cool teachers!) I haven't shot it yet (welcome to the People's Republic of Illinois...) The gun as it currently sits, is damn heavy tipping the scale at, and I'm not kidding, 20lbs without ammo. Without any of the hardware its still heavy, somewhere in the neighborhood of 15-17 lbs. The gun holds 11 shells inside each gun (10 in the tube, one in the chamber) and 30 shells on the outside shell carriers. I fused a few of the ideas out there in the design to try and incorporate the lessons others have had with their builds.
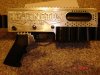
The rear block is meant not only to be a way to attach an AR15 grip (based on Cavalry Manufacturing's SST-880 stock adapter) but also as a place for the recoil to go. In Deerhunter's design, the recoil sheared the bolts through the receivers where the trigger group pins originally were (I did this as well for added stiffness). There is a guy on YouTube that made a rear block with a centered stock and grip, but I found doing that made trying to reach both triggers pretty uncomfortable for me. To do it that way, I had to torque my wrist pretty hard and I didn't like the idea of having 2 12ga shells' worth of recoil hit when I was in that position.
The stock can be mounted directly behind either one of the guns or centered, but like Deerhunter found, its more comfortable to one side. The stock has an adjustable cheekpiece, a spike that can be screwed into the ground on the bottom and an adjustable rear pad, but the length of the stock at the moment makes holding it to my shoulder almost impossible. This stock will eventually go onto a sniper rifle project, and I wanted to try out some ideas on it for this build.
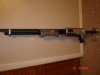
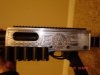
The receiver is encased in 3 aluminum plates which I engraved using the CNC mill. I think it adds alot to the look and it has a centered rail on it that way too.
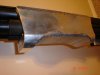
My forend is a pair of solid (and a royal PITA to machine) aluminum blocks bolted together and polished as a single unit to hide that its 2 pieces. I made it a single pump for both guns. I was thinking of making them independent, but the engineering was difficult to figure for it and would have added a ton of time to the build, more than I could have gotten done during the semester. For those wondering, the notch in the top of it on the RH side wasn't intentional- it was due to a tool crash. Oops. (Lesson learned? Never talk and hand-machine at the same time!)
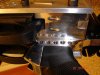
The clamp on the front was found by the guy on YouTube (sorry if you read this dude, its late!) to be necessary to keep the barrels locked together when its fired, so I made one of my own. The next iteration of it might incorporate a bayonet mount; I haven't decided yet.
Initial inspiration and thanks to Deerhunter and the other version out there on YouTube (I forget the gentleman's name again). Thanks to both of you.
Things yet to go-
1. Have to add the integrated safety (one button does 'em both)
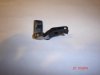
2. Add the extended LH trigger (see the pic... Anyone have a good reference as to how to strip down the 870 trigger group?)
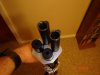
3. Need to shorten the barrels- its a bit unwieldy at 28 inches, even though the extended mags look cool on it and I can shoot all day with how many rounds it holds) Anyone have a source for a LH 18 inch barrel? I can't find one less than 28 inches ANYwhere, and I've been looking for almost a year.
4. Have to add some recoil comps- not sure which one to get yet...
5. Have to add a bayonet to it somehow. I was thinking of an M9, but it doesn't have the right feel to it IMO.
6. Have to remake the stock (I thought it was cool with the 4 shell holders, and it looks that way but its a bit of a stretch to hold the thing at my shoulder.)
7. Get the forend engraved (love to do this myself, but I suck at it. Any suggestions in the Chicagoland area?)
8. Have to get the aluminum parts hard-anodized (blue? black? Camo?)
9. Have to get the guns re-parkerized (aluminum streaks, scratches, etc.)
Does anyone have suggestions for it (its still a work in progress)? Whatchall think?
-Farasien
I saw Deerhunter's Rem 1740 a year or so ago (search THR for it) and wanted to build one myself. The hardware (stock, rear block, receiver covers, forend and front clamp) are all CNC machined 6061 aluminum made on an EZ Trak Bridgeport mill at my local community college (yay for cool teachers!) I haven't shot it yet (welcome to the People's Republic of Illinois...) The gun as it currently sits, is damn heavy tipping the scale at, and I'm not kidding, 20lbs without ammo. Without any of the hardware its still heavy, somewhere in the neighborhood of 15-17 lbs. The gun holds 11 shells inside each gun (10 in the tube, one in the chamber) and 30 shells on the outside shell carriers. I fused a few of the ideas out there in the design to try and incorporate the lessons others have had with their builds.
The rear block is meant not only to be a way to attach an AR15 grip (based on Cavalry Manufacturing's SST-880 stock adapter) but also as a place for the recoil to go. In Deerhunter's design, the recoil sheared the bolts through the receivers where the trigger group pins originally were (I did this as well for added stiffness). There is a guy on YouTube that made a rear block with a centered stock and grip, but I found doing that made trying to reach both triggers pretty uncomfortable for me. To do it that way, I had to torque my wrist pretty hard and I didn't like the idea of having 2 12ga shells' worth of recoil hit when I was in that position.
The stock can be mounted directly behind either one of the guns or centered, but like Deerhunter found, its more comfortable to one side. The stock has an adjustable cheekpiece, a spike that can be screwed into the ground on the bottom and an adjustable rear pad, but the length of the stock at the moment makes holding it to my shoulder almost impossible. This stock will eventually go onto a sniper rifle project, and I wanted to try out some ideas on it for this build.
The receiver is encased in 3 aluminum plates which I engraved using the CNC mill. I think it adds alot to the look and it has a centered rail on it that way too.
My forend is a pair of solid (and a royal PITA to machine) aluminum blocks bolted together and polished as a single unit to hide that its 2 pieces. I made it a single pump for both guns. I was thinking of making them independent, but the engineering was difficult to figure for it and would have added a ton of time to the build, more than I could have gotten done during the semester. For those wondering, the notch in the top of it on the RH side wasn't intentional- it was due to a tool crash. Oops. (Lesson learned? Never talk and hand-machine at the same time!)
The clamp on the front was found by the guy on YouTube (sorry if you read this dude, its late!) to be necessary to keep the barrels locked together when its fired, so I made one of my own. The next iteration of it might incorporate a bayonet mount; I haven't decided yet.
Initial inspiration and thanks to Deerhunter and the other version out there on YouTube (I forget the gentleman's name again). Thanks to both of you.
Things yet to go-
1. Have to add the integrated safety (one button does 'em both)
2. Add the extended LH trigger (see the pic... Anyone have a good reference as to how to strip down the 870 trigger group?)
3. Need to shorten the barrels- its a bit unwieldy at 28 inches, even though the extended mags look cool on it and I can shoot all day with how many rounds it holds) Anyone have a source for a LH 18 inch barrel? I can't find one less than 28 inches ANYwhere, and I've been looking for almost a year.
4. Have to add some recoil comps- not sure which one to get yet...
5. Have to add a bayonet to it somehow. I was thinking of an M9, but it doesn't have the right feel to it IMO.
6. Have to remake the stock (I thought it was cool with the 4 shell holders, and it looks that way but its a bit of a stretch to hold the thing at my shoulder.)
7. Get the forend engraved (love to do this myself, but I suck at it. Any suggestions in the Chicagoland area?)
8. Have to get the aluminum parts hard-anodized (blue? black? Camo?)
9. Have to get the guns re-parkerized (aluminum streaks, scratches, etc.)
Does anyone have suggestions for it (its still a work in progress)? Whatchall think?
-Farasien