New Rolling Blocks!

Status
Not open for further replies.
Got 'em. I wasn't able to do anything about them until today as I was away at a big 3 day cowboy action meet.

Here's tark's rolling block 30-06.
 

Attachments

  • photo (1).JPG
    photo (1).JPG
    64.2 KB · Views: 86
  • photo (2).JPG
    photo (2).JPG
    78.2 KB · Views: 85
  • photo (3).JPG
    photo (3).JPG
    101.4 KB · Views: 82
  • photo (4).JPG
    photo (4).JPG
    97.8 KB · Views: 80
And here are two pictures of his 45-70.

Tark, this is seriously nice work you did. Anything you care to offer about the machines and perhaps any tricks used for machining out the inside of the receiver would be appreciated.
 

Attachments

  • photo (5).JPG
    photo (5).JPG
    103.8 KB · Views: 69
  • photo (6).jpg
    photo (6).jpg
    135.6 KB · Views: 65
Bc thank you so much for posting the pics! When my computer whiz son visits this summer I will learn how to do this myself. It is late in my time zone and I,m still a little woozy from the wonderfully joyous colonoscopy experience I had today, but tomorrow I will tell the story of these two guns. And then...there was the 45caliber horse pistol I made. Again , a rolling block action. And a 32-20 and a 38 special, all rolling blocks. I seem to be be infected with Rolling block fever....hope they have something for that... Oh, well.. Will yak at you tomorrow... Thanks again..
 
Very nice work,kudos. But looking at the basic Rider design I see a large heavy hammer that means slower lock time and more disturbance when it hits the primer. Also not a very advanced sear system so although I am sure you workeed to a nice trigger, it still wil never equal a multi lever sear system Also the primary extraction is no great shakes with not much leverage . However as I stated at the outset; I loves me some rolling blocks as a nostalgia rifle and neat you pushed the limits of the design.
 
Very nice work,kudos. But looking at the basic Rider design I see a large heavy hammer that means slower lock time and more disturbance when it hits the primer. Also not a very advanced sear system so although I am sure you workeed to a nice trigger, it still wil never equal a multi lever sear system Also the primary extraction is no great shakes with not much leverage . However as I stated at the outset; I loves me some rolling blocks as a nostalgia rifle and neat you pushed the limits of the design.


I note that Tark's actions, as he mentioned, have breechblocks and hammers just wide enough to fit the intended cartridge. That's going to reduce both lock time and 'thunk' quite a lot. While the hammer is not as dainty as, say, a Highwall or a Stevens 44 1/2, it should be light enough to perform acceptably. The stock trigger puts a lot of load on the sear surface, but in the Golden Age gunsmiths like G. Schalk did produce custom Rolling Blocks with set triggers: there's quite a lot of room in the lower tang for extra mechanism. As far as extraction goes, I remember the 7x57 Model 1902 I had spitting the cases out quite briskly, which it continued to do after converting to 45-70 with a Numrich barrel, even with very stout smokeless loads which would be in the 'Ruger-only' section of the loading manual today. Hey, I was young and immortal...

While I love the Winchester and Stevens falling-blocks, both designs require too much machining to ever be produced cheaply. The Rolling Block in my eyes is a handsome action with all the strength needed for most cartridges, and the potential for a reasonable price tag. Tark's revisions have nailed it, and we would benefit if a serious manufacturer would take up the design.
 
The big thing here as I see it is that we're seeing an updated rolling block that is able to not only survive the mid to high 55 to 58K pressure range but one that also survived the proof load of up somewhere around 80K.

Things like a smaller or skeletonized lighter hammer are possible now that it's been shown that this old design is able to be updated to a modern cartridge.

Truthfully I don't see the rolling block design being that much easier to make than a falling block such as the 1885 Winchester. There's still the need for a rather nasty opening to be cut into a rather big hunk of steel to produce the receiver. The hollow cheek casting used on the originals is not going to withstand the sort of pressures of modern rounds. The update to make this work has to be solid cheeks with the pins fully supported so they withstand the loads in shear with only a few thou of clearance between the side cheeks and the rolling block and hammer. That way we avoid the nasty bending issues that rc mentioned.

But making that sort of slot or pocket in a big block like this means that it's not much more work to keep on going and make the sort of rectangular through hole that a falling block requires.
 
Well, I just spent an hour writing how I built those two guns and when I tried to post it this stupid forum told me I wasnt logged in (I was) so I logged in and then it told me I had to push some "back" button to reload the post(That button doesnt exist of my keyboard) So I tried the backspace button whid didn't solve the problem. My post was lost and I want to shoot this computer. Im too mad to do it all over again. Ill try tomorrow
 
Iv'e calmed down a little, so Ill try this again' in short posts, so if this computer $#%&* up again, I wont lose so many minutes of typing.

I made the 45-70 in 1993. I had just started working for Les and a co-worker approached me with a 15 pound block of 1045 steel. He challenged me to make a gun out of it. I called the heat treater, he said that 1045 would harden nicely, so off I went.

at this point I want to give credit to Les Baer. I had never touched a milling machine before I went to work for him and he taught me everything I know about machining. He was also nice enough to let me use the companies machines and cutters. He taught me everything I know and helped me with what I didn't.

I chose to copy the rolling block because they are stupid simple and I had one in 43 Spanish to copy.

The first job was to cut out the rough outline of the action. Then I drilled the pin holes followed by the hole for the barrel shank. My original intent was to make the thing in 458 winchester so I knew it had to be strong. I got the idea of narrowing the breech block and hammer to no wider than necessary, which would give me thicker side walls. Then I upped the pin dia. from 7/16 to 1/2 ". Many long nights were spent after work hogging out interior. In some areas I drilled out what I could and some areas I plunged with an end mill. Some metal was removed with a coarse file. I ended up with a receiver that had thicker walls than the original and used larger pins. I hoped this, along with superior modern steels and heat treating, would do the job.

The breech block and hammer were a challenge. I went through three breech blocks and two hammers before I had something that worked. The most difficult thing was drilling the firing pin hole. I had to eyeball it and it took three tries to get it right. I made the actual firing pin out of a drill bit shank. Lapping the actual surface where the breech block bears against the hammer was a tedious process. It involved lots of elbow grease and lapping compound. . At this point I had a half finished action and it was shot show time so I took it it to the 94 show, where I showed it to Mike Venturino. I told hom what I was going to chamber it it and of course he told me I was Crazy. He suggested I do it in 45-70. I couldn't Shoot it in BPCR competition if it was a 458. Mike was right, so the caliber was agreed upon.

To be continued....
 
So here I was, back from the shot show with a half finished action. The trigger guard is not a stressed part, so I made it out of 1018. The trigger also functioned as the sear so it was made from 1045. If you have ever had a rolling block apart you know that the trigger guard is actually an entire assembly, containing the trigger, trigger spring, and the mainspring for the hammer, along with a spring which holds the breech block closed. There is also a lever which prevents you from pulling the trigger while the action is open. All of these were direct copies of the original with coil springs instead of flat. The extractor is a simple post in the breech block, which catches the rim as the block is rotated.

I didn't have the knowledge back then to chamber the barrel or cut threads in the shank so I had a friend do it in trade for a cap and ball pistol. The barrel shank is threaded 7/8 X 14 with 60 degree V thread. It was locktited in place.

The actual barrel was given to me by Les. It is octagonal, 31 inches long and quite heave. The gun weighs 11 1/2 pounds and the barrel is over half of it. It had no markings and has a strange twist rate of 1 in 21 which I have never seen before or since. Fast enough for 500 grain bullets if you don't push them too fast. I bought a walnut board from a lumber co and stocked it (rather horribly) myself. I am terrible at stocking a rifle. It can charitably be described as "functional". So there I was with a gun I had no money in! The sights I made myself and it is zeroed in at 100 yards with a 500 grain bullet and a case full of 2F.

I have won a couple of matches with it and bagged a Wild Boar in California. With the black powder loads it will shoot MOA at 100 yards By actual count I have put about 10,000 rounds through it, ranging from black powder loads up to Ruger #1 and #3 only loads. It eats them all . I have mentioned previously how I have proofed it with a 458 load.

It is my pride and joy and will go to my son.
 
The 30-06 was a different challenge entirely as I knew I would be dealing with a lot more pressure. Ill tell that story tomorrow, I am bone tired tonite. Hopefully my spelling will improve with rest.....
 
The 30-06 was quite a project. I had been reading articles on rolling blocks in the gun rags and some of the writers claimed that the rolling block was never really as strong as it's reputation claimed. So I decided to build one in 30-06. I called up Mc Master Carr and ordered a block of 4140. I knew with this one I would need even more strength, so I narrowed the breech block and hammer even more and upped the pins to 9/16". I built it pretty much the same way as the 45-70, using what I had learned from the first gun.

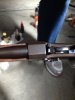
The extractor was a problem. I couldn't just use a simple post anymore. I ended up with a curved piece of spring steel with a hook in it. It looks flimsy but it works. I beefed up the hammer and breech block wherever I could. I was more concerned with strength than I was with fast lock time. And Gordon is right, rolling blocks have about the slowest lock time of any firearm that I know of.

The amount of machining needed to make a rolling block action really isn't that much, nor is it that complicated. A 1911 frame is a far more complicated project, from a machinists point of view. And I am no machinist. If you gave me a print and told me to machine something to spec I would be helpless.

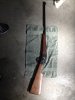
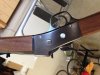
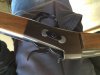
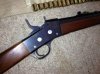
The barrel came from Brownells as did the rear sight. The barrel was left as it came from Brownells, with a medium heavy contour and 27 inches long. A 1 in 10 twist. By this time I had learned enough to thread it myself. I chambered it myself, with only a finishing reamer. I took it VERY slowly! So now I had a couple hundred bucks into it. I did my usual gruesome stocking job and I rust blued it at home. For reasons I dont understand, the hammer and breech block blued nicely, while the receiver took a greyish brown look. You can see it in the pictures.

Time to proof it. I have mentioned that I used a German proof round, given to me by one of out German customers. He will remain anonymous. The German proof houses don't just give those away to anyone who asks. I suppose he got it into the country the same way he got the box of Cuban Cohibas here. Of course I tied the thing to a tire, got me a long string, said my prayers and let it fly. It was really rather uneventful. Sounded like a 300 RUM when it went off. The hammer was quite stiff to cock. This was expected. When you feed a rolling block too heavy a load the hammer will be difficult to cock. The rifle is warning you. I measured the headspace. It was unchanged! I fired ten more factory loads through it. The hammer cocked easily with these and they extracted normally. The fired cases showed almost no expansion whatsoever! They could be resized in a full length die with very little effort. Finally I had the hammer, breech block, receiver and pins magnafluxed for any cracks. There were none. As far as I am concerned, my rifle had passed proof.

I have put almost a thousand rounds through it since. It likes the heavier bullets, especially the 180 grainers. I have shot several groups under 1 inch at 100 yards. I have cases I have reloaded ten times, finally retiring them because the primer pockets were getting loose. The fact that my fired cases show so little wear and can be reloaded so many times convinces me that this rifle is fully capable of handling the pressures it is operating with.

A few final thoughts. Rolling blocks are not hard to make. Remington considered going with investment casting when the brought them back in the 90s but decided against it BECAUSE they were so easy to machine. You may not know that Lewis Machine And Tool (LMT) made the actions for Remington. I asked Carl about it once and he said that it didn't take much to do one. I think a modern rolling block that could handle just about anything would not be that hard at all to do. And it wouldn't cost that much. Why don't they do it? Simple. Lack of demand And that 'bout sums it up

Thanks again for your kind compliments and thanks especially to BCrider for posting.
 
Well, I just spent an hour writing how I built those two guns and when I tried to post it this stupid forum told me I wasnt logged in (I was) so I logged in and then it told me I had to push some "back" button to reload the post(That button doesnt exist of my keyboard) So I tried the backspace button whid didn't solve the problem. My post was lost and I want to shoot this computer. Im too mad to do it all over again. Ill try tomorrow
For long passages, I write them out in the word processing program on my computer. Then I sign in, bring up the reply page, copy and paste the reply from Word, and post.

It makes it easier to edit the reply before posting it.

Yes, the same thing happened to me.
 
I've been busy for a few days so this was the first chance I had to read the descriptions. That's some nice work Tark.

And you are downplaying what a project it was and how neatly you did it in the end. I know pictures can hide and minimize some flaws but whatever you feel is a bad spot is apparently not as bad as you think since even the closeups look DARN good. But then all the true craftsfolk I've ever known were always their own worst critics.
 
Such a neat story! What great work, Tark.

I would love it if a manufacturer started making your design!
 
I'm not downplaying BC LOL If you saw my stock work you would vomit. But it is functional and that's all I care about. Thanks again
 
Tark,

I am really impressed. You have great rifles and a great stories to go with them! Thank you for sharing it. I knew the Rolling Block was an under-appreciated great design and now you have shown it is even greater than I thought. Recently I commented on the Rolling Block in comparison to the Springfield 1873 and Martini Henry in this thread:

http://www.thehighroad.org/showthread.php?t=751358&highlight=martini

Have you ever tried the firing technique described in my post #18?

Thanks again for the great stories and education.
 
In some of the events I shoot my own rolling block in the elapsed time is recorded for tie breakers. I'll have to give that pinky and heel method a try to cut down on my loading time between careful sighting and shooting.
 
For a number of years Lonestar Rifles made modern RBs for the BPCR crowd, but around 2011 the owner Dave Higginbotham was killed by an ND while pulling a rifle out of the back of his vehicle. Tragedy for his family, and sad news for lovers of old-school rifles to lose such an enthusiast.

Baileywood006.jpg
 
That side lever looks amazing. He was obviously a gifted craftsman.

And the side lever idea cures two things. One being the big ear sticking up to the side in the sight picture and the other being the added leverage it would provide for pushing home rounds and extracting any sticky cases.
 
Status
Not open for further replies.
Back
Top