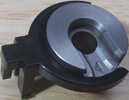
New turret press under development with 3/4/5/6 configuration turrets

why do you have to fiddle with the detent pin ... What are you and Lee getting at or trying to achieve?
Because I am a beta tester for Lee Precision and product testing the Ultimate Turret Press while following documentation/instructions that came with the press kit. (My agreement with Lee Precision is that I can test their products to breaking point and openly share my findings/recommendations/suggestions/product ideas and email exchanges with Calvin, my contact with Lee Precision, in full transparency of "Open" collaboration with THR forum members ... I have no restrictions on what I do)

Under "SINGLE STATION PRESS OPERATION", it says to "Simply remove the detent pin and drop in place on the top side of the tool head as shown"; but in reality, when I tried to remove the detent pin with a screw driver, it was not feasible due to lack of space under the tool head and screwdriver needed to be used at an angle, which made unscrewing undoable.

So to apply straight line unscrewing force on the bottom of Phillips head detent pin, I had to remove the tool head but unscrewing counterclockwise did not loosen the detent pin. I even mounted detent pin/tool head in the vise but was unable to loosen (Which Calvin suggested).

And I thought, "Heck, if I am having such a problem removing the detent pin, how will some other customers with stiff hands/arthritic fingers be able to remove the detent pin?" and looked for a simpler solution for single station operation (Tool carrier/turret needs to be secured for single station operation as it rotates freely, especially with lubrication and once removed, the tool head really needs to be pounded hard down or shell holder won't slide in). That's when I came up with locking other tool carrier/turret index holes instead of 4 o'clock position hole documentation/instructions suggested and found 11 o'clock position had an open box under the bearing plate (To not require modification of tool caddy/Safety Primer holder) and another slot cut on bearing plate would allow simply dropping a 13/64" pin to hold the tool carrier/turret for single station operation without having to remove the detent pin.

I have another email out to Calvin and awaiting response (I am sure product development team is doing a review as we speak).

index.php


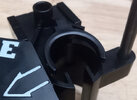
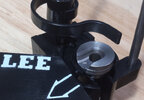
This is the DIY 11 o'clock slot I drilled/filed to duplicate factory slot at 4 o'clock


index.php
 
Last edited:
Because I am a beta tester for Lee Precision and product testing the Ultimate Turret Press while following documentation/instructions that came with the press kit. (My agreement with Lee Precision is that I can test their products to breaking point and openly share my findings/recommendations/suggestions/product ideas and email exchanges with Calvin, my contact with Lee Precision, in full transparency of "Open" collaboration with THR forum members ... I have no restrictions on what I do)

Under "SINGLE STATION PRESS OPERATION", it says to "Simply remove the detent pin and drop in place on the top side of the tool head as shown"; but in reality, when I tried to remove the detent pin with a screw driver, it was not feasible due to lack of space under the tool head and screwdriver needed to be used at an angle, which made unscrewing undoable.

So to apply straight line unscrewing force on the bottom of Phillips head detent pin, I had to remove the tool head but unscrewing counterclockwise did not loosen the detent pin. I even mounted detent pin/tool head in the vise but was unable to loosen (Which Calvin suggested).

And I thought, "Heck, if I am having such a problem removing the detent pin, how will some other customers with stiff hands/arthritic fingers be able to remove the detent pin?" and looked for a simpler solution for single station operation (Tool carrier/turret needs to be secured for single station operation as it rotates freely, especially with lubrication and once removed, the tool head really needs to be pounded hard down or shell holder won't slide in). That's when I came up with locking other tool carrier/turret index holes instead of 4 o'clock position hole documentation/instructions suggested and found 11 o'clock position had an open box under the bearing plate (To not require modification of tool caddy/Safety Primer holder) and another slot cut on bearing plate would allow simply dropping a 13/64" pin to hold the tool carrier/turret for single station operation without having to remove the detent pin.

I have another email out to Calvin and awaiting response (I am sure product development team is doing a review as we speak).

index.php


This is the DIY 11 o'clock slot I drilled/filed to duplicate factory slot at 4 o'clock


index.php
Thanks for going into detail on this and thanks for @R44 flyer for asking.
I have the same deal with my Piggy Back press and have delt with philips head screws a lot in the past on motorcycles.
As I am somewhat of a tool hoarder, I have an assortment of tools used in many different venues and have used them in reloading.
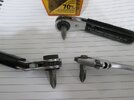
These 1/4" hex ratchets are very handy and should work for removing that detent rod screw.
I have 3 different offsets and a small adjustable that work great.
RatchetS.JPG
Here's where I use them on the Piggyback:
PigBacUse.JPG
RatPpS.JPG
Those ratchets are craftsmen and available at Ace hardware or Amazon.
Their "clicks" are course but there are better ones available.
Once you get that screw out you may want to swap it out to a hex head or button-head cap screw.
 
Last edited:
Because I am a beta tester for Lee Precision and product testing the Ultimate Turret Press while following documentation/instructions that came with the press kit. (My agreement with Lee Precision is that I can test their products to breaking point and openly share my findings/recommendations/suggestions/product ideas and email exchanges with Calvin, my contact with Lee Precision, in full transparency of "Open" collaboration with THR forum members ... I have no restrictions on what I do

I didn’t mean to offend. I am just curious why they even recommend removing the detent pin. Seems like an unnecessary operation.
 
primer drop tube ... walk ... off the nipple ... so put a 18 MM spring hose clamp on over the drop tube and nipple.
Mine seems to come off within about 50 rounds

... zip tie on the hose ... works okay unless I move the press off the bench
I sent Calvin an email regarding primer collection tube "walking" off the ram nipple and got two responses:

Calvin at Lee Precision, Inc.
Staff - 02/26/2024 9:15 am​
Hello John,​

... the primer catch tube design is identical to the six pack, are there issues with that press too? I will continue to look into this further. The immediate best fix for the moment would be using a hose clamp in my opinion.​
Calvin at Lee Precision, Inc.
Staff - 02/26/2024 7:14 pm​
Hello John,​
Are you noticing a different result for this press compared to the Six Pack? Everything should be the same. I have started some correspondence to the supplier of the tube to see if anything has changed.​
For the moment, I feel a hose clamp is the best fix. I will keep looking into more permanent solutions.​
Calvin Katzfey​
Lee Precision, Inc.​
I haven't even gotten to the press operations yet (Been busy working on "single station" operation issue all day today and just got done doing some single stage resizing test for Calvin with good news < Will post today's entire email exchange summary for transparency in next post >).

Will test primer collection tube "walking off" tomorrow.
 
Last edited:
I remember in the late 1950's when everyone was tossing the old slot head screws for Phillips head screws because they were impossible to unscrew when you couldn't see or feel to align them with a screwdriver. Here we are again......lets get rid of those pesky Phillips head screws for good and replace them with hex heads that can be aligned in hard-to-see places and torqued and un-torqued with some decent power even when you can't put pressure to keep it aligned in the bottom of the Phillips hole ! I do hate wallered out Phillips screw head holes! :)
 
Last edited:
I am just curious why they even recommend removing the detent pin. Seems like an unnecessary operation.
Following is recap of what happened today for transparency of our "Open" collaboration.

Had multiple email exchanges with Calvin and even with John Lee this afternoon:
  • We brainstormed many ideas and possible solutions
  • Went back to the beginning and retraced step-by-step
  • Tool head was taken off the ram because I could not apply straight unscrewing force with a Phillips head screwdriver
  • Initial attempt was done with a Phillips head screw driver turning counter-clockwise but there was a lot of resistance with no movement of detent pin
  • Tool head was even mounted into a vise and pressure applied to tip of detent pin while unscrewing but still no movement of detent pin
  • Apparently the detent pin is supposed to readily unscrew from the tool head just using a Phillips head screwdriver so I responded to Calvin perhaps they could send me a tool head with detent pin that would readily unscrew - "... unscrewing the detent pin counter-clockwise keeps turning and staying TIGHT. If for some reason the detent pin/tool head is not doing what it's supposed to do, could you send me a tool head with detent pin that can be readily unscrewed?"
Excerpt of several email exchanges with Calvin:

Me - "Could the detent pin possibly have been overtightened at the factory so as to strip the plastic thread? If so, it could explain counter-clock turning not loosening the detent pin. And if that is the case, then some kind of QC step may be needed to prevent another occurrence or another customer will have the same experience."​
Calvin - "I am checking further with assembly on how these are assembled, my concern is they are getting over tightened."​
(Most recent email) Calvin - That is what I spent some time looking into today. I have a new part on my desk that is assembled correctly. I will send it out tomorrow for you to give a try.​
Calvin - "... in reviewing the disassembly of the press steps, I would like to provide some caution. The small cross bar in the middle of the feed ramp should not be used as a lever point, damage sustained to that portion will negatively impact the priming function of the press. The primer arm relies on that cross bar to hinge at the proper height for primer feeding. I would work the feed ramp loose in any other portion along the bottom of the part where it meets the ram."​
< I did try pulling/twisting the tool head loose with my hands but it didn't budge hence why I had to pry the tool head up with a flathead screwdriver (BTW, tool head slides up). I will convey this more in detail with Calvin tomorrow as I am sure he was inundated with overloading issues/emails today >
Calvin - "At the end of the day, I am not sure how important 'locking' the press in for single stage operation truly is."​
Me - "That was my thought initially for single station operation but when the documentation instructed to remove the detent pin, I thought 'Engineers/technicians at Lee must know something' and proceeded to remove the detent pin without success."​
Calvin - "If the index rod is removed the press will cycle correctly and maintain the proper position, can you give this a try and let me know your feedback and thoughts."​
< And I suggested >
Me - "If another slot was cut on the bearing plate, a simple drop of pin will allow single stage operation without having to remove the detent pin" < Pictures of modified bearing plate sent >​
Calvin - "We would prefer to have this function the way we have intended. Plus that will be a much quicker remedy than adjusting the bearing ring. I apologize, I am not trying to minimize your experience or input."​
Calvin - "Realistically, the press can be operated as a single stage press with only the index rod removed and no further action, the pin installation as guided in the instructions just provides further feedback to the user to confirm positive alignment."​
Me to John Lee - "turret design ... with absolute zero index detent pin ... cone shaped opening on tool carrier/turret to guide the detent pin through [for single station operation]"​

Some excerpts from email exchange with John Lee regarding several topics not specific to single station operation (Shed quite a bit of light on Lee Precision as a global company surpassing all other competitors in volume):

John Lee
Staff - 02/26/2024 1:15 pm​
Thanks for the kind words on our product line. I have been at Lee Precision for 52 years and have been President for the past 32 years. Notice I said been, not worked, I never felt it work, just enjoyed producing the most economical hand tools in the world. Along the way we became the world's largest in volume.​
... We have never made products by using inferior materials rather our low prices come from superior designs. For example in 1985 I received a patent for a "stress limited reloading press". This idea allowed us to produce a reloading press made from a low cost aluminum die casting. The difference was we placed a stop on the linkage to prevent the press from toggling over center. You see when a toggle link reaches top dead center the mechanical advantage goes to infinity. The amount of force limited by the weakest link. Other manufactures were caught in an endless loop, they would make a beefier frame then the connecting links would break, then they make stronger connecting links then the pivot pins would break and so on.​
... I believe that making things unbreakable, lowest part count and no user adjustments possible or necessary will keep us ahead of the pack.​
As to durability I'll put the Six Pack up against any progressive. I doubt anyone could wear one out in a lifetime.​
Sincerely,​
John Lee, President​
Lee Precision, Inc.​

< And back to single station operation issue >

(Most recent email) Calvin - "If you wouldn't mind, please let me know if you feel single stage operation is sufficient without the use of any 'lock'."​

Single station resizing impression - I was planning to do press operations today but due to single station operation issue, never even got to resize any brass. So I removed the index rod and pop in #19 shell holder for 9mm. 9mm resizing die was borrowed from SPP. I grabbed several different headstamp brass that have been deprimed and wet tumbled but not resized. (Husky height adjustable bench is setup for comfortable sit down reloading)

Even with squeaky clean brass without lubrication, resizing effort was "SOLID". No play or any movement of linkage ... Just smooth up and down movement of ram with ergo roller handle. Brought me memories of C-H 205 single stage press I used for resizing military .308 cases but with less effort and more comfortable ergo handle as my wrist stayed in same position throughout the resizing motion.

Next, I grab once fired factory new Remington .223 brass shot in my .223 Wylde AR that have been deprimed and wet tumbled but not resized. I usually use Bag Balm as case lube but since Lee die set came with a packet of resizing lubricant, decided to use it. And just like resizing 9mm brass, solid and smooth up and down movement of ram with no drama ... .223 brass resized.

And during the entire time of single station resizing of 9mm and .223 brass, no movement of tool carrier/turret and detent pin consistently went through the index hole without issue.

This is one SOLID turret press that feels like a single stage press. It will definitely be designated for .223 reloading and I will designate SPP for pistol cartridges due to higher volume reloading.

Summary/Thought for the day - Since the detent pin has cone shaped tip and bottom of tool carrier/turret index holes are also cone shaped, when operating with index rod removed, even if tool carrier/turret rotates slightly, cone shaped opening with cone shaped tip will help the detent pin align with the top opening by rotating the tool carrier automatically as ram/detent pin rise. So if the documentation/instructions never mentioned removing the detent pin to lock the tool carrier/turret from the top, single station issue of today would have never been an issue.

I will summarize our emails of today and recommend that documentation be changed to remove the part about unscrewing detent pin and to use the press in single stage (single station per Lee) mode relying on tip of detent pin guided by cone shaped bottom opening of the index holes.

I will move onto setting up dies and press operations starting tomorrow but I sure have a good feeling about this press! 👍

P.S. - Calvin, in case you are wondering why there were some long pauses between emails, I was also multi-tasking for wife cooking and baking today. (Homemade spaghetti with meat sauce/deviled eggs for lunch and dozen milk butter rolls for Philly Cheese sliders and 4 dozen chocolate chip/walnut cookies for dinner)


MBRolls.jpg DEggs.jpg DinnerCookie.jpg
 
Hello John,Are you noticing a different result for this press compared to the Six Pack? Everything should be the same. I have started some correspondence to the supplier of the tube to see if anything has changed.
I first noticed it on my Classic Cast single stage....but it wasn't too bad.
..that's what I addressed with a zip tie

It was much worst on my Six Pack. It is just how far the bottom of the linkage pushes the plastic hose at the end of the stroke. I would think any press using this linkage would be experiencing the same issue.
The hose clamp is a simple hack...especially now that we know which size it is.

I've heard some folks applying a 45 degree angled plastic PVC elbow to it. Another solution seems to be to print a 3D elbow. Seems like a lot of trouble when a hose clamp just slips on
 
I remember in the late 1950's when everyone was tossing the old slot head screws for Phillips head screws because they were impossible to unscrew when you couldn't see or feel to align them with a screwdriver. Here we are again......lets get rid of those pesky Phillips head screws for good and replace them with hex heads that can be aligned in hard-to-see places and torqued and un-torqued with some decent power even when you can't put pressure to keep it aligned in the bottom of the Phillips hole ! I do hate wallered out Phillips screw head holes! :)

Your a generation behind. Now every thing is going to Torx which is better than Phillps heads.
 
I was still having trouble with the RCBS shell holder moving out of position for the case eject. The RCBS shell holders are pretty smooth and slip around on the ram more than some Hornady that have a more sandblasted finish. Had tried the o-ring under the shell holder retainer and it helped some, but made it hard to change shell holders so removed it.

My next idea was to try 1/8” shrink tube, so cut 2 pieces about 1/4“ long and placed them half way on each arm of the shell retainer. I did not shrink fit them to the arms as they worked real well without and provided some spring action from the rubber tube.

If this works out over time I will get another shell retainer and try shrinking the tube to the arms.

hope this is some help to those who might run into the same thing.
 
I was still having trouble with the RCBS shell holder moving out of position for the case eject. The RCBS shell holders are pretty smooth and slip around on the ram more than some Hornady that have a more sandblasted finish ... If this works out over time I will get another shell retainer and try shrinking the tube to the arms.
Sorry to hear the issue with RCBS shell holder not staying inside shell holder retainer. Hope you come up with a working solution.👍

Thus far, Lee shell holders I have tested have not moved out of position.

BTW, you do have the opening of shell holder pointing towards arrow on the ramp? If not, I could see case ejector pushing case and shell holder out of shell holder retainer.
 
Last edited:
UPDATE: Continuing from post #179 - https://www.thehighroad.org/index.p...iguration-turrets.926488/page-8#post-12843487

Will test primer collection tube "walking off" tomorrow.
I did some measuring and "stress testing" of primer collection tube/nipple.
  • UTP ram nipple measured around .590" OD and .625" OD at the tip
  • SPP ram nipple measured around .585" OD and .625" OD at the tip
  • Collection tube measured around .525" ID
I noticed top edge of tip ring was very sharp and likely meant to hold/lock the collection tube from increasing weight of primers as they accumulate. I checked the nipple surface for residual oil/solvent and they were essentially dry (I wiped them with paper towel anyways for testing)

Same brand new collection tube was used on UTP and SPP for testing of tube "walking off" the ram nipple:
  • Ram lever was cycled 50 times as @9mmepiphany reported his collection tube "walked off" after 50 cycles
  • Tube was tugged to simulate increasing weight of primers accumulating inside the tube
  • Towards the last 20 cycles, tube was tugged harder to where I felt resistance operating the ram lever
Result: No "walking off" or dropping down of collection tube for both UTP and SPP.

I emailed Calvin my findings and this was his response:

Calvin at Lee Precision, Inc.
Staff - 02/27/2024 11:24 am​
Okay, thank you for your feedback, I am not concerned of a widespread issue. I am still looking into this with our suppliers to see if anything changed, rather be safe than sorry.​
Calvin Katzfey​
Lee Precision, Inc.​

Another thing I pointed out is our location of being at the coast, house is maintained around 62F year round and press location being warmer could perhaps soften the collection tube.

So while I could not replicate the "walking off" of collection tube, I will keep this issue at "< Pending >" until Calvin verifies with supplier.
 
Last edited:
Calvin's response email after post #182 reporting single station/stage operation with just the index rod removed produced steady holding of tool carrier/turret with consistent detent pin coming up through index hole - https://www.thehighroad.org/index.p...iguration-turrets.926488/page-8#post-12843618

I will summarize our emails of today and recommend that documentation be changed to remove the part about unscrewing detent pin and to use the press in single stage (single station per Lee) mode relying on tip of detent pin guided by cone shaped bottom opening of the index holes.
BTW, wife did enjoy the "Philly cheese" sliders and her favorite milk/semi-sweet chocolate chip and walnut cookies. 😁 😘

Calvin at Lee Precision, Inc.
Staff - 02/27/2024 11:20 am​
Hello John,​
Thank you, glad we found a working solution. I will be sure to modify the instructions!​
We too have a good feeling about this press. I agree it is very solid and rigid press, all while having the ability to automatically index.​
Looking forward to the rest of your findings.​
Looks like you are quite the cook, I am sure the wife was very pleased!​
Calvin Katzfey​
Lee Precision, Inc.​

Updating index listing for Ultimate Turret Press:
Press Set Up:​
Press Disassembly/Reassembly and Swapping out 3/4/5/6 station Tool carrier/Turret:​
Single Stage mode operation:​
Troubleshooting and Solutions:​
Beta testing/Product development:​
Lee Precision Update Parts/New Products:​
  • < None so far >
 
Last edited:
I did some measuring and "stress testing" of primer collection tube/nipple.
  • UTP ram nipple measured around .590" OD and .625" OD at the tip
  • SPP ram nipple measured around .685" OD and .625" OD at the tip
  • Collection tube measured around .525" ID
I noticed top edge of tip ring was very sharp and likely meant to hold/lock the collection tube from increasing weight of primers as they accumulate. I checked the nipple surface for residual oil/solvent and they were essentially dry (I wiped them with paper towel anyways for testing)
Thank you for the measurements. I like the reasurance that the design was sound and it also gives me something (measurements) to look at if I get motivated

press location being warmer could perhaps soften the collection tube.
I'm thinking it is just a matter of the tube being new and not having settled onto the nipple before I started loading

If I had patience, I'd mount the tubes, hit them slightly with a heat gun and then let them cool before going forward...or...apply the hose clamp and let the natural temperature fluctuations in the garage cause the hose to form to the nipple
 
Update to post #187 - https://www.thehighroad.org/index.p...iguration-turrets.926488/page-8#post-12843973

I'm thinking it is just a matter of the tube being new and not having settled onto the nipple before I started loading
My test was done with brand new tubing that came with the UTP. For me, it was a little struggle to get the tubing on the nipple as it was tight to slip the end over the nipple. And the "stress test" was me tugging at the tube the last 20 cycles to where I felt resistance operating the ram lever (I was tugging that hard) and yet the tubing did not budge (I attribute this to sharp edge on top of nipple and tight fitting of tube).

That's why Calvin contacted the supplier, to see if anything had changed with the tubing.

Thank you for the measurements. I like the reasurance that the design was sound and it also gives me something (measurements) to look at if I get motivated
To cover all bases. could you measure the diameter of the nipple end and feel the top of nipple? And also check to see if any oil/lubricant had dripped down the ram onto the tubing/nipple?

If it measures .625" with sharp edge on top of nipple, we could rule out out-of-spec nipple and suspect tubing as the culprit.

If measurement is smaller than .625", that could be the reason for tubing walking off the nipple (If supplier reports back that nothing had changed with the tubing).
 
Last edited:
Sorry to hear the issue with RCBS shell holder not staying inside shell holder retainer. Hope you come up with a working solution.👍

Thus far, Lee shell holders I have tested have not moved out of position.

BTW, you do have the opening of shell holder pointing towards arrow on the ramp? If not, I could see case ejector pushing case and shell holder out of shell holder retainer.
The RCBS shell holder is staying in the shell holder retainer and not coming out, that’s not the problem.

The problem is there is not enough tension on it to keep it from rotating on top of the ram and getting out of position of the case eject arrow.

Good to know that the Lee shell holders stay put, however I don’t have any here to try. I have RCBS and a few Redding along with a couple Hornady shell holders. Any way looks like the shrink tube fix is keeping the shell holder from rotating. If I still have trouble with the RCBS will try and get a lee shell holder.
 
Update to post #190 - https://www.thehighroad.org/index.p...iguration-turrets.926488/page-8#post-12844495

That's why Calvin contacted the supplier, to see if anything had changed with the tubing.
Got following email response back from Calvin/John Lee:

Calvin at Lee Precision, Inc.
Staff - 02/28/2024 8:27 am​
Good morning John,​
Heard back from the tubing supplier, they have not had any change in material over at least the last 6 lots that we purchased. (That is all the further they looked back for me, but 6 lots is about 3 years)​
Following this information John and I had a conversation about barb design. We did change the design on the barb from the Classic Cast press line to the Six Pack and now Ultimate Turret. The newer barb on the Six Pack and Ultimate Turret Press is far superior and has been tested to withstand the cross bolt hitting the tube, in our experience it is very difficult to remove, which you confirmed. We are changing the Classic Cast series over to this same barb as the inventory rotates.​
PS. I believe there was a typo in your post, SPP ram nipple should be .585" not .685" OD I believe?​
Calvin Katzfey​
Lee Precision, Inc.​
(Typo correction: Yes, SPP ram nipple shaft should be .585", not .685" ... Post corrected)


Updating index listing with primer collection tube testing and supplier update:

Press Set Up:
Press Disassembly/Reassembly and Swapping out 3/4/5/6 station Tool carrier/Turret:
Single Stage mode operation:
Troubleshooting and Solutions:
Beta testing/Product development:
Lee Precision Update Parts/New Products:
  • < None >
 
Last edited:
I was still having trouble with the RCBS shell holder moving out of position for the case eject. The RCBS shell holders are pretty smooth and slip around on the ram more than some Hornady that have a more sandblasted finish. Had tried the o-ring under the shell holder retainer and it helped some, but made it hard to change shell holders so removed it.

My next idea was to try 1/8” shrink tube, so cut 2 pieces about 1/4“ long and placed them half way on each arm of the shell retainer. I did not shrink fit them to the arms as they worked real well without and provided some spring action from the rubber tube.

If this works out over time I will get another shell retainer and try shrinking the tube to the arms.

hope this is some help to those who might run into the same thing.
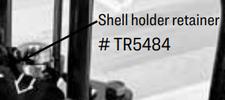
Have you removed the Shell holder retainer# TR5484?
It's basically a spring that puts pressure on the shell holder.
You may be able pinch it smaller to put more grip on the shell holder.

I have found the retainer that fits the hole in the ram to have a generous radius in the corner bend.
If the hole in the ram is not chamfered, the amount of the pin that contacts the shell holder will be diminished.
Slightly chamfering that hole (with a needle handle file) will allow the retainer to put more pressure on the shell holder.
1709137783674.png
I don't have an ultimate turret press but I have had to do this
on other press to tighten shell holder retention.
This type of mod may be beyond your comfort zone and understand why you may be hesitant to try it.
jmo,
.
 
Last edited:
Have you removed the Shell holder retainer# TR5484?
It's basically a spring that puts pressure on the shell holder.
You may be able pinch it smaller to put more grip on the shell holder.

I have found the retainer that fits the hole in the ram to have a generous radius in the corner bend.
If the hole in the ram is not chamfered, the amount of the pin that contacts the shell holder will be diminished.
Slightly chamfering that hole (with a needle handle file) will allow the retainer to put more pressure on the shell holder.
View attachment 1196849
I don't have an ultimate turret press but I have had to do this
on other press to tighten shell holder retention.
This type of mod may be beyond your comfort zone and understand why you may be hesitant to try it.
jmo,
.
Tilos the ram on this press does not have a hole for the spring clip like most other single stage presses. The shell holder fits in the ram the same way but the retainer has 2 arms that are above the top of the ram and around the major diameter of the shell holder this keeps the shell holder centered.

My problem is with the RCBS shell holders moving around because there is not enough tension from the retainer to stop it from rotating out of position for the case to eject properly. Looks like the 2 sort pieces of shrink tube on each arm has fixed this so I no longer have any issues.
Thanks for reading and responding to my post.
OK
I could not find a clear pic of that retainer and just assumed it look like most others, my bad.
Thanks for your explanation as how the retainer fits/works, it is crystal clear.
(the retainer has 2 arms that are above the top of the ram and around the major diameter of the shell holder)
I had read your shrink tube fix but thought this would be a more permenate solution but now knowing how the retainer works your fix is a simple/good one.
thanks again,
.
 
Last edited:
... this press does not have a hole for the spring clip like most other single stage presses. The shell holder fits in the ram the same way but the retainer has 2 arms that are above the top of the ram and around the major diameter of the shell holder this keeps the shell holder centered.
I could not find a clear pic of that retainer and just assumed it look like most others, my bad. Thanks for your explanation as how the retainer fits/works, it is crystal clear.
A picture is worth a thousand words and I have three pictures of "shell holder retainer" new to UTP operation:

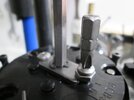
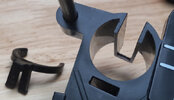
This is tool head with attached "shell holder retainer" removed from ram (Front of tool head shows two vertical fins that slide inside ram groove and why the tool head cannot be twisted off rather pulled straight up). BTW, detent pin is shown to the right of the "shell holder retainer"

UTPtoolhead.jpg

"Shell holder retainer" is snapped into slot on the backside of tool head. (Front of tool head showing two vertical fins and bottom bracket Calvin advised us to not break by prying with a flathead screwdriver)

UTPtoolhead1.jpg

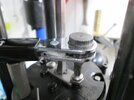
"Shell holder retainer" shown HOLDING THE SHELL HOLDER". If shell holder diameter is not large enough, fingers of "shell holder retainer" won't be able to hold the opening of shell holder towards the arrow on ramp where clockwise rotating case ejector pushes the case from right side.

UTPtoolhead3.jpg


Updating index listing with "Shell holder retainer and case ejector function" under "Auto Index/Progressive Operation":

Press Set Up:
Press Disassembly/Reassembly and Swapping out 3/4/5/6 station Tool carrier/Turret:
Single Stage Mode Operation:
Auto Index/Progressive Operation:
Troubleshooting and Solutions:
Beta testing/Product development:
Lee Precision Update Parts/New Products:
  • < None >
 
Last edited:
A picture is worth a thousand words and I have three pictures of "shell holder retainer" new to UTP operation:

This is tool head with attached "shell holder retainer" removed from ram (Front of tool head shows two vertical fins that slide inside ram groove and why the tool head cannot be twisted off rather pulled straight up)

View attachment 1196880

"Shell holder retainer" is snapped into slot on the backside of tool head. (Front of tool head showing two vertical fins and bottom bracket Calvin advised us to not break by prying with a flathead screwdriver)

View attachment 1196881

"Shell holder retainer" shown HOLDING THE SHELL HOLDER". If shell holder diameter is not large enough, fingers of "shell holder retainer" won't be able to hold the opening of shell holder towards the arrow on ramp which pushes the case by the rotating case ejector.

View attachment 1196879
Thanks for the pics.
I see now that is not even a wire, just a plastic partial ring.
@jrumsey and I have already discussed this.

Thanks again for the pics.
When I blew-up the manual pic it got all pixilated.
I just now down loaded those awesome pics.
.
 
Last edited:
Continued from post #196 - https://www.thehighroad.org/index.p...iguration-turrets.926488/page-8#post-12844925

Thanks for the pics. I see now that is ... plastic partial ring.
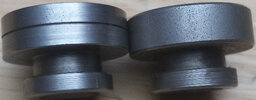
Another thing to consider is #4 shell holder for .223 UTP kit came with modified shell holder that has a "cut step" above the line of shell holder retainer fingers to allow case to slide out of shell holder without getting caught on the retainer finger.

#4 shell holder that came with .223 UTP kit on the left (With "cut step") and regular Lee #4 shell holder on the right

UTPdieclose1.jpg

While regular shell holder provides a tight fit to hold the retainer fingers below the case rim on the left, cut step of new shell holder helps keep retainer fingers below the case rim (And it is likely why the shell holder retainer is "free floating" with two clip legs so it can work with regular shell holder and not have fingers riding up to block sliding case rim for auto case ejection).

UTPdieclose2.jpg

Also, notice opening of UTP shell holder is different where TOP of holder is NOT CUT while regular shell holder opening is cut. This was likely done to help case rim slide above the shell holder retainer fingers.

UTPcutstepSH.jpg

Updating index listing with "Free-floating shell holder retainer and cut stepped shell holder" under "Auto Index/Progressive Operation":

Press Set Up:
Press Disassembly/Reassembly and Swapping out 3/4/5/6 station Tool carrier/Turret:
Single Stage Mode Operation:
Auto Index/Progressive Operation:
Troubleshooting and Solutions:
Beta testing/Product development:
Lee Precision Update Parts/New Products:
  • < None >
 
Last edited:
Another thing to consider is #4 shell holder for .223 UTP kit came with modified shell holder that has a "cut step" above the line of shell holder retainer fingers to allow case to slide out of shell holder without getting caught on the retainer finger.

#4 shell holder that came with .223 UTP kit on the left (With "cut step") and regular Lee #4 shell holder on the right

View attachment 1196888

While regular shell holder provides a tight fit to hold the retainer fingers below the case rim on the left, cut step of new shell holder helps keep retainer fingers below the case rim (And it is likely why the shell holder retainer is "free floating" with two clip legs so it can work with regular shell holder and not have fingers riding up to block sliding case rim for auto case ejection).

View attachment 1196887

Also, notice opening of UTP shell holder is different where TOP of holder is NOT CUT while regular shell holder opening is cut. This was likely done to help case rim slide above the shell holder retainer fingers.

View attachment 1196891

Updating index listing with "Free-floating shell holder retainer and cut stepped shell holder" under "Auto Index/Progressive Operation":

Wow, if I'm reading that right, a special shell holder for the UTP.
I never had a turret press but do recall an aftermarket kit that reversed the index rotation and had a finished round ejector on the index rod for 3 and 4 hole presses, that ejected from a standard shell holder.
.
 
... if I'm reading that right, a special shell holder for the UTP.
Looks like Lee designed the shell holder retainer to work with regular Lee shell holders from tight friction fit and "floating" shell holder retainer (When used with regular Lee shell holder, retainer fingers hold the shell holder tight while the "floating" clipped feet move in the slot.

But the new UTP shell holder that came with the kit has the cut step to better ensure the retainer fingers stay below the sliding case rim while retainer fingers move below the cut step.

Both features designed to allow case rim to slide above the retainer fingers onto the ramp/box bin instead of getting caught/blocked by the retainer fingers.
 
Back
Top