Press Mounting: Lee Bench Plate, Pat Marlin's ROCKDock?

Status
Not open for further replies.

Jumping Frog

Member
Joined
Dec 25, 2007
Messages
321
Location
Texas
I am planning on building a new reloading bench, and want more flexibility on mounting presses or other accessories to the workbench.

The Lee Bench Plate system started me thinking along these lines, but I am not sold on their product because I am concerned about a wooden base blank cracking (I have cracked a workbench top before). Actually, I should say that I am not even considering the Lee, but I am looking for alternatives.

90251.jpg

Then I stumbled across the Pat Marlin ROCKDock system.

turrets1small.jpg


out550small.jpg

It seems far more solid, will also work with non-Lee products, and is only about $20 more than the Lee.

Anyone have real-world experience with a docking-style press mount system have recommendations regarding these two -- or any similar -- products?
 
I actually came across pat's 2 days ago and it got me thinking about just making my own. looks like you could do it pretty easy with some steel plate. but I would choose it over lee myself.
 
I use a Rockdock for my two presses, a Lee turret and an old C-H single stage. Works great...
 
Hey Jumping,

I cannot tell you how many benches I have made in the last 50 years considering how many times we have moved. Every time I made a new bench I seemed to make it bigger and stronger. It kept getting bigger because I kept getting more presses. My last home was on ten acres of farmland, the basement was over 100 feet long, and I had an indoor shooting range adjacent to my loading bench. That bench was about 20 feet long, and I found I had still run out of room after mounting six shotshell presses and four metallic presses.

We moved in 2005 to our present home in 2005, and I did not have as much room to make a new bench. I figured I was pretty good at making strong benches, but I had never done anything to make better use of limited bench space. I had priviously mounted my Hornady L&L progressive press on a 1/4 inch steel plate bolted to the bench to make it more solid. Then I got the idea of using two steel plates to mount all my presses. The idea was that I would only ever have two presses mounted on the bench at a time, and I would keep all the other presses sitting closely together on a wall shelf to the side of the bench. Any two presses being used on the steel plates on the bench would have ample room for working comfortably.

A friend of mine gave me two pieces of half inch steel plate, each 12" deep and 16" wide, and I used a file to smooth off all the sharp edges to keep from getting cuts on the fingers. I bolted each corner of the plates solidly into the under frame using 3" 3/8 lag bolts. Those four lag bolts held each half inch steel plate as solid as can be, and I now had two steel plates which could be used to mount all my presses. How? It took a little time, but it really was pretty easy. I simply set a press on the first steel plate, marked the plate for mounting holes and then drilled holes completely through the plate and into the bench top. I then tapped the holes for 3/8" bolts which would then solidly hold the press to the steel plate. I drilled and tapped mounting holes for each press, and I did the same thing for each steel plate. That way, I can mount any press on either steel plate.

Some of the presses used four holes and bolts, and other presses used two hole and bolts. I used 3/8" bolts for the big two hole mounted presses, but I used smaller holes and bolts for my Hornady 366 presses which had four holes. For my MEC Sizemaster machines, I only needed 1/4" bolts for their four holes. I have three shelves mounted above the length of the bench. At each steel plate, I have a set of each size bolts which are stored closely together in holes drilled into the wood face strip of the lower shelf. I can put a press on a steel plate, get two bolts from the shelf face behind the press, screw them into the plate, and tighten them with a socket wrench I keep there all the time. When I am done with that press and want to put another in its place, I take the bolts out and put the press back on the wood shelf where they are held safely with smaller lag screws instead of bolts.

I can assure you that 1/2 inch steel plate makes any press rock solid - especially when it is secured with steel bolts directly into the steel plate. I do use a lock washer and flat washer between the bolt head and the press body. It only takes a few minutes to switch presses on a steel plate, and I do not need to get adapter plates for each press. It also saves a lot of room on the bench rather than mounting all you presses side by side. When designing the bench, I had enough room to use three steel plate mounts, but I thought I really could get by quite well with just two, and I would then have more room for other loading work. The half inch steel plate is also a lot more solid than the aluminium unit you found elsewhere, and it is a whole lot cheaper. You just have to spend a little time drilling and tapping your holes exactly where you prefer them to be.

I should have thought of the steel plate idea many years ago. I just kept making bigger benches for more presses every time I moved to a new home. With this place, my bench is down to 12 feet in length, but I now have more working room than ever before.

Best wishes,
Dave Wile
 
The rock dock works great. I have 4 presses mounted to them and I find the manufacturer very easy to work with. No problems and I highly recommend it.
 
Or you can make your own setup with T-track and you still have a totally flat bench top when press is removed. I used 3/8 track and is rock solid
IMG_20111113_102649.jpg
[/IMG]
My press plates are made from two 3/4" hard wood plywood glued together then trimmed and router-ed. very strong
IMG_20111113_102659.jpg
[/IMG]
I guess you could make the press plates from steel or aluminum if wanted
 
I simply set a press on the first steel plate, marked the plate for mounting holes and then drilled holes completely through the plate and into the bench top. I then tapped the holes for 3/8" bolts which would then solidly hold the press to the steel plate.
I've been pondering this. I think it would be difficult for me to mark the holes, drill and tap them accurately enough without a drill press.

Before, when I was simply mounting bolts drilled though wood, my holes were a little bigger than the bolt dia. to give me a little "slop" to have everything fit together.
 
Hey Bob,

It really is not difficult at all. Put the press where you want it to go, put a dot in the center of where you want your hold down holes with a felt tip pen, take the press away, drill your first hole with an 1/8 inch bit, then your full size hole, and finally use a tap and WD-40 to cut your threads into the hole. I did them all with a 3/8" variable speed hand held drill, and I did not break one bit nor one tap, and that is pretty good for me. Normally I would break a few 1/8" bits. It does work best if you drill through the bench as well as the steel plate. That way the cuttings fall through.

I will try to take some pictures in the next few days and see if I can figure out how to post them on the thread. It really makes it easy to switch presses out without taking up bench space, and I also mount my Lubrisizer on the plate. With a half inch steel plate that big, you do not have to worry about your progressive presses being mounted solidly. They do not move.

Best wishes,
Dave Wile
 
Or you can make your own setup with T-track and you still have a totally flat bench top when press is removed. I used 3/8 track and is rock solid

My press plates are made from two 3/4" hard wood plywood glued together then trimmed and router-ed. very strong

I guess you could make the press plates from steel or aluminum if wanted

Well, I wanted to follow up by thanking you for the idea. That is what I ended up doing.

I countersunk the press mount bolts so that the plate sits flush on the bench. It is a 1/16 steel plate backed by 3/4 inch oak plywood.

DSCF4217.jpg


DSCF4218.jpg

DSCF4219.jpg
 
Are there any issues with concentricity by using the press in something like the Rock Dock vs just bolting it to the bench? I am intrigued by the possibilities. Does the Rock Dock hold up over time?
 
I haven't noticed any issues with the RockDock. I use it on several items.

Normally my turret press sits in it, but I remove it on occasion for a single stage or a bullet sizer.

You can crank it down pretty snug if you like. The press doesn't move at all.
 
Since I originally posted my above pictures, I replaced that thin steel sheet with a 3/8 inch aluminum plate with the same wood backing.

In general, a progressive press puts more average stress on a press mount than a simple single stage press. This has been absolutely rock solid and a real pleasure to use.

If a progressive press is not absolutely solid, with any rocking or movement during cycling, then it can be at risk for the on-press priming to be less reliable. Flipped or crushed primers can be the symptom.

Thankfully, my priming has been very reliable with this solid press mount.

A03D894F-DF6F-49D4-A0D3-B92936093E95-29780-00002AF80404A6DC_zps85eff2dd.jpg

D825BBD1-CF5A-4622-A169-8FA431563610-25607-000024C2ABCAA3AE_zpsbb946d74.jpg

C69901E0-A447-4247-AB68-3BBE30EF60FD-26379-000025CBBF113A6B_zps750fbf99.jpg
 
I use the Lee Bench Plate, but in a modified form. I had endless problems with the wood plates working loose, especially during heavy duty resizing and not allowing my presses to mount deeply enough. Lee supplies a thicker gauge bent metal plate, but my LNL AP would not fit any of the pre-drilled holes as it is drilled for Lee press bolt patterns. I mounted to the wood, but it did not support the press very well because it was hanging so far out.

First, I went to socket head screws to get more torque over the phillips head screws that were included. This marginally improved the situation as I was tightening the screws less frequently. But it still came loose.

Next, I decided to make the plates out of 3/4" carbon steel plate. I drilled and tapped the plates for the required patterns and installed studs with lock nuts or lock washers to mount the presses. I used tack welds at the front of the plates to prevent them from slipping past the Z-brackets if it came loose. I ground the brackets a little to clear the welds when installed. On the plate for the LNL AP, I made a little shelf that came out to support the press at the point Hornady states in their instructions.

Now it works great. All I had to do was change nearly everything!

If I do one more thing, it would be to mill the area that the brackets clamp down on a little/ It looks like the full 3/4" plate is a little thick but it never comes loose.

ETA: I dovetailed a slot in my bench top to change out accessories on different blanks and it has worked well for me. It can be seen in the bottom left of some of the photos.
 

Attachments

  • DSCF0668.jpg
    DSCF0668.jpg
    94.8 KB · Views: 39
  • DSCF0710.jpg
    DSCF0710.jpg
    135.8 KB · Views: 44
  • DSCF0711.jpg
    DSCF0711.jpg
    114.9 KB · Views: 34
How much do you like your knees? I've pulled my press into my lap a few times using the Lee wooden bench plates. I think they have metal ones now that maybe are a little more secure.
 
Hey 119er,

Back in December of 2011 I wrote a post on this thread that described what I did when I moved to our new house in 2005. I had about ten presses (six shotshell and four or five metallic) mounted on a very big bench at our old house, and I simply did not have the room to have that many presses mounted at the new house.

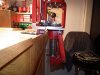
Over nearly 50 years of reloading by 2005, I had made a lot of reloading benches at numerous houses. With our new house in 2005, my new bench was only 12 feet long, and I decided to try a new idea of only mounting two presses at any one time, but I would make it so the presses could be switched out very quickly and easily while still being mounted on a rock solid platform. The remaining presses that were not in use were stored closely together on a shelf on the side wall. This allowed much more work room on the 12 foot bench with only two presses mounted at any one time.

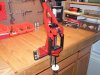
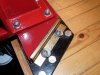
The key to having two quick change press mounts was two pieces of half inch steel plate, each 12" deep and 16" wide. After bolting each plate securely to the bench about 4 feet apart, I now had two rock solid steel platforms to mount all my presses. I set each press on the steel plate, marked the center of each press mounting hole with a felt tip pen, then drilled and tapped each of the holes. I drilled completely through the steel and the wood bench to make the tapping easier for the cutting to fall through.

For presses with only two mounting holes like the RockChucker, I tapped holes for 3/8" bolts. For presses using four mounting holes like my Hornady 366s and MEC single stages, I used smaller 1/4" bolts. In the face of a wood shelf in front of each steel plate, I drilled appropriate holes and store the different sized bolts for the different sized holes in the plates.

I can put a press on a steel plate, get the appropriate sized bolts from the shelf face behind the press, screw them into the plate, and tighten them with a socket wrench I keep there all the time. When wanting to change a press out, I take the bolts out, put the press back on the storage shelf, and install the next press.

I can assure you the 1/2 inch steel plate over a solid reloading bench makes any press rock solid - especially when it is secured with steel bolts directly into the steel plate. I do use a flat washer between bolt hex heads and the press body. It only takes a few minutes to switch presses on the steel plates, and there is no need for adapter plates for each press.

Using half inch steel plates that you custom drilled and tapped for you presses is far more solid than the aluminum units sold commercially, and it is a lot less expensive. You just have to spend a little time drilling and tapping your holes exactly where you require them.

In response to Photosaurus, no, the bench does not flex. I make really heavy duty benches, and the steel plates make for a super solid bench which you really need if you are using progressive presses.

As I noted earlier, I just made these steel plates and the new bench when we made our "downsizing" move in 2005, and I figured that would be my last bench. Wrong! We downsized again this year when we bought a townhouse with no basement and no stairs to go up and down. Once again I built another reloading bench which I hope will be my last. While the bench stayed in the last house, the steel plates came along with me to be used on the bench in the new house. Where does one make a reloading bench in a townhouse? First it is a fairly big townhouse at about 1,700 square feet of non-garage living space, and it does have a two-car garage that is big enough to build a bench on my side of the garage. Yes, we still have enough room to keep both cars inside.

I would recommend using the steel plates for anyone. They really are rock solid, simple to make, and less expensive than other more complex commercial systems. You just need to drill and tap your mounting holes, and that is not really hard to do.

Best wishes,
Dave Wile
 
Hey David,

My next step was going to be a direct mount like you stated. The four socket head bolts are really feeling the strain from repeated tightening and loosening. I drilled deeper into my bench top like you mentioned for clearance of the longer socket head screws I installed. The base plate is only about 3/16" thick and there is not many threads to take the wear and they are getting loose.

My next step will likely be a rectangular plate like you have. I will probably use 3/4" plate as it is easier for me to come by.:evil: I will then use a router to remove bench top material similar to the way I did the dovetail, without the bevels. I will countersink the holes to flush mount the bolts to attach it to the bench top and have it already drilled and tapped for my presses.

My bench doesn't flex at all. It is laminated 2X4's, screwed and glued together. That assembly is screwed to a 3/4" plywood sheet underneath. I trimmed it with red oak to have a more resilient edge. Even after using a jointer to true up the 2X4's, I spent about two weeks after work with a hand held plane/belt sander/orbital to get it level. It is on a 5' sink base that I reinforced heavily. I built a riser on the bottom and covered it with oak veneer. The whole thing is screwed to the wall studs. My first session after the seasons change always make the studs pop as they settle.
 
:eek:I just realized how old this thread is!:eek:

Jumping Frog, glad you found a solution that worked for you!
 
Hey 119er,

As far as I am concerned, half inch plate is great, but if I could get three quarter inch plate, that would be even better. This may be obvious, but I think I will mention it anyway. When drilling and tapping holes for mounting presses, I think it is best to drill and tap all the way through the steel plate. Again, not just drilling through, but also tapping all the way through the plate. When drilling plate holes, I also drilled all the way through the 2 3/4 inches of wood material that made up the actual bench top.

Another thing to consider when drilling holes in the plate is to make sure your holes are not too big for the tap you will be using. You need to use the right size bit for the tap you intend to use. If your bit is too big for the intended tap, it will make the tapping process easier, but your bolts will fit sloppy and not hold fast as intended. I would also suggest drilling and tapping your mounting holes after you securely mount the plate to your bench. Some presses like the RockChucker (and others) may need some adjustment for clearance of toggle linkage.

Now that we moved to our townhouse this year, I secured one plate near the corner of my bench, and I drilled and tapped it so I could also mount a really heavy duty vice to it. My only problem with the vice is that it is so heavy I dread having to remove it to use for a press. When you downsize so much, however, you have to expect to compromise somewhere.

Best wishes,
Dave Wile
 
Status
Not open for further replies.
Back
Top