• You are using the old High Contrast theme. We have installed a new dark theme for you, called UI.X. This will work better with the new upgrade of our software. You can select it at the bottom of any page.

Spiller & Burr modified Pietta replica pics

Status
Not open for further replies.

kwetu

Member
Joined
Jul 31, 2009
Messages
19
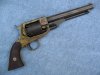
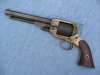
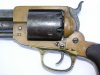
This is the S&B I assembled from the Pietta kit. I have modified the recoil shield, trigger guard and a few other things as well as removed all the cr*p that Pietta stamps all over the barrel by draw filing. The mods were done to try to get it to look more like a genuine S&B. I then stamped CS on the LH side and aged the gun. My plan was to try and create a very old looking original Civil War revolver. She shoots very nicely but I had to replace the front sight with a taller one to get her to shoot to POA.
kwetu
 

Attachments

  • S&B Replica 1.jpg
    S&B Replica 1.jpg
    186.1 KB · Views: 108
  • S&B Replica 2.jpg
    S&B Replica 2.jpg
    199.7 KB · Views: 101
I was hoping no one would ask that question. To tell you the truth I cannot remember. I built the gun back in 2005 and I know I tried quite a few things to try and age it. The one was “barrel washings”, water from cleaning the barrel of a BP gun after shooting. That turned the brass a reddish colour, which while interesting was not really what I had in mind. I think in the end I used browning solution (home made from an old British recepe). I think that I coated the brass with the solution every time I removed the steel parts from the damp-box where they hung while slow rusting. After the browning was complete I removed most of it in uneven patches using fine steel wool. After everything had been rinsed and oiled and the gun put away I discovered some time later on taking the gun out of the safe that the cylinder had developed a severe secondary rust – don’t ask me how as it had been oiled – anyway it was almost ruined but fortunately there was no rust in the chambers, only the outside of the cyl and after I had carded it down and used soda to make sure that there was no acid left on it it actually resembled a very old relic so that was probably a good thing. It didn’t have any effect on the guns working and she shoots very nicely. I normally use a load of 24 grains FFFg behind a .375 RB and she’s a pleasure to shoot.
kwetu
 
Isn't 24 grains of FFFg putting a dent in the recoil shield? I though 15~20 was the recomended load. Or perhaps you're using a weak powder?
 
I use Wano powder and haven't noticed any problems with the brass frame. There are no marks on the recoil shield caused by the cylinder, but this gun has minimal end shake. I would think that trouble would only arise if the cyl has some fore and aft movement which would allow the cyl to slam into the recoil shield at every shot. Modern brass has a tensile strength of about 36k psi and the wrought iron of the originals only had a tensile strength across the grain of about 40k psi so I don't anticipate any problems.

Madcratebuilder that's a very nice original you have, and you've done a lovely job on your replica.
kwetu
 
Thanks. What did you use to get that flat finish in the cylinder? I finally ordered a set of letter stamps from midway. I think I well add the C.S. to my repro.
 
I'm not sure what you mean by 'flat finish'. All I did was rust brown all the steel parts and the cyl started rusting again all by itself after everthing was finished. It rusted very heavily on the outside while in the safe and was crusted in rust when I took the gun out after a week or two. I hadn't expected this to happen and hadn't been inspecting the gun on a daily basis, which is why it managed to rust so heavily. I had no option but to just scratch the rust off with steel wool and hope for the best. I then used bicarbonate of soda to neutralise any acid before oiling heavily. This time I examined the gun daily for a month as I didn't trust it and almost expected the rust to start up again. Fortunately it never did.
kwetu
 
Here is another original, apparently stored in a Tennessee horse barn for a very long time. The reddish cast to the frame is because it is a bronze alloy, 88%Copper 6%Tin 4%Zinc 1.5%Lead, residual nickel. Trigger guard is a Confederate replacement, by the marks inside and the odd chemistry--copper/zinc brass containing 1% silver. When you got a reddish color from odd chemicals on your Italian frame, that was because sometimes the zinc preferrentially corrodes out, leaving mostly copper behind. See this on old plumbing fixtures continually immersed in water.

Love those defarbed Piettas, looking to get one now. Like the small grip frame, fits my hand.
 

Attachments

  • SpillrBrrLftFrameSmallFileN0764.jpg
    SpillrBrrLftFrameSmallFileN0764.jpg
    673.1 KB · Views: 44
I've wondered about the composition of the original frames because they are definately not the same colour as modern brass. Never would have guessed that they used a bronze alloy. Perhaps they wanted to increase the strength of the brass seeing as how the first design cracked in use.
kwetu
 
How would you stamp letters into a frame? Would you heat the metal first, or just pound away? The CSA was stamped on my repro S&B at some point:
S4020029.gif
 
Well, I'd use a steel head hammer to keep from leaving indents in the face of the plastic no-bounce but yeah.....

Practice on scrap metal first and it's not a bad idea to figure out how to clamp on a bit of metal or wood as a guide so they all sit on the same line and don't get a lean to them.
 
Which ever way you go pohill, a metal faced or non marring type of mallet, make certain you use the "dead blow" variety.

Bronze and brass are relatively soft metals. I bet you'll be surprised at how easy it is to impart nice lettering onto those frames.
 
You can do a few practice stamps by removing the wood grips and using the grip frame area.
The horrible freight stamps well work with brass but not to well on steel. You need a set from battenfeldtechnologies.com if you want to stamp steel. PRACTICE, you only get one shot at this. Nothing looks worse than a poor letter job.
I lay out tape and use tic marks. The spacing of the tic marks depend on the letter. Take your time and you can do a professional job.
 
Best not to heat any brass-type alloy, especially a casting, to work on it. It will be softer thanyour steel stamp anyway.

Some brass bar & sheet contains lead to improve machining, and many castings have some lead to reduce porosity.

If you heat some lead-bearing brass to, say 671F or higher, the lead melts & runs between the crystals of brass. Translation--the piece crumbles.

Some who have heated brass Kentucky rifle trigger guard castings to bend them learnt this the costly way.

Also if you want to nicely fake those "CS" markings you need an older style stamp where the letters have serifs (seraphs?). I would like to know where to obtains such stamps, myself. The originals were marked "CS" and not "CSA" Two originals are shown in this thread to date, one of which is for sale at collectorsfirearms.com
 
James thats a good question and short of having them specially made I doubt that one could obtain correct style stamps commercialy. I have thought of taking a sharp engraving tool and a big magnifying glass on a stand and then engraving the serifs onto the stamped CS. I don't think one could achieve the correct style lettering any other way and although difficult, it's not impossible.
 
Some brass bar & sheet contains lead to improve machining, and many castings have some lead to reduce porosity.

If you heat some lead-bearing brass to, say 671F or higher, the lead melts & runs between the crystals of brass. Translation--the piece crumbles.

Do you know of any way to determine if the brass you are working with has lead content, short of a metallurgy test?

I looked for a set of serif stamps and was unsuccessful. Hand engraving would be one solution. My eyes are not up to that anymore.


Blame it on the Kelley's.
 
Another option. A lot of engraving businesses that use a pantograph machine have various sets of type on hand. If this is only going to be a one-time thing it may work out cheaper to have it done at a trophy shop rather than buying a set of punches that are of an incorrect font anyway. My first job out of high school (1970s) was as an Industrial Engraver, & I can remember using various font types, including ones with serifs. Even if the shop doesn't have a serif font type it wouldn't be a big deal to add them 'freehand' while the revolver frame is still set up in the pantograph. Just a thought.
 
That is a fine looking job on your revolver! A word of advice about heating brass to make it softer. I bought what I thought was a large solid brass belt buckle for a holster I was making. I tried to bend the buckle because it was rather flat so I thought I would just heat it up with a propane torch and quench it to soften the brass. I didn't have the flame on the buckle for twenty seconds and it dissolved into a glob of molten metal. To this day I have no idea as to the composition of the buckle but after reading some of the post here I bet lead was part of it.
 
Status
Not open for further replies.
Back
Top