JimGnitecki
Member
- Joined
- Mar 28, 2010
- Messages
- 1,258
I've had my forster press for a few years now and had never noticed a screw, which I'll refer to here as a "securing screw", that is located on my Forster press, within the head, to the operator's left.
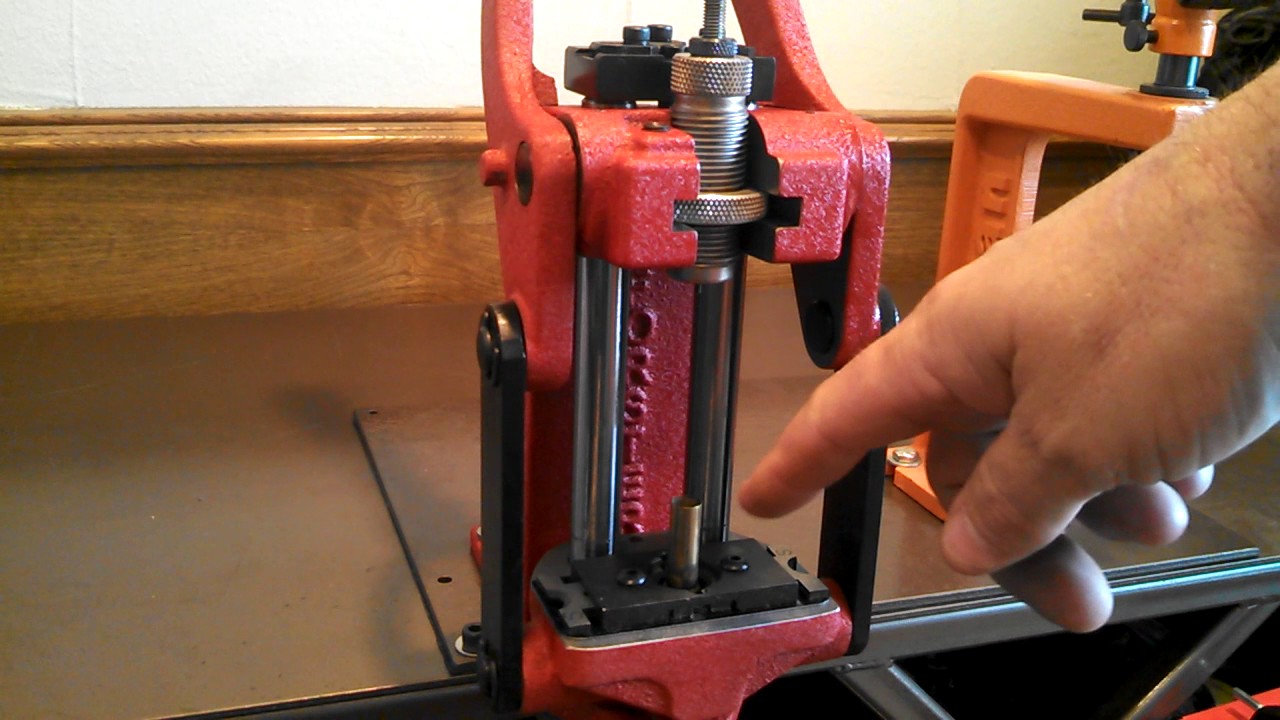
You can see the screw just to the left of my micrometer seating die in this photo:

That screw was not documented in the paper instructions that came with my press, but IS mentioned in one of the 40 or so videos that Forster provides on its website.
Apparently, its purpose is to enable the operator to tighten it down vertically to secure the die lock-ring on a die so that the die cannot inadvertently slide towards the operator and potentially right out of the press.
I am puzzled as to WHY Forster provided this feature. I do realize that any die lock-ring, even a genuine "Forster" die lock-ring, has to have "clearance in order to slide in and out of the press. But that clearance does not "matter". I say this because when you pull the handle down, the shellholder pushes the case into the die, and any "slack" between the top of the die ring and the press head is automatically eliminated, AND the die is guaranteed to be perfectly vertical, because the top surface of the die ring is pushed into a perfect zero clearance position, all around its circumference, against the head of the press.
BUT, if you actually thread this "securing screw" in to exert pressure on the die ring while the shellholder is in the DOWN position (i.e. handle is NOT pulled down), you will COCK the die as you take up the clearance on ONLY that ONE location on the circumference of the die ring!
In addition, you will then be preventing the die from aligning itself horizontally with the case being lifted into it.
If you just leave the screw UNengaged, the shellholder, the case, and the die will all automatically align, AND the case, or ogive of the bullet, will always be stopped at EXACTLY the same height, when the top of the die lock ring hits the frame of the press.
So, what am I missing here? WHY does Forster provide that screw?
Jim G
You can see the screw just to the left of my micrometer seating die in this photo:
That screw was not documented in the paper instructions that came with my press, but IS mentioned in one of the 40 or so videos that Forster provides on its website.
Apparently, its purpose is to enable the operator to tighten it down vertically to secure the die lock-ring on a die so that the die cannot inadvertently slide towards the operator and potentially right out of the press.
I am puzzled as to WHY Forster provided this feature. I do realize that any die lock-ring, even a genuine "Forster" die lock-ring, has to have "clearance in order to slide in and out of the press. But that clearance does not "matter". I say this because when you pull the handle down, the shellholder pushes the case into the die, and any "slack" between the top of the die ring and the press head is automatically eliminated, AND the die is guaranteed to be perfectly vertical, because the top surface of the die ring is pushed into a perfect zero clearance position, all around its circumference, against the head of the press.
BUT, if you actually thread this "securing screw" in to exert pressure on the die ring while the shellholder is in the DOWN position (i.e. handle is NOT pulled down), you will COCK the die as you take up the clearance on ONLY that ONE location on the circumference of the die ring!
In addition, you will then be preventing the die from aligning itself horizontally with the case being lifted into it.
If you just leave the screw UNengaged, the shellholder, the case, and the die will all automatically align, AND the case, or ogive of the bullet, will always be stopped at EXACTLY the same height, when the top of the die lock ring hits the frame of the press.
So, what am I missing here? WHY does Forster provide that screw?
Jim G