Who here has built a flintlock pistol?

Status
Not open for further replies.

brentn

Member
Joined
May 17, 2007
Messages
870
Location
Canada
I have been looking on www.trackofthewolf.com at their flintlock pistol kits and really want to try this out.
kit-kentucky-pistol-13-l-flint_1.jpg


I'm hoping there are a couple of you out there that have built flintlock rifles/pistols online and I have some questions before I jump into this.

Looking at the stocks, I can see that some of them have inlets for the lock, and others don't. Because I don't have the tools or skill to properly cut one out or cut it out to exact dimensions, I've decided to get a kit that has a pre-cut inlet.

I've also looked at the barrel options and they offer fitting of the breech plug and crowning of the barrel, also options for sight installation. Becuase I don't have any staking tools/skills for sights/crowning, I'll have the option to have this done.


-Does the inlet need to be worked further for 'fitting' of the lock, or is it a drop in?
-Why does the breech plug require fitting? doesn't it just screw in?
-Where is the flash hole drilled, in the breech plug or the barrel?
-how you know exactly where to punch for the hole? Does it come with instructions, pictures, or do you just do it by eye?


I would love to do this with my dad, he's a jack of all trades and knows his stuff when it comes to construction of pretty much anything. I asked him earlier and he said that he'd love to help me out with it, so I think that for the skills that I lack, he can teach me the rest.

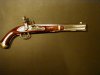
If any of you guys have pictures of some of the ones that you have assembled and finished, I would love to see them. I also appreciate any answers/suggestions you have.

THANKS!
 
I'm not sure about the stuff on trackofthewolf and I can't help with your specific assembly questions.

My father has built two kit pistols over the years (cap, and flint) but they were lyman kits IIRC. One was his christmass present when I was maybe 6, and the other I bought him for christmass years ago. Watching/helping him build those are my only experience and it may not carry over to the trackofthewolf stuff... but here it is for what it's worth:

The problem with kits is when they start you off with too little material. Not too few parts, but parts that have been taken too close to final shape. They do that to make things easier of course... the lyman kits could be assembled straight out of the box and fired... but if you want to do a good job of fitting and finishing it is frustrating when you don't have enough raw material to work with. If the inletting is loose enough that you can drop the lock in, that means you can hardly finish the stock without rounding off the inletting and ruining the wood/metal fit. (We came up with a partial work-around for that...on the second kit I gave him some of the epoxy putty they sell in tubes (looks like modeling clay) and we made plugs to fit into all the inletted openings in the stock. That way the stock could be sanded and finished without rounding down the inletting excessively.) It still would've been better if they'd left more material.

It looks like trackofthewolf kits address many of the issues by doing less of the fitting work beforehand. That means you can assemble a tighter and better fitted gun, but of course it also means more work and skill required. In my father's case he was more disappointed by the sloppy fitting he couldn't correct than he would've been put off by more work (he put an incredible amount of time into reshaping and finishing those kits but there's a perfectionism issue there).

Not sure that helps much....
 
The lock still needs to be fitted. What John House taught me was to find the highest part (the part that will set the deepest in the wood-generally the screw head for the sear and then the centerpin for the bridle) and drill it out (you mark the drill with tape so as not to overdrill). Repeat the process successively (probably bridle, screw for fence-depends on the lock). Carefully chisel away the wood such that you can sink the lock into the wood. Leave as much wood as you can since you don't want to unnecessarily weaken the wood.

On the breechplug, that is screwed in. What you have to do is to note the relation of the end of the plug and the barrel. Once the barrel and tang are fitted into the wood, the end of the breechplug determines where you mount the lock. After the barrel/tang and lock are mounted, you determine where to drill the touchhole (flashhole).

The touchhole is drilled such that the drill bit clears just the end of the breechplug (that's why you mark the exterior of the barrel where the end of the breechplug is at). Buy yourself a White Lightnin' touchhole liner from Jim Chambers (Siler Locks) (Track of the Wolf also sells them). They're the best for quick ignition (faster lock time). You drill a little pilot hole and then a larger hole which you thread to install the liner.
 
Because I don't have the tools or skill to properly cut one out or cut it out to exact dimensions, I've decided to get a kit that has a pre-cut inlet.
You will need a few tools at a minimum, even with a pre-cut inlet there is work to be done. The barrel channel needs to be squared off for the barrel end to fit, for example. A set of chisels would be a big help here. Also, You can't own chisels without a method to sharpen them. A dull chisel WILL ruin your work.

-Does the inlet need to be worked further for 'fitting' of the lock, or is it a drop in?

See above
-Why does the breech plug require fitting? doesn't it just screw in?

Yes, it does just screw in, but you have to fit it properly. This plug/tang directs all of the force of the expanding gases away from it, so it better be fitted right. Your face will thank you. The plug has to line up with a barrel flat with zero gap. Also, the front face of the plug has to mate with the end of the threaded portion of the barrel. The threads are cut with a bottoming tap, so they run all the way to the bottom where the rifled barrel begins. If you plan to do this, you need files and a bottoming tap and die set.
-Where is the flash hole drilled, in the breech plug or the barrel?

Could be both. On my last pistol, the lock/barrel geometry was such that I had to file a notch in the breech plug. Generally, the barrel is drilled for a flash hole. I would recommend a liner, such as the Chamber's White Lightnin'. This adds more tools to your list: drill press with proper size bit, tap, and tapping cream. TOTW sells all of this.
-how you know exactly where to punch for the hole? Does it come with instructions, pictures, or do you just do it by eye?

The touch hole has to be positioned at the "sunset" position in relation to the flashpan. This takes a lot of pre-planning, and may be dictated by your lock mortise if it's pre-cut.

Look, you need a good book to guide you, or a better forum before you even unpack your kit. Check out:

"Recreating the American Longrifle" by William Buchelle, George Shumway, and Peter Alexander.

http://www.americanlongrifles.com/Books_frame.htm

http://muzzleloadingforum.com

Here's my last pistol:


This is a .32 cal 12" bbl w/a small Siler lock. I got the wood from MBS and the bbl from TOTW. All other parts came from TOTW. This one took me 5 months to build, off and on.
 
http://www.dixiegunworks.com/produc...d=965&osCsid=aebbe5a69aed1ea36c6ebff780d7f666

The TotW guns are nice, but may be more than you want to get into for a first build. Dixie has several kit rock-locks that have most of the hard and critical work already done for you.

I built the Harpers Ferry and it came out pretty nice. Took WAY longer than it looked like it would when first opening the box. Yes, you could assemble and fire it without doing much of anything to the kit....but it would be ugly as sin.

Working the stock and filing/fitting and polishing all the hardware is a time consuming labor of love trying to get the contours close to correct.

If you want a kit to gently ease your toe into the kitbuilding waters, I'd recommend the Dixie without hesitation.
 

Attachments

  • HF.JPG
    HF.JPG
    63.1 KB · Views: 33
Since ky_man mentioned about notching the breech plug, let me explain this.

Breechplugs originally were about 1/2" deep into the barrel. Liability today makes barrel makers thread the barrels 3/4" deep and produce a correspondingly longer breechplug. What this does is make the breechplug deeper in the barrel. Resultingly, the gunmaker is compelled to move the lock further forward (closer to the muzzle) and spoiling the "looks" of the gun. Some gunmakers cut the plug shorter and others file a notch into the plug so that the touchhole may be positioned correctly.
 
Status
Not open for further replies.
Back
Top