2nd 1911 built from SCRATCH

Status
Not open for further replies.

theQman23

Member
Joined
Jun 1, 2009
Messages
210
Hello guys. I had so much fun (and made so much $) on the last 1911 I built I decided it was time to do another. After scouring gun broker for a decent used donor piece I scored this stainless slide on this stainless frame, to be stripped and used as home base.

Notice the standard bushing/spring arrangement, and the old style hammer, safeties, and grip screws etc.
 

Attachments

  • spr1.jpg
    spr1.jpg
    78.8 KB · Views: 369
  • spr2.jpg
    spr2.jpg
    82 KB · Views: 197
  • spr3.jpg
    spr3.jpg
    82.7 KB · Views: 196
I look forward to seeing your progress and results.

When I saw your post title I thought you were starting with a chunk of steel and some tools.

Bob
 
So after ordering the appropriate new parts, safeties, slide lock, spring and pin kit, hammer, grips, etc I decided to start with modifying the mainspring housing. Last time I bobtailed a regular style piece but with the extra welding I decided not to do that, and besides, this piece was to be a range gun, not a carry gun, so I cut off the "arched" part and smoothed it all out, radiused the bottom corner, and then checkered everything. Also, the next photo shows the fitment blending/sanding/polishing of the new beavertail safety. The last photo shows the fitment of the hammer, (pain in but, spur top was not in line with hammer pin hole.... needed to bend in press to achieve proper alignment, arrrgh). Also, the new extended controls.
 

Attachments

  • spr4.jpg
    spr4.jpg
    77.3 KB · Views: 139
  • spr5.jpg
    spr5.jpg
    79.9 KB · Views: 125
  • spr6.jpg
    spr6.jpg
    90 KB · Views: 149
Sorry Bob, I don't have an FFL so I have to at least start with a serialized frame in the state in which I live............. the rupublik of Marylandistan.............
Still fun though.........
 
doing some checkering..............
 

Attachments

  • spr7.jpg
    spr7.jpg
    73.8 KB · Views: 173
  • spr8.jpg
    spr8.jpg
    87.7 KB · Views: 175
These photos show the finished piece. The grips were ordered, I made some nice walnut ones out of old grips that I sanded down and stained but when I saw these with the red/black real wood I knew they'd be hot. I think they were like 60-70 bucks from midway, I bought them when I got new grip bushings. OH YEAH, if you ever change grip bushings, just buy the tap and run it through. Whether you think you'll need it or not, I HIGHLY recommend at least under finger strength if nothing else, run that fine tap through before doing new bushings. Well worth the time and extra money, and you'll own the tap forever.

Ok, these photos show the milled slide lightening areas, the completed checkering on not only the front strap and mainspring, but I went wild and did the palm swell on the beaver safety as well. You like? Or no? I'm still undecided.

I didn't like the stock hammer strut so I made a new one from scratch, and then put in a slightly lighter hammer mainspring. Trigger came in at 4.25 lbs, and I'm cool with that. I could go lower, but decided not too. I went .021 on the hammer hooks, I'm sure .019 is okay, but it felt crisp so I rolled with it the way I initially cut it. I did decided to use less undercut on the sear this time though.

Also, you can see the side-to-side lines on the back of the slide. I didn't want full checkering back there, but some nice horizontal lines complemented the way the hammer was made so a 20lpi checkering file used in only one direction produced the slide lines you see on the back.

On the front strap checkering, there are two ways to end at the trigger guard. One way, is to checker as high as you can, and then remove metal above the checkering to blend, and then it looks as though the front strap is slightly raised over the rest of the grip. Nice looking, but time consuming. The other way is to fade the checkering until it dissappears, here is a photo example of how that looks.
 

Attachments

  • spr9.jpg
    spr9.jpg
    91 KB · Views: 149
  • spr10.jpg
    spr10.jpg
    93.4 KB · Views: 189
  • spr12.jpg
    spr12.jpg
    123 KB · Views: 167
  • spr11.jpg
    spr11.jpg
    91.6 KB · Views: 163
Last edited:
Nice grips.

I'm confused as to what you are actually doing though..... is this the gun equivalent of re-finishing furniture, or rebuilding a vehicle engine ?
 
The top of slide was boring looking so I ran an end mill down the top between the sights just to flat top it a bit. On the sides of the slide up front I took some dead weight off. Notice I kept the cut above where the rails are, you don't want to cut down into the rails much, so I stayed above all of that. A friend at the gun club commented that those areas would make perfect places to do some name engraving or slogan engraving, etc.....

Also, you can see the hollowed out spring plug with the new solid one piece guide rod. I took an old motorcycle axle and chucked it in the lathe to make the guide rod. This is the 2nd one I made and they work really well, while looking nice as well. The polish on the bushing is funky, but in regular light it's okay. Notice the crowned and relieved barrel end, that was of course done in the lathe as well. It was cut to exactly match the end of the bushing. (that was a pain............. but fun)
 

Attachments

  • spr14.jpg
    spr14.jpg
    99.6 KB · Views: 130
  • spr13.jpg
    spr13.jpg
    116.6 KB · Views: 123
  • spr15.jpg
    spr15.jpg
    114.2 KB · Views: 139
Hi Blarby,
Uhhmmmm I'm not exactly sure what this is like....... it's more than just an engine rebuild, more like a total overhaul...........
It's not just a cosmetic thing because the gun's performance is way better now....... it just is what it is. A profitable way to work on metal, and to enjoy pride in hand crafting something.

Cyclops, when are you going to do one? Get it on the fun brother!!
 
To talk about performance, the gun as originally purchased was very reliable, but not too stellar accurate. I'm sure with it's former owner who knew her well, she was willing to play better, but my initial bench rest shots at 25 yards were not stellar. In the 5 to 6 inch range. Better than the last springer I started with, (AAAHhhhhh my precious Sally........... I miss her.......) but this piece here, (Samantha) was a little tighter out of the box. Six inches wouldn't do at 25 though, so some work was to be done.

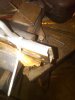
First, the slide was tight side to side, but rocked up and down front to rear. Not unusual for a decent 1911. So, I welded up the top of the front ends of the rails, and then started the HOURS of hand fitting work that goes into making a slide play nice with it's host.

The front bushing was really nice and tight, I'm guessing already replaced, so I just polished it and rolled with it. It fit the barrel and the slide nicely, so there was no noticable play there.

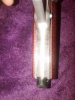
The rear of the barrel needed some lockup help though. The link was the right length, but slightly out of round, so in with a new one, and then of course I tacked up the sides of the hood, the link channels, and re-milled and smoothed it all to fit with no wiggle once in battery.

The new hammer, re-cut sear, and .021 hook job netted a clean trigger. If this was to be a true competition piece I would have went down from the 4+ lbs to 3 or so, but I liked it and went with the 4.25 I wound up with when the trigger parts were done. After the trigger and main spring work was done, (along with polishing the upper main spring housing plunger and freshly made hammer strut,) this netted some more accuracy.

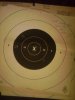
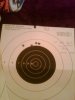
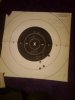
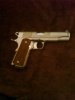
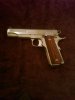
As you can see from the photos, she now has a bench rested 25 yard group of about 2.5 iches, she has a free hand 25 yard group of about 4 inches, and with the higher tension recoil spring and lightened slide work the speed shooting is awesome. I busted 14 rounds out of 2 magazines as fast as I could at 7 yds and came up with all 14 holes in a good spot.

I don't know if this gun would ransom rest along with a les baer or ed brown, etc, but I bet she's close. All of the important work has been done, and short of paying big money for testing barrels and spending the time on fancy hand loads, I think Samantha is right where she needs to be accuracy wise.
 

Attachments

  • spr16.jpg
    spr16.jpg
    54.6 KB · Views: 58
  • spr17.jpg
    spr17.jpg
    82.3 KB · Views: 55
  • spr18.jpg
    spr18.jpg
    47.4 KB · Views: 58
so cyclops, how many rounds are you seeing on these colts? What is the metal like in this springfield comparatively and how many rounds would you expect a stainless model like this to handle?
 
theQman23

Looks like a quality M1911 build you have there. I did something similar to that years ago with an Essex frame and a Colt slide and barrel assembly in . 38 Super. It was challenging at times but well worth the effort and time spent on it.
 
The forged steel in the Springfield frame/slide is likely just as good as a Colt, the difference is in the small parts, newer Springfields are loaded with MIM. I recently had an older Springer apart that was from the early 2000s and the only obvious MIM that I noticed was the sear and disconector... which you will also find in factory Colts. My only Colt that I have any expectation of wearing out is the Lightweight Commander... But who knows...

http://www.thehighroad.org/showthread.php?t=620192

http://www.thehighroad.org/showthread.php?t=651472
 
Thanks Bannockburn, I appreciate your noticing. It's a real shame that too many gun people are afraid to work on and modify and improve their own stuff. That's half the fun of 1911's for me. Do you have photos of that gun? Do you still have it? How has it done?

I can understand not wanting to dig into a nice safe queen with a ball mill, but for the average 1911 out there that isn't exactly a "collector piece" the owners couldn't do anything to it's value by learning to upgrade parts and learning to at least polish them, or re-blue them, or checker them etc.........

Come on Guys, show us some pics of the work YOU did on YOUR guns!!!

Also, cyclops, I digged the threads on the tests you're running. Nice...........
 
Samantha is gone now. $1500 was all it took for me to turn my back on her. But she was a sweety........
 
No offense at all to your skills but I guess I'm confused by the "from scratch" part. Rebuilt, reconditioned, modified, customized, tuned, tweaked all sound more accurate.
 
I can see the suggestion there. If I started with a purchased caspian frame or a sarco casted piece it would be more from scratch I guess, but I was referring to modifying and/or replacing each and every part on the gun.

Honestly, whether I bought a frame, or did like I did and welded up the rails and started with an original frame, either way the work is about the same. Possibly more involved in that fitting a loose old frame is harder than fitting a tight new one.

It was from this thinking, the thinking that every single part is repaired, modified, or replaced, that I used the phrase "from scratch".

If it wasn't illegal where I live I would just buy a block of metal and cut my own frame.... but where I live we can't do that. Where I live doing what I'm doing is as far as you can legally go and still be able to sell the gun when you're finished unless you get a manufacturers license.
 
TheQman23 you are doing the equivalent of what in Detroit used to be called building a hot rod. I get it.
 
yeah that's it!

Instead of Saleen mustangs I build Sally and Samantha 1911's!!!!

So how about you harvester? Have you modded any of your pieces? If so why not share? Lets see some pics. If not, what are you waiting for? Surely something in your collection needs a new hammer, or a polish job, or a reduced grip?
 
Agree with cyclops, this is an interesting thread and good on Qman for posting his work in such detail.
 
I love everything you did with the slide. When I get a 1911 someday I want to do that to it, althought I would want to go one step further and put non-glare lines in the flat top because I've always liked that look. Never seen lightening like that on a 1911 but I love it
 
Thank you guys, I appreciate it.

Sawdeanz, you don't have a 1911 now, okay, what DO you have? Any gun with a round top can have a flat top put on it like the one I did, and yes, to add some non glare lines with either a checkering file or a mill would be the next step, and very cool looking.

Why not do that to the gun you have now? You're signature says cz p-07,ok, lets have a look online at one of those.....

Oh cool, they have that third angle pie cut looking slide, very nice gun........... Ok, why don't you pull your slide, polish the finish off to a shiny steel bling top on a black poly bottom to get the two tone look.

Then you could have someone ball end mill some grooves then get real close and touch behind the front sight, and then fan out and run the length of the slide and spread out around the rear sight?

Come on guys, you can do some of this stuff, get personal with your guns!!!
 
Status
Not open for further replies.
Back
Top