First bedding job

Status
Not open for further replies.

CptnAwesome

Member
Joined
Dec 13, 2015
Messages
643
Location
Alabama
I've been wanting to get to this project for about 5 months and finally got around to it. Got a lot of good advice from some folks over on the Savage forum.

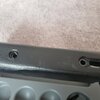
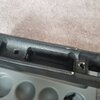
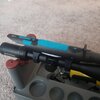
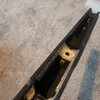
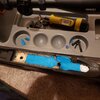
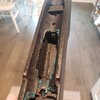
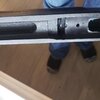
This is my first attempt at bedding aside from bedding the blocks on my Ruger American Predator in a Boyd's At-One. This one is a Savage model 12fv 22-250 in a Boyd's ProVarmint stock. Got my pillars from Stocky's and Pro-Bed2000 from Boyd's. I didn't get the crisp edges along the top I was looking for but I don't think it will matter. I did rub a couple of places on the stock ill have to touch up.

There was a little bit of play doh clean up (even with the using the play doh a little epoxy crept in to a few places I didn't want it) and trimming with the dremel afterwards but all in all I think it turned out well. I forgot to get pics after the clean up. I'm anxious to see how it shoots.
 

Attachments

  • 20210319_205830.jpg
    20210319_205830.jpg
    142.7 KB · Views: 56
  • 20210321_151237.jpg
    20210321_151237.jpg
    77.5 KB · Views: 54
  • 20210321_151250.jpg
    20210321_151250.jpg
    83.4 KB · Views: 54
  • 20210321_155025.jpg
    20210321_155025.jpg
    98.5 KB · Views: 52
  • 20210321_171014.jpg
    20210321_171014.jpg
    107.6 KB · Views: 56
Very neat job. The only concern I have is that you introduced the pillars AFTER the epoxy instead of before and that the pillars are quite small in diameter. I also like to bed up the barrel channel at least a couple of inches ahead of the recoil plate, leaving a small space at the front part of the plate. Also, the rear of the action doesn't seem to have a lot of bedding area to keep it from moving, but the sides of the action seems to be contained well. The bottom line is how it shoots! Hope it's great!
 
Good job, I started one but got side tracked. I am a little timid about doing it. I don't like the kit I got from Midway. The epoxy is really stiff and sticky. Hard to use. I did bed an old rifle with that kit but I am looking for better stuff to use.
 
Very neat job. The only concern I have is that you introduced the pillars AFTER the epoxy instead of before and that the pillars are quite small in diameter. I also like to bed up the barrel channel at least a couple of inches ahead of the recoil plate, leaving a small space at the front part of the plate. Also, the rear of the action doesn't seem to have a lot of bedding area to keep it from moving, but the sides of the action seems to be contained well. The bottom line is how it shoots! Hope it's great!

No no. The pillars were first, then the full epoxy bed. I considered bedding up the barrel channel at first. A lot of people do it so I'm sure there's something to it. But then decided to just keep it free floated.
 
No no. The pillars were first, then the full epoxy bed. I considered bedding up the barrel channel at first. A lot of people do it so I'm sure there's something to it. But then decided to just keep it free floated.
Sorry. My mistake about the pillars being installed after the bedding. It didn't appear that way to me. You did a much neater job than most of us.
 
Thats a good looking job. I hope it shoots well for you.

It looks like Savages are a little harder to do than Remingtons. I started using a 3M product thats a liquid steel putty. Its about the consistency of peanut butter and dries pretty slow so you have plenty of time to work it and clean up. I use Kewi shoe polish for a release agent.

I never do a barrel channel because I prefer a free floated barrel. I do put enough putty around the recoil lug to have some migrate to the area under the chamber ahead of the recoil lug.
 
Status
Not open for further replies.
Back
Top