GW Staar
Member
- Joined
- Feb 26, 2009
- Messages
- 3,717
I went with buying a 3d Printer instead of a Mr. Bullet Feeder. So what's the result? I can print bullet and case collators, buy the motors and tubing for them, print the bullet feeder dies for them that work just as well as the commercial, for about $70 a piece. So now I have a printer, and 5 bullet and case feeders......never would have happened if I was stuck with commercial prices.
The one below has a special bullet plate for extra long rifle bullets....but I printed plates for pistol, regular rifle and the long ones.
In the video some bullets needed the backup ramp.....because I didn't have enough tilt in the collator body......but that's not needed with more tilt.
The next video is a short test of pistol cases running very fast before my speed control came in.")
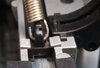
But what about bullet feed dies? How about these for $6. worth of plastic, and 2 springs and ball bearings from Amazon? And they work every time.
Below is the first trial of the first caliber I printed.....357. Tested on a single stage to see if "plastic" would REALLY work!
Printed more.....

The one below has a special bullet plate for extra long rifle bullets....but I printed plates for pistol, regular rifle and the long ones.
In the video some bullets needed the backup ramp.....because I didn't have enough tilt in the collator body......but that's not needed with more tilt.
The next video is a short test of pistol cases running very fast before my speed control came in.
But what about bullet feed dies? How about these for $6. worth of plastic, and 2 springs and ball bearings from Amazon? And they work every time.
Below is the first trial of the first caliber I printed.....357. Tested on a single stage to see if "plastic" would REALLY work!
Printed more.....
Last edited: