My take on the NRMA reloading bench

Status
Not open for further replies.

Damien45

Member
Joined
Mar 19, 2007
Messages
279
Location
Peoples Republic of Monterey, CA
Since I don't have the space for the way it is designed, want to add a bench vise and have to put it in the corner, here is what I came up with. Hoping some of the wood working knowledge can help spot potential problems or improvements before I get into the build.

MRUHXGD.jpg Mb5RuDI.jpg
 

Attachments

  • received_10153455099397717.jpeg
    received_10153455099397717.jpeg
    46.6 KB · Views: 32
  • received_10153455099392717.jpeg
    received_10153455099392717.jpeg
    39 KB · Views: 31
Last edited:
Just a few random comments. I'm assuming that you are not building the storage hutch on the back. My first overall impression is that unless you really enjoy making benches, the plan is way too complicated for what the intended purpose is.

If you are standing on the right side the bench is 4 feet deep which in my mind will end up being a place where clutter lives. If it were me I would make a simple 4' long shelf that is about 20" deep. I would mount my tools (press, vise, so forth) on thick plywood bases, then devise a quick mounting system using rails or threaded inserts and swap out tools as needed.

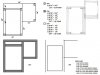
It is true that you are maximizing leading edge surfaces but those surfaces are in my opinion a bit on the small side. The 18" on the left side is not much room. Perhaps you should make a cardboard mock up of the bench top and see if you can actually work at the bench. If you want to keep the L shape of the bench consider making it about half as deep as the plan currently calls for.

Most firearms related forums have in the reloading section (this one is no exception) a thread dedicated to members showing off their benches. The one on this forum is not a sticky and not as well populated as others. If your not aware of this then I encourage you to look for them as there are a great resource for ideas. If I may suggest this, the reloading section of the 1911 forum has one of the biggest threads of pictures showing benches that I know of. Lots of ideas there.
 
I have looked through a lot of show me threads. *My plan is based on the NRMA bench, but have a couple twists I needed to figure out with it.

1 I don't have the linear feet to build it to spec.

2 I have a water main shut off that protrudes from the wall to work around. Which also plays a part in the why I don't have enough length.

3 this creates a unique leg placement issue.*

4 I intend on*mounting*a 4" bench vise to the short end.
 
The question boils down to this, is it possible to build the bench shown in the blueprint? The answer is in my opinion is yes it is possible.

If you want to know if the finished product is going to be an efficient use of available space or worth the cost in time and materials to make then I would say most likely no. But go ahead and prove me wrong, I make no claims to being infallible.

Sometimes "less" is "more", other times "simple" is better than "complex". Only you can decide which way to go, I personally have no skin in the game.
 
That's a nice set of drawings but as mentioned you don't give any details of your work space or explain why you are planning this solution.

As for the construction details I'd skip the T shaped front edge and simply go with two layers of fir plywood screwed together using a grid like pattern that basically "stitches" it together into a single 1.5" thick top. You can then afford to have it overhang the front edge by around 2 inches without any flexing issues.

If things are tight in your work area I'd then also suggest that you don't fix the vise directly to the bench. Instead drill and set in a pattern of holes with Tee nuts set in from below and turn the whole top of your bench into a fully adjustable mounting and clamping system. Presses and even your bench vise are then mounted to 3/4" plywood plates which bolt to the top based on that regular pattern of mounting holes. Then you can put anything anywhere.

I went with this same system for my own area and it's working out super well. I can set up and put away stuff easily and configure the bench for whatever I need to do in just a couple of minutes.

I went with a pattern of holes that is spaced at 6 inches apart and the line is 5 inches back from the front edge. If you're in a tight spot for room a pattern that is spaced at 4 inches apart and 5 inches back will give you more options for how you set your tooling in place.

Here's a couple of pictures of my setup. The vise on the corner is on a slightly larger mounting plate and held to the cabinet with three bolts. All the presses just use two bolts. The mounting plates use the same T nuts set into shallow counterbores done with a Forstner bit. I could have just stuck the heads through from below but I wanted to keep the wood of the plates as thick as I could. And the Tee nuts was the way that worked best for that.


P1020176.jpg

P1020177.jpg
 
Status
Not open for further replies.
Back
Top