photographing guns

Status
Not open for further replies.
I bought a few sheets of I think 3/16 inch thick white foam board at the local arts/crafts supply and 4 clamp-on reflector utility light fixtures at Home Depot. Just add Duct Tape.

I clamp the lights on the vertical edges of the box and bounce the light off the white walls and "roof, usually not shining directly on the gun. Use no flash and if using digital, be sure to set and use the white balance feature.

The one you linked to is pretty small. I made mine closer to twice that size and used the white foam board on all 3 walls, the floor, and roof. I'm no guru but get results like this without really trying and with a cheap 8 year old point and shoot digital.
img_0287_500x343.jpg
img_0121_500x375.jpg
img_0243_500x375.jpg
 
Last edited:
Tips: natural light is the biggest thing. my living room window is 12 feet long and 7 feet high. gives off good light

IMG_3477.jpg

best other piece of advice is if you're using a digital camera, a macro setting is your best friend if the camera is not SLR

IMG_2921.gif

EDIT: as far as a photo box, idk, if I need a white backround, I use poster board
 
It really doesn't matter if you use natural light or artificial light. You'll be working with different color temperatures, but digital cameras will usually "correct" any differences in color temperature anyway. The key is diffusion.

One reason natural light looks better is because there is naturally-occuring studio photography equipment floating in the sky (i.e. clouds). If not, you can shoot inside without the sun directly hitting the subject of the photograph. The light is still diffused; bounced off walls and carpet until it hits your gun.

You want your light source to be as large as possible. The reason lightboxes work so well is because you put the object inside, causing the size of the light source to be as large as possible, or in other words, 100%. The light from any smaller light sources outside (such as a lightbulb) is diffused by passing through the lightbox.

For shooting indoors, you can get great results by simply making your own lightbox using wax paper and whatever you need for a "frame". Keep in mind the frame material will cast shadows and mess up diffusion if it isn't transparent.

Google "Homemade Lightbox", build your own, and as always, spend the rest of the money on ammo. :)
 
I've built a few light boxes out of foam-core, but for 40 bucks that one from amazon looks good.

Here's a cheap and quick trick that often works. Get a frosted white shower curtin. Put your shiny subject (In this case a gun) on a picnic table or similar surface outside in bright sunlight. Toss the shower curtin over your head with the camera and subject in here with you. (You'll look like an idiot. The price of art.) The shower curtin softens the light and creates some great highlights on shiny surfaces. I'll look for some samples, they aren't on this computer.
 
A light box can help but it's not mandatory. I almost never use a light box but I do have a proper lighting setup and many years of professional photography experience to help me out. I spent many years in college studying art photography so when it comes to photographing guns I tend to lean towards the artsy as opposed to commercial styles but I enjoy doing a mix of both.

One of the keys to taking good gun photos is to make sure your colors and lighting are accurate and balanced properly. With digital camera now we have the advantage of adjusting to the lighting condition with just the push of a button, so make sure your camera settings are correct. I always use a tripod and touch up the images in Photoshop after they are shot. If you don't have Photoshop that's ok, there are lots of good inexpensive photo editing programs available.

Other tips...
Choose interesting backgrounds, don't be afraid to experiment with different surfaces to photograph your guns on.

watch your negative space and don't be afraid to crop. Sometimes just showing a portion of the gun can be more effective than showing the whole thing.

The most important tip is to photograph a lot. The more pictures you take the faster you'll improve. Don't think that it will happen overnight, I've probably taken many thousands of gun pictures over the years and when I started off I was really bad at it. I could photograph other things fine but it took me a while to start getting what I considered decent gun pics.

Here are a few of my favorites to help give you some ideas:)

FS2000-2.gif HK45c-2.gif

CZ40B-3-1.jpg P99-1-2.gif

BuckmarkCamper5-1.jpg

duelWalthers4-1.gif


RugerServiceSix7-1.jpg
 
Last edited:
These took longer to re-size than to snap. FujiFilm Finepix S8000FD. not an SLR but comes damn close.
My advice is too get a decent camera, and just experiment with stuff. Different angles and different types of focus and lighting. :D
If you focus on the things you want, lots of niffty things can happen. Like, you can see the scratches on bullets, your feed ramp, the barrel...stuff that doesn't show up well sometimes. But it does when it reflects light!
 

Attachments

  • p345 002.jpg
    p345 002.jpg
    110.9 KB · Views: 33
  • p345 003.jpg
    p345 003.jpg
    216.1 KB · Views: 38
  • p345 004.jpg
    p345 004.jpg
    130.3 KB · Views: 33
  • p345 005.jpg
    p345 005.jpg
    446.6 KB · Views: 30
  • p345 006.jpg
    p345 006.jpg
    176.2 KB · Views: 22
There have been several excellent threads on this topic here. A search should turn them up. If nothing else, search under my user name, as I've posted in most of those threads.
 
Like someone said, you can make light boxes at home. I did this mainly because of space. When I was done with it, I'd throw it away and when I needed one again, I'd quickly build one. I guess it would be nice to have one that folds away.

I used to use a cardboard box, cut out the sides and place white translucent paper such as tracing paper, and a sheet of white or whatever color backdrop paper that was taped or stapled along the top of the back wall and draped down towards your tripod. Then introduce lighting from both sides through the white paper using bright work lamps bought from Home Depot.
 
Wow...some really nice pics...I can see some of you guys really take the time to do a professional looking shoot...
My guns still aren't talking to me...I made them look sleazy and cheap in some hurried photos I took...go figure...guns...can't live with em, can't live without em....
 
youforgottopostpicturesofyourwea-1.gif

I like working with wide open spaces and a combination of lighting techniques.

I use different areas of the house for morning and afternoon light.

P2140017-1.jpg

P9110038.jpg

I may get one good shot out of 50, sometimes a higer success rate.

Backgrounds are fun to work with too.

P2120038.jpg


PA230002.jpg

P5270018.jpg

And it helps to have a handsome subject.

PBP should be here soon.


And it helps to have a handsome subject.
 
Last edited:
Beautiful photographs, guys.

In answer to the OP, I would also like to add in that I had bought that exact set up, or one that is visually identical to the one you linked. I got if for general macro use. The lights are not really bright enough and the box is small. It's really too small to give you adequate room for photographing guns.

Here's a few links to home made lightboxes which can be superior in size and flexibilty, if you choose to go that route.

Link 1
Link 2
Link 3

They're generally quite easy to build and can be as easy as clipping a white bed sheet over a cardboard frame.

The purpose is to diffuse the light, which as the pros have pointed out, natural light does a wonderful job with.

If you want to go with natural light, then a couple pieces of white cardboard (project board (foam or cardboard) or science fair board at the art shop is great, if you can't get large foam core board) will do and you'll want to set them on the opposite side of your weapon from the source of life (eg sun left, reflectors right) or wherever until you get the lighting you want.
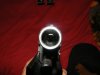
Macro is awesome.

If you want depth of field, go manual aperature and set it to small, and then use a tripod (like F22). For shallow depth of field (business end in focus, but further down the weapon is out of focus) then you go to the other end, or "wide open" if you like (F3.5 or whatever is the small number on your lens or digital camera menu).

Best advice was a few posts up, just take alot of pictures and you'll get better at it.

Hope it helps & look forward to seeing those photos :)

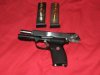
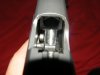
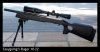
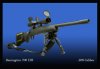
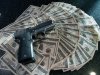
note: pics 2 & 3 were shot greenscreen then the background was photoshopped in.

(personally I think the pros take much better photos than I do :D, but I'm practicing!)
 

Attachments

  • Finished1022x640.jpg
    Finished1022x640.jpg
    50.3 KB · Views: 21
  • 700ltr sideview.jpg
    700ltr sideview.jpg
    46 KB · Views: 19
  • 700LTRGSAfter.jpg
    700LTRGSAfter.jpg
    29 KB · Views: 23
  • 9mm.jpg
    9mm.jpg
    122.2 KB · Views: 48
Nice shots guys!
I'm still learning how to use my camera and took some pics that I was pleased with.


No light box but I did bounce the flash off my wall. Hand held with IS on.
 
Wow! Some nice photos here guys!
Scary & WB very good use of background textures!
I have a confession to make, as a Pro-Photographer for about 8-10 yrs now, not one gun photo do I have! Hundreds of weddings, hundreds of Seniors, hundreds of babies, cars, trucks, cats, dogs, buildings, lakes, mountains, sunrises, sunsets, and zero gun photos! I've wore out the shutters on two Cannon DSRL cameras and no gun photos. I have a studio full of strobes, reflectors, meters, backgrounds, lens and cameras, but I've failed to take time to enjoy what I like to do....Shoot guns. I've gave the cameras a break from business, but now I'll have to fire'm back up and post some(photos)!

Jimmy K
 
The Norinco M1911 that I frequently carry, just taken with my Canon Digital Rebel Xt:

Norinco.jpg


My Model 65:

Model65.jpg

My Model 14:

Model14.jpg
 
I just did this one fast for a buddy to show the size of the LCP compared to a Taurus PT22. I've never before taken still images of a gun by itself. I can see the challenges involved.

I didn't take the time to do anything but on cam flash (SB-800). Camera is a Fuji S5. I did a bit of clean up in Photoshop of a couple of scratches on the surface and added my standard logo along with a cute frame.
LCP01.jpg
 
Status
Not open for further replies.
Back
Top