Replacing slide release lever on Glock 17 question

Status
Not open for further replies.

FFGColorado

Member
Joined
Mar 2, 2020
Messages
1,129
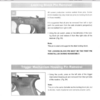
Kinda new guy with guns..have limited experience taking the above apart. My Glock 17/4 needs a new slide release lever(spring broken)..I have seen youtubes that show taking both pins annotated below OUT, then the top one back in..then slide new slide release lever in, bottom pin back in.

BUT, since the spring rests on the bottom of the top spring..why not just take only the lower pin out, take out lever, put new lever in..lower pin in?
I don't understand why you take the top pin out at all..

Thanks 71f8dc354c94e8c2fc1cd645552cf48aee466471_glock-17-gen4-9mm-fs-10rd-3-mags.jpg
 
To me, a better question would be why not just strip and clean your gun as you're already partly disassembling it?

But to answer your question: It may be that spring tension makes aligning the hole in the slide release difficult if the upper pin is not also removed.
 
Installation reverse of disassembly. It doesn't get any simpler than a Glock.
Thanks sir, but once again..why remove the top pin first if the spring of the lever just rests against the bottom of the top pin?
 
To me, a better question would be why not just strip and clean your gun as you're already partly disassembling it?

But to answer your question: It may be that spring tension makes aligning the hole in the slide release difficult if the upper pin is not also removed.
Well, the YT video says to reinstall the top pin first, then insert the lever, then the lower pin back in..so the spring is under tension..
 
Thanks sir, but once again..why remove the top pin first if the spring of the lever just rests against the bottom of the top pin?
IF you don't remove the top pin, its presence will create too much downward pressure on the upper limb of the U-shape spring that will make it impossible (almost) to remove the lower limb of the spring from its position retention engagement in the recess in the trigger pin axle. On installation the top pin installed first, allows a stable point for the spring to be compressed as it is inserted to align the trigger pin hole in the lever. I think your question will be answered when you see how difficult it is to perform without removing the top pin. Also, on installation of the symmetrical trigger pin if you insert it right to left, you only have to deal with the spring-pin recess engagement once, otherwise twice. The diagrams are from the Glock Armorer Manual.
 
Last edited:
IF you don't remove the top pin, its presence will create too much downward pressure on the upper limb of the U-shape spring that will make it impossible (almost) to remove the lower limb of the spring from its position retention engagement in the recess in the trigger pin axle. On installation the top pin installed first, allows a stable point for the spring to be compressed as it is inserted to align the trigger pin hole in the lever. I think your question will be answered when you see how difficult it is to perform without removing the top pin. Also, on installation of the symmetrical trigger pin if you insert it right to left, you only have to deal with the spring-pin recess engagement once, otherwise twice. The diagrams are from the Glock Armorer Manual.
Thanks...I'll remove the top pin, then the lower..old lever out, top pin back in..lever in, lower pin in..Thank you.
 
Learn by doing.

Some suggestions learned the hard way:

1) be prepared for springs to go flying (keep dogs and cats away).
2) have something to put the small parts in (eg small dish).
3) note the differences between similar parts (I take a photo).
4) note which direction pins come out (usually out left to right).
5) note if the pin is directional (ie tapered).
6) a "slave" pin (made from a small nail) helps to keep parts aligned.

Have patience, but have fun!! :thumbup:
 
The Gen 5 has an ambidextrous slide stop lever that is "U-shaped that is retained in position by the locking block; the other generations have a left side only release that is parallel to the frame side and the is captured by the two pins as discussed before, and NOT the locking block (some generations have a 3rd pin to add security to its location in the frame). So the process is not the same, but the spirit of removal is.....only remove the components that are retaining the slide lever. Screen Shot 2021-02-04 at 6.10.56 PM.png
 
but is it the same process for a 2-pin Gen 5 (like the video) and a 3-pin Gen 4 (like the OP's Glock)?
They have several other vids, I think they have one for the older generation Glocks. I used the Glock 43 video to remind me of the steps to replace the striker and safety plunger springs. :)

Stay safe.
 
Update..received the wee slide lock assembly.
Top pin out easy..little fiddling with lower pin, that out easy also..last 1/2 of spring of old slide lock lever missing.
Top pin back in, assembly in, lower pin back in with a little fiddling of the slide lock..all way easy.
I changed it because after slide locked back with empty magazine, new magazine in, slide wouldn't release with the 'pull back' technique'..had to use my thumb..
Once again impressed by the simplicity of my Glock 17/4...
 
Status
Not open for further replies.
Back
Top