
You are using an out of date browser. It may not display this or other websites correctly.
You should upgrade or use an alternative browser.
You should upgrade or use an alternative browser.
Show us a picture of your reloading bench
- Thread starter James THR
- Start date
LAH
Member
Welcome to the board Mark. Geez that place is way too clean.")

RevolvingGarbage
Member
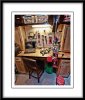
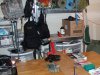
Here's my compact setup. It fits in the closet of my apartment bedroom, but totally satisfies my production needs

I'm set-up for .38spl, .40S&W, and maybe soon .308win.
I'm set-up for .38spl, .40S&W, and maybe soon .308win.
thump_rrr
Member
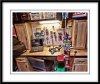
These are pics of my nearly finished reloading bench.
I used doors and cabinets I purchsed from IKEA and modified them to fit my purpose.
I used the piece of bucher block that was left over from the counter top to make the removable press and powder measure holder.
I still need to add a few more shelves to my storage unit as well as lighting, plugs, and a locking system to prevent unauthorized access to where my ammo is stored.


The piece of bucher block holding the press is only being held in by a couple of 1/2" dowels and 2 brackets that prevent the front of the piece from lifting.
To remove it you just give a firm pull towards you.


I don't know what you call this fastening system but with these 1/2" steel dowels and 5/16" cross bolts holding the bucherblock it isn't going anywhere.


I used doors and cabinets I purchsed from IKEA and modified them to fit my purpose.
I used the piece of bucher block that was left over from the counter top to make the removable press and powder measure holder.
I still need to add a few more shelves to my storage unit as well as lighting, plugs, and a locking system to prevent unauthorized access to where my ammo is stored.
The piece of bucher block holding the press is only being held in by a couple of 1/2" dowels and 2 brackets that prevent the front of the piece from lifting.
To remove it you just give a firm pull towards you.
I don't know what you call this fastening system but with these 1/2" steel dowels and 5/16" cross bolts holding the bucherblock it isn't going anywhere.
rattletrap1970
Member
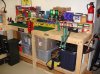
This is my room. It's changing a bit though, the rifles are now mounted vertically and the current benches are being replaced by cabinets and an "L" shaped counter top. Also have a 3rd Dillon 550 and a small single stage. Geez.. I really have to update this picture.

Kristensdaddy
Member
- Joined
- Jun 2, 2010
- Messages
- 124
QuarkMartial
Member
- Joined
- Jul 13, 2008
- Messages
- 19
Mine's a WIP, but I figured this the right place to ask for help:

(Note: That stool is under the top, it's not supporting it at all. Clamp is for demonstration purposes only.)
This is what I would like to have. I'd mount the press by drilling holes through the top and the bookcase itself, then use bolts + nuts + washers to secure it (Not screws, but bolts that go through both pieces)
Would that be enough or will it rip out?

Closeup of the MDF to show thickness and composition. These are cellphone pictures, so they're not the best, but they should do.
Also, that bookcase is 8' long and made entirely out of MDF, even the back. It's heavy and not going anywhere at all.
(Note: That stool is under the top, it's not supporting it at all. Clamp is for demonstration purposes only.)
This is what I would like to have. I'd mount the press by drilling holes through the top and the bookcase itself, then use bolts + nuts + washers to secure it (Not screws, but bolts that go through both pieces)
Would that be enough or will it rip out?
Closeup of the MDF to show thickness and composition. These are cellphone pictures, so they're not the best, but they should do.
Also, that bookcase is 8' long and made entirely out of MDF, even the back. It's heavy and not going anywhere at all.
Maverick223
Member
QuarkMartial, there is quite a bit of stress on that press when you are FL sizing. Assuming that you use fender washers and through bolts (like you said), the MDF is probably strong enough to withstand the stress for a while, but eventually it will crumble under the stress allowing the bolts to work their way through. How long that will take I can't say (may very well happen fairly quick). If you want to give it a go, I think it would be best to mount the press at the very corner of the bookcase to mitigate bending stresses. Otherwise I would suggest building a new bench out of solid 2x4 building lumber with a 1/2in. plywood top as a conservative minimum (IMO 4x4 legs, 2x6 top support, and 7/8in. plywood would be best for long life).
gaucho
Member

raisedin99
Member
QuarkMartial:
sandwich your MDF where the press mounts with either plywood or steel plate approximately 4" x 6", it should last forever
sandwich your MDF where the press mounts with either plywood or steel plate approximately 4" x 6", it should last forever
QuarkMartial, the easiest way to make that MDF last forever is to cut two pieces to the same size, then use construction adhesive (comes in a caulking gun tube) and screws to double it up, making your 3/4" piece now 1 1/2" thick. After that, get a gallon bucket of clear epoxy and coat the MDF sandwich in it. Use thin coats and wait a full week for the stuff to completely cure. You'll end up with an incredibly heavy, unbelievably tough surface that can pretty much survive anything.
My neighbor's workbench was built this way. To damage it, you'd have to either drop a 500 lbs bomb on the thing or attack it with a jackhammer. Even then, I'm sure the jackhammer wouldn't do much.
My neighbor's workbench was built this way. To damage it, you'd have to either drop a 500 lbs bomb on the thing or attack it with a jackhammer. Even then, I'm sure the jackhammer wouldn't do much.
J_McLeod
Member
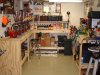
I wanted something that I could easily take down and store, not damage anything I had already, and not cost a lot. So this is what I got. Works pretty well so far. Haven't completed any rounds with it yet, but just started loading.
Attachments
It's nothing special but it works for the time being. My reloading bench is also my work bench, toy repair bench, pipe tobacco blending bench and gun care bench. I hope to built a room in the basement this winter for my guns and reloading stuff.

The shelf up high so the kids can't get to it. Not that they are ever in the basement by themselves.

A few more things on an old book shelf.

The shelf up high so the kids can't get to it. Not that they are ever in the basement by themselves.
A few more things on an old book shelf.
Maverick223
Member
TH3180, just be careful blending tobacky with gunpowder around...put some of that in your pipe and it'll put hair on your chest...er is it take hair off your face. 
mongoose33
Member
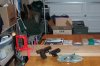
Hey JMcleod, explain this pic for us, especially how you were able to get those two pistols to float in the air like that (note the shadows underneath them):

It must be a Jedi mind trickHey JMcleod, explain this pic for us, especially how you were able to get those two pistols to float in the air like that (note the shadows underneath them):
J_McLeod
Member
Jedi Mind Trick..
Actually I've got a large block of wood across the table. I couldn't put holes in the table, so I got some cull lumber from Home Depot, mounted the press to that, and clamped it across the table. So the pistols are resting on that. Here's another pic I just took that shows it a somewhat better. Apparently when I made the pics smaller to post, it cropped the right and bottom sides.
Actually I've got a large block of wood across the table. I couldn't put holes in the table, so I got some cull lumber from Home Depot, mounted the press to that, and clamped it across the table. So the pistols are resting on that. Here's another pic I just took that shows it a somewhat better. Apparently when I made the pics smaller to post, it cropped the right and bottom sides.
Attachments


mongoose33
Member
Jedi Mind Trick
I understood the reason for the board, it's an excellent way to do it w/o sacrificing the table underneath.
It's the pistols' images that are interesting. Look at the shadows underneath them. They aren't sitting on that board, are they?
It just looks photoshopped to me.
ctually I've got a large block of wood across the table. I couldn't put holes in the table, so I got some cull lumber from Home Depot, mounted the press to that, and clamped it across the table. So the pistols are resting on that. Here's another pic I just took that shows it a somewhat better. Apparently when I made the pics smaller to post, it cropped the right and bottom sides.
I understood the reason for the board, it's an excellent way to do it w/o sacrificing the table underneath.
It's the pistols' images that are interesting. Look at the shadows underneath them. They aren't sitting on that board, are they?
It just looks photoshopped to me.
J_McLeod
Member
The barrels of the pistols are resting on the board, and the grips are on the table. It took some work to get them balanced like that.
Maverick_52
Member
- Joined
- Dec 4, 2010
- Messages
- 49
Need help
Hi guys. I'm new to this site so bear with me. I realize that this thread seems to be about pictures of your reloading area but I could use your expertise to find something out. I purchased a Dillon 550 and dies for 9mm, 380, and my 45. A friend of mine gave me some green dot for my 45. He said that the grain load shoudl be 6.4 g but everything in the literature says 4.9 to 5.3. I have a 230 g projectile. Alliant seems to say 5.3. So, can you provide me some insight as to the range I might go or direct me where I might look.
Thanks
xcgates
Member
Go by what published manuals say, and especially if it is your first experience, work your way up from the lower end.
Maverick223
Member
+1, furthermore it seems that the manufacturer doesn't recommend that powder when using jacketed bullets...are you using cast lead?Go by what published manuals say, and especially if it is your first experience, work your way up from the lower end.
Similar threads
- Replies
- 45
- Views
- 4K
- Replies
- 44
- Views
- 4K
- Replies
- 151
- Views
- 23K
- Replies
- 13
- Views
- 2K
- Replies
- 14
- Views
- 2K