
You are using an out of date browser. It may not display this or other websites correctly.
You should upgrade or use an alternative browser.
You should upgrade or use an alternative browser.
Show us a picture of your reloading bench
- Thread starter James THR
- Start date


LAH
Member
Nice set up Tango Sierra.
LAH
Member
dsm I certainly like the looks of that.
Thank you! Lotta work to go on it. The bench will actually be a U shape where the one end of the U will extended into the room and be almost like a peninsula in which I can work on both sides. Will be nice to clean and work on rifles. And eventually, the entire room will be framed in and my safe set somewhere in the room. I'll be sure to check back with better pics. Later.
I really enjoy this thread and check back here quite often to see if there is anything new. I got some great ideas here. What I want to do with my presses is to elevate them in some way. I like the Dillon strong mount, but pretty pricey and I need 3 of them. I plan on fabricating something out of steel. One of the presses is a Lee cast iron and the primer tube comes out of the bottom of the ram...just need to figure a way to elevate it so I can clear the cabinets and be able to drop primers out.
I really enjoy this thread and check back here quite often to see if there is anything new. I got some great ideas here. What I want to do with my presses is to elevate them in some way. I like the Dillon strong mount, but pretty pricey and I need 3 of them. I plan on fabricating something out of steel. One of the presses is a Lee cast iron and the primer tube comes out of the bottom of the ram...just need to figure a way to elevate it so I can clear the cabinets and be able to drop primers out.
Tango Sierra
Member
dsm,
Here is a picture from behind the press and strong mount.

The strong mount metal is between 0.12 and 0.13 inch thick. I don't know metal fabrication from peanut butter but I think you would need some sort of metal folding press to form the two pieces of the strong mount. Not only does the mount raise the press, but more importantly it really stabilizes the unit and removes most of the flex of the countertop while placing pressure on the press ram.
The dimensions when assembled and mounted are:
Front to back top: 4.5 inches
Front to back bottom: 10 inches
The two pieces at the folds are 5" apart at the top and 10" at the bottom.
Let me know when you start selling your version of the strong mount.
Here is a picture from behind the press and strong mount.
The strong mount metal is between 0.12 and 0.13 inch thick. I don't know metal fabrication from peanut butter but I think you would need some sort of metal folding press to form the two pieces of the strong mount. Not only does the mount raise the press, but more importantly it really stabilizes the unit and removes most of the flex of the countertop while placing pressure on the press ram.
The dimensions when assembled and mounted are:
Front to back top: 4.5 inches
Front to back bottom: 10 inches
The two pieces at the folds are 5" apart at the top and 10" at the bottom.
Let me know when you start selling your version of the strong mount.
Last edited:
Maverick223
Member
Tango Sierra; it wouldn't be the prettiest mount, but one could make a similar mount using 1/8in. mild steel plate a standard machinist vice and a heavy ball-peen hammer...or take the simpler route by cutting and welding (you could use the same pattern if you want, but Runninshu's design {see post no. 2350} is easier to fabricate and stronger).
")
LouisianaJoe
Member
DSM, I suggest that you put another 3/4" MDF on top. We earlier discussed the T-Track and it will have more strength with 2 layers of 3/4" MDF. If you decide to use the T-Track, route the groove for it before you attach the top piece. I clamped a guide board to the top to guide the router. I also used contact cement to put a Formica top on mine after I installed the T-Track. See page 85 for my results.
As for an elevated mount...I'm thinking of a 10"x10"x3/16" plate for a base a 5"x5"x1/4" plate for the top and a 2.5"x2.5" steel tube welded between them vertical. Maybe a slight angle cut on the tube to tilt the press slightly.
Joe...I do like the idea of T track, but I think I'm going to mount all my stuff on the bench. I have the room and cabinets for plenty of bench space.
Joe...I do like the idea of T track, but I think I'm going to mount all my stuff on the bench. I have the room and cabinets for plenty of bench space.
Maverick223
Member
One suggestion regarding the press mount, if you have the tools to do so and choose something with enough meat on it (3/16in. would be enough, but your 1/4in. plate is even better) drill and tap the holes for the fasteners (both for the press and the bench) so you needn't use nuts and washers. Makes for a much cleaner and simpler design.
LAH
Member
try some Ramshot TAC. Great stuff.
Agree

A Pause for the Coz
Member
- Joined
- Apr 14, 2009
- Messages
- 339
I had two issue I needed to solve at my loading bench. While using stuff I had on hand.
1st. I use a LEE turret that dumps the spent primers into the base of the unit. ( when not dumping them all over the bench) The only way to empty them out is to dismount the press.
This really irritated me. ALLOT!
I understand LEE is getting double duty from this base. It is the same base they use on the PRO 1000 press. This helps keep the cost to me low. I like the cost to me being low. So I have lived with it.
I have had a classic turret press in my basket at least 5 times but have not pulled the trigger yet. ( if you are reading this and are considering a LEE Turret, Buy the Classic cast if you can if not do what I did.)
So if I am going to use this press I need to make its use more user friendly.
2nd. I have a lube- sizer coming next month and I and sure one of my low ball bids on ebay will result in another press that needs mounting one of these days. I have seen some pics of benches that have press next to press next to press. Thats not for me I like to have room to work and wiggle if needed.
I am not in the mood to add more bench real-estate, So I need to add a quick way to change the presses out on the bench space I have. With out spending any money if possible.

1st I bolted some carriage bolts to the bench and installed a washer on top of the nut to act as a mounting platform. This is a permanent fixture. I did this at two stations.
Then I went digging in the scrap pile in the shop. Looking to see what i had on hand. (NOTE: 1/4 inch steel plate would be awesome for this use. maybe latter)
I found some 1x8 inch oak cut off ends that I had in a pile. Left over from a hay rack build I did a couple years ago. " See thats why you don't throw that crap out. Never know when you will need it"
I found 6 good ones. I drilled holes to match the bolts I have installed. I will mount my presses and sizers and any thing else I want onto these.

I mounted the presses to these boards. I set them on the washers on top of the bolts/ washers I have mounted to the bench. I did go buy 8 3/8ths wing nuts. To make mounting and dismounting by hand easy. No tools needed.
This works very very well. With my bench being bolted to the wall, there is no flex when working the press.
Of all the things I have learned so far. Having a nice stiff no wiggle/ flex install of your press is priority #1. Esp with LEE tools.
I have 4 extra of these made up so when a new press shows up it only takes a minute to change them out.

Here is how to solve the primmer issue on the LEE turret press. See the hole I cut?

Made a primmer catcher out of a ice cream bucket. Cant have too many ice cream buckets. This works very well. almost every primer that drops into the base then drops into the bucket. Unfortunately a high percentage of spent primers never get near the catch basin on the press.

A cheap fix is to use the business cards from guys trying to sell you stuff. Now 99% land in the bucket.
There I am happy now. Total cost to me. $4 for the wing nuts.
1st. I use a LEE turret that dumps the spent primers into the base of the unit. ( when not dumping them all over the bench) The only way to empty them out is to dismount the press.
This really irritated me. ALLOT!
I understand LEE is getting double duty from this base. It is the same base they use on the PRO 1000 press. This helps keep the cost to me low. I like the cost to me being low. So I have lived with it.
I have had a classic turret press in my basket at least 5 times but have not pulled the trigger yet. ( if you are reading this and are considering a LEE Turret, Buy the Classic cast if you can if not do what I did.)
So if I am going to use this press I need to make its use more user friendly.
2nd. I have a lube- sizer coming next month and I and sure one of my low ball bids on ebay will result in another press that needs mounting one of these days. I have seen some pics of benches that have press next to press next to press. Thats not for me I like to have room to work and wiggle if needed.
I am not in the mood to add more bench real-estate, So I need to add a quick way to change the presses out on the bench space I have. With out spending any money if possible.
1st I bolted some carriage bolts to the bench and installed a washer on top of the nut to act as a mounting platform. This is a permanent fixture. I did this at two stations.
Then I went digging in the scrap pile in the shop. Looking to see what i had on hand. (NOTE: 1/4 inch steel plate would be awesome for this use. maybe latter)
I found some 1x8 inch oak cut off ends that I had in a pile. Left over from a hay rack build I did a couple years ago. " See thats why you don't throw that crap out. Never know when you will need it"
I found 6 good ones. I drilled holes to match the bolts I have installed. I will mount my presses and sizers and any thing else I want onto these.
I mounted the presses to these boards. I set them on the washers on top of the bolts/ washers I have mounted to the bench. I did go buy 8 3/8ths wing nuts. To make mounting and dismounting by hand easy. No tools needed.
This works very very well. With my bench being bolted to the wall, there is no flex when working the press.
Of all the things I have learned so far. Having a nice stiff no wiggle/ flex install of your press is priority #1. Esp with LEE tools.
I have 4 extra of these made up so when a new press shows up it only takes a minute to change them out.
Here is how to solve the primmer issue on the LEE turret press. See the hole I cut?
Made a primmer catcher out of a ice cream bucket. Cant have too many ice cream buckets. This works very well. almost every primer that drops into the base then drops into the bucket. Unfortunately a high percentage of spent primers never get near the catch basin on the press.
A cheap fix is to use the business cards from guys trying to sell you stuff. Now 99% land in the bucket.
There I am happy now. Total cost to me. $4 for the wing nuts.
Coz, You will not regret going to the Classic Press. It is worth every penny. Not only for the spent primers but also the overall quality of the linkage. For some reason, the primers slide in so much smoother on the Classic, big improvement over the Deluxe. You work hard for your money, you deserve it, go on out there and help the economy! Get yourself a new press, it will make you happier. (I love spending other peoples money)
A Pause for the Coz
Member
- Joined
- Apr 14, 2009
- Messages
- 339
I have had that classic cast turret in the on line cart at least 5 times. haven't pulled the trigger yet. I agree on the primer seating. I dont use this one for rifle priming at all. Not a big deal because it just ends up as part of my case prep on the single stage.Coz, You will not regret going to the Classic Press. It is worth every penny. Not only for the spent primers but also the overall quality of the linkage. For some reason, the primers slide in so much smoother on the Classic, big improvement over the Deluxe. You work hard for your money, you deserve it, go on out there and help the economy! Get yourself a new press, it will make you happier. (I love spending other peoples money)
Cant get one right now. Have a RCBS lube- sizer coming and have plenty more molds I want.
Dennis Murawski
Member
- Joined
- Oct 26, 2011
- Messages
- 2

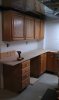
It's kind of a wannabe bench, but it fits in the back bedroom. Can anyone identify the unit on the far left side of the bench?
Last edited:
LAH
Member
Could it be a shotshell conditioner??????????
Dennis Murawski
Member
- Joined
- Oct 26, 2011
- Messages
- 2
Yup, it's a MEC case conditioner. The reloader is a MEC 650. Back in the sixties my brother and I were reloading for the whole family. That included a Winchester 101, a couple of 870's and an Ithaca 37. The case conditioner deprimes, sizes and flattens the rims. It also has much better leverage than if these functions were on the reloader. Good call.
flhtci2006
Member
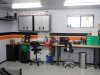
As you can see, I'm new to this. The other side of the shop is for welding and machining (welder is 25' from powder and powder is kept in the cabinet).
Items are the LNL with ez eject and powder feed, new dim. dies for .223 and .40, powder cop, Lee FCD, and much more.
Items are the LNL with ez eject and powder feed, new dim. dies for .223 and .40, powder cop, Lee FCD, and much more.
Attachments
Last edited:
mikegl
Member
Looks like my bench...
rockn30809
Member
My junk
![122611140009[1].jpg](https://www.thehighroad.org/data/attachments/110/110069-335e1df0f8800f1a315eb5084835a873.jpg "122611140009[1].jpg")
![122611140136[1].jpg](https://www.thehighroad.org/data/attachments/110/110070-81a326712b666db64b226c5c1d355ece.jpg "122611140136[1].jpg")
Here is mine. Seperate benches for shotshell and metallic. Got a Dillon on the way this week so I'm running out of bench space. I've got a room in the basement that I'm going to move all the reloading equipment in and also build more benchs.
Here is mine. Seperate benches for shotshell and metallic. Got a Dillon on the way this week so I'm running out of bench space. I've got a room in the basement that I'm going to move all the reloading equipment in and also build more benchs.
LAH
Member
How long you had the Lyman All American?
rockn30809
Member
I've had it close to a year now. I had another but sold it.How long you had the Lyman All American?
Similar threads
- Replies
- 45
- Views
- 4K
- Replies
- 44
- Views
- 4K
- Replies
- 151
- Views
- 23K
- Replies
- 13
- Views
- 2K
- Replies
- 14
- Views
- 2K