Ak-47 Parts Kit

Status
Not open for further replies.
Semyon Vasilii said:
because its not only a little more time and effort. its about 20 times the time and effort.

Really? From the experience I've had so far, bending the receiver is nothing, tempering the receiver is nothing, and we all know how easy welding is. (When you have a good welder behind it, that is. In this case, I do.)
 
Ian said:
The FCG pins are designed to go just far enough that the end is flush with the outside far surface of the receiver. The head is wide enough to stop them from going farther, and there is a groove around the head for the retaining wire that will keep them in place. In order to fit, you will need the right side holes larger than the left, and they may not be the correct size on the flat you purchased. Some that I've done were, and some needed a slight reaming out the the proper diameter.

Okay, after a little drilling, the pins fit quite nicely. But I didn't see any retaining wire in my parts kit.

Ian said:
As for heat treating, the pin holes and rails are the only parts that really need it. I did try doing a whole receiver with a heat treat oven, and the result was a badly warped receiver. I don't recall the initial temperature you need to reach for proper hardening, but I took it to bright orange with the torch, and then quenched in water, then took them back to 600 degrees in the oven (or dull purple with the torch) and air cooled.

Thanks. I decided to follow your advice and only temper the holes and rails. I used a weed burner for the rails, and a combination of a weed burner and a almost empty MAPP gas set up for the receiver. They came out really nice in my opinion.

Unfortunately, the guy doing the welding didn't get home until late, and we ran into some issues with the welding, and we plain ran out of time, so the gun isn't finished.:( Maybe by next weekend, it'll be done.
 
Really? From the experience I've had so far, bending the receiver is nothing, tempering the receiver is nothing, and we all know how easy welding is. (When you have a good welder behind it, that is. In this case, I do.)


how is doing all of this work easier than walking into a store and buying one?

thats what i was referring to when i said building one would be 20 times harder.

and remember child: pics or it didnt happen. start taking pics of every step of this build.
 
Building is more fun and more gratifying than buying.

Matthew,

The retaining wire is also known as a shepherds hook. If you got all the original parts with your kit, it will be the single-strand wire with a could at one end and then a hooked wire about 2-3 inches long (bottom left item in this batch). You'll need to clip off the coil (it's function is to tension the full auto bits) and just use the long bit with a loop at one end and a hook at the other. It's a serious pain to install.

Alternatively, you can buy a retaining plate like this one, or just use e-clips to hold the pins in place. The plate is definitely the easiest, but the wire works just fine once you get the hang of installing it.

And just in case Semyon doesn't think I have the BTDT to describe the process... :)

attachment.php
 

Attachments

  • DSCF0533.JPG
    DSCF0533.JPG
    105.4 KB · Views: 113
Ian said:
or just use e-clips to hold the pins in place.
E-clips are about the worst possible option for this.

• They're very hard to install.
• They're not the right thickness (they're either too thin or too thick when stacked), and so do not stay in place well.


If your'e gonna go with a nonstandard method, use a hitch pin.

retainers_627.jpg

Just take a pivot pin to the hardware store to find the right size.
 
And just in case Semyon doesn't think I have the BTDT to describe the process... :)

you have pics! so it DID happen!

but i really wouldnt have any reason to doubt that you know what youre talking about from experience. your advice is spot on. i just have my doubts that this kid can put together an ak that isnt a jam queen or a grenade. especially after he suggested using a tig welder to heat temper his receiver.

i just want him to post some pics and prove me wrong :)
 
Semyon Vasilii said:
how is doing all of this work easier than walking into a store and buying one?

thats what i was referring to when i said building one would be 20 times harder.

I never did say that building an AK was easier than buying one, just that it is a lot simpler then you guys told me it would be.

Semyon Vasilii said:
and remember child: pics or it didnt happen. start taking pics of every step of this build.

That would be kind of hard as everything is done except for the welding. But if you insist, I will take pics of the welding process. (And don't forget the pics I already posted of the receiver I bent.)
 
Ian said:
Matthew,

The retaining wire is also known as a shepherds hook. If you got all the original parts with your kit, it will be the single-strand wire with a could at one end and then a hooked wire about 2-3 inches long (bottom left item in this batch). You'll need to clip off the coil (it's function is to tension the full auto bits) and just use the long bit with a loop at one end and a hook at the other. It's a serious pain to install.

Alternatively, you can buy a retaining plate like this one, or just use e-clips to hold the pins in place. The plate is definitely the easiest, but the wire works just fine once you get the hang of installing it.

I knew that wire had some sort of a purpose!:)

nalioth said:
If your'e gonna go with a nonstandard method, use a hitch pin.

Just take a pivot pin to the hardware store to find the right size.

I think that is what I'm leaning towards.
 
Semyon Vasilii said:
i just have my doubts that this kid can put together an ak that isnt a jam queen or a grenade. especially after he suggested using a tig welder to heat temper his receiver.

Hey, that was late at night. People never think as well when it is late at night.

Semyon Vasilii said:
i just want him to post some pics and prove me wrong

Gladly.:cool:

If you really doubt that I'm doing what I say I'm doing, I'd be more than happy to bring a camera when my friend and I meet to wrap this project up.:)
 
Well, it is almost done! If the welder hadn't run out of wire and we hadn't run out of time, we could of had it done today.

We couldn't figure out how to weld the trigger guard without anything behind the holes to join the trigger guard to, so we made some rivets and riveted it. (I'll post pictures of that once my friend emails me the photos.)

We only had time to weld on one side of the front trunnion, and I was able to take a picture of that, so I attached that photo. More pics to follow within a few days!
 

Attachments

  • 100_0021.jpg
    100_0021.jpg
    269.4 KB · Views: 43
Nalioth,

It'll look A LOT better once we actually sand down the welds. What you're seeing is a 'Straight from the shop in untouched condition' situation.

And that IS NOT a TIG welder doing the weld there. That is a standard wire feed 110.
 
It is done!!!:D:D:D

We finished up the welding with a MIG welder, and the welds came out really nice. Attached are a couple of pictures.

After grinding down the rails and fitting the bolt, it functions flawlessly and after 30-40 rounds, hasn't blown up yet.;)

P.S. I still haven't ground down the welds, yet.
 

Attachments

  • resized1.jpg
    resized1.jpg
    214.3 KB · Views: 24
  • resized2.jpg
    resized2.jpg
    148.8 KB · Views: 19
  • resized4.jpg
    resized4.jpg
    191.7 KB · Views: 28
  • resized3.jpg
    resized3.jpg
    113.3 KB · Views: 19
This has been a cool journey to watch, just fyi - congrats on what you've achieved!

Now go clean that thing up so it looks like something you'd be proud to show off :D
 
Well, I sure haven't seen anyone do a full weld build in a few years now. That's interesting.

Congratulations on getting it done and a successful function test!
 
I missed if you discussed it elsewhere, but do the mags fit okay w/ the bottom edge of the receiver around the magwell not bent around to create the sides of the mag well? I guess the dimples would pretty much support the mag, but seems like you might get some extra mag wobble there.

I built my first kit on a bent blank receiver that just didn't turn out well. Couldn't get it heat treated well enough and was never happy with it. My kit (virtually new Bulgarian plum stocked AK74) was just toooooo nice for my half assed receiver so I rebuilt it on a Nodak spud '74 receiver. Turned our really nice, both versions of mine were screw builds though vs weld.
 
MakOwner said:
I missed if you discussed it elsewhere, but do the mags fit okay w/ the bottom edge of the receiver around the magwell not bent around to create the sides of the mag well? I guess the dimples would pretty much support the mag, but seems like you might get some extra mag wobble there
Dimples exist to strengthen a piece of sheet metal.

They don't have anything to do with stabilizing the magazine.


It's the mag well opening that has more to do with mag stability.
 
Dimples exist to strengthen a piece of sheet metal.

They don't have anything to do with stabilizing the magazine.


It's the mag well opening that has more to do with mag stability.
Yeah but absent the bottom sides of the magwell like in this case (unless I'm not seeing it right in the pictures) I imagine the dimples are coming into play...
 
Thanks guys, glad you like it!:)

MAKOwner and nalioth,

Some friends were just over that have a couple of AKs, and they said that my mags locked up tighter in my gun then their mags do in their guns!:what: 
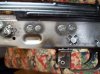
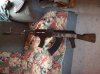
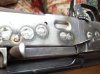
In other words, when I insert a magazine into my gun, there is almost NO wobble what so ever. As far as I can tell, most of this lock up is coming from the dimples and the custom fitted lower rails.

Sam1911,

It isn't a FULL weld job, we did rivet the trigger guard...;)

Hoping to post a few more detailed pics of the rivets and maybe even a range report in a few days. A guy offered to let me shoot up his ammo at the range, so how could I resist?!?!:D

I want to thank all of you guys extensively for all your input, and all of the help you have given me. I truly couldn't of got this good of a job done without your help. Thanks again.:)
 
Range Report!!!

Went shooting at a friends house today. I was pretty impressed with the accuracy of the iron sights. At 30-35yds, 9 shots were grouped into two clusters, both pretty tight. My first four shots were just left of the bullseye, then I unconsciously started holding my sight in a slightly different position, resulting in the next four shots being high. I then caught myself, corrected where I was holding the sight, and placed the 9th shot with the first cluster near the bullseye. (Refer to picture.)

After proceeding to demolish a couple of cinder blocks :cool:, we moved up to 100yds. 3 out of 5 shots were in a 3 inch group at the top edge of the box, so I'm guessing the other two went right over. Pretty impressive for iron sights!

I included some pictures of the grouping at ~30yds. The group on the right of the target (circled in green) is mine, and the group on the left was my brother sighting in his new red dot.

P.S. Rifle functioned perfectly through the entire day without any FTFs, FTEs, etc..
 

Attachments

  • Resized01.jpg
    Resized01.jpg
    144.1 KB · Views: 6
  • resized02.jpg
    resized02.jpg
    131.9 KB · Views: 3
  • resized03.JPG
    resized03.JPG
    138.8 KB · Views: 2
Last edited:
nice work man. those welds make me:barf: but maybe thats because i practically lived in the welding shop in high school and asked for a tig welder for xmas one year (never got it btw) but yeah im really into welding.

how much did this project cost you in total?
 
Semyon Vasilii said:
nice work man. those welds make me:barf: but maybe thats because i practically lived in the welding shop in high school and asked for a tig welder for xmas one year (never got it btw) but yeah im really into welding.

Thanks. As for the welding, it looks fine to me. But maybe that is because I haven't been around a lot of welding in my life.:)

Semyon Vasilii said:
how much did this project cost you in total?

If you mean how much money I spent in parts, $418.84. There were a couple of parts I bought and then didn't end up using, so you could say that the gun only cost $384.39. So if you don't mind doing a little work, I'd say it is cheaper to do this than to buy and convert a Saiga. (Sorry nalioth:D)
 
Status
Not open for further replies.
Back
Top