I present to you my ABLP press improved

Status
Not open for further replies.
The time has come to open a new chapter to present to you the last small improvement that I brought to my installation.
But before that, I would like to let you know the journey that led me to this realization...
Preamble
I developed on this post all the material which came to enrich and improve my reloading station as well as my technique of reloading (which is worth what it is worth, but which suits me well).
The use of electrical and electronic equipment (Box, distributors, 220V/12V transformer) brought me a lot of comfort during my recharging as well as a certain satisfaction.
But during my reloading sessions the idea of
a new evolution germinated and quickly imposed itself.
Basically, the Upgrade was only supposed to be a simple box intended to accommodate an M/A switch and a variable speed drive.
This box would have had the function of replacing the power supply cable of my warhead distributor which, although of excellent quality, did not suit me 100%.
18-10111.jpg
It didn't suit me because I prefer when the variable speed drive and the M/A switch are separate (it's a matter of personal taste). However, the original cable has only one button (integrated on the 12V transformer) to vary the speed and turn the distributor on/off.
This is what originally triggered the desire to add a new module to my installation.
As I wrote above: "The Upgrade was supposed to be (at the beginning) just a simple little box intended to replace the power supply cable of the warhead distributor" but after reflection, I said to myself that adding other things will definitely improve the installation.
The small box gradually expanded to eventually become...
 
Last edited:
- THE DEPORTED CONTROL -

a10.jpg
The Central Unit and its remote control

I-Function of the remote control

vlcsna13.png
This remote control is, in fact, an extension of the Central Unit (the Box).
It is intended for:
- house the transformer which supplies the Central Unit with 12V current.
- order the distributors of warheads and cases ...
- electrically supply the warhead and case dispensers
- have these commands at hand

II- Presentation of the remote control in pictures

vlcsna14.png
Front, side and top view
vlcsna15.png
Rear view

III- Operation of the Central Unit and its remote control


IV- Creation of the remote control step by step

119.jpg
1/ The PVC box is received... I can start
214.jpg
2/ This small metal part will hold the transformer in place

315.jpg
3/ The transformer is slipped into its case and takes place in the case

415.jpg
4/ The dimmer support is bent so that the dimmer button does not protrude too much

512.jpg
5/ This support will be maintained on the front panel by the distributor switches

6_112.jpg
6/ The drive and the switches are located on the front panel... The rear panel accommodates the female "jack" sockets

612.jpg
7/ White tape is placed around the voltage indicator so that it stands out

711.jpg
8/ The sockets are placed and connected... Everything is connected.

810.jpg
9/The painting in the colors of the Central Unit is complete

vlcsna17.png
10/To facilitate heat exchange, the top of the box is drilled and keyholes are made on the side for fixing the box

vlcsna16.png
11/Screws are placed on the base of the press so that, thanks to the keyholes on the side of the box, the remote control is blocked

c_copi10.jpg
12/ The remote control is in place ... ready to use
 
V- Remote control: Advantages and disadvantages
I have been using the remote control for several weeks and, the more I use it, the more I tell myself that: including this control in the Central Unit has been a very good thing because it brings quite a lot of advantages.
- The 1st of these advantages is that now the entire installation (distributors included) only requires a single 12V transformer to operate. Previously, three were needed: one for the Box, and another for each distributor.
- Second advantage: Who says: a single transformer also means a single electrical outlet.
- Third advantage: Orders from distributors are within reach ... at hand
- Fourth advantage: The voltage indicator indicates that the installation is under voltage, or not.
- fifth advantage : The transformer is stored in the remote control and the connection cables make a "clean" set (for the tortured that I am, it's a big advantage)

20211017.jpg
For cons: In all honesty, since I've been using the remote control, I'm still looking for them.
VI- Conclusion
This remote control really brings a plus and optimizes my installation.
To try it is to adopt it.

0010.jpg
In addition, I find that the whole throws a Max !!!
Be well and @+
PS: Since I like you: I invite you to see the installation "by Night"

d10.jpg
If one day, I stop reloading, I could possibly recycle it in Disco!!! :LOL
 
V- Remote control: Advantages and disadvantages
I have been using the remote control for several weeks and, the more I use it, the more I tell myself that: including this control in the Central Unit has been a very good thing because it brings quite a lot of advantages.
- The 1st of these advantages is that now the entire installation (distributors included) only requires a single 12V transformer to operate. Previously, three were needed: one for the Box, and another for each distributor.
- Second advantage: Who says: a single transformer also means a single electrical outlet.
- Third advantage: Orders from distributors are within reach ... at hand
- Fourth advantage: The voltage indicator indicates that the installation is under voltage, or not.
- fifth advantage : The transformer is stored in the remote control and the connection cables make a "clean" set (for the tortured that I am, it's a big advantage)


For cons: In all honesty, since I've been using the remote control, I'm still looking for them.
VI- Conclusion
This remote control really brings a plus and optimizes my installation.
To try it is to adopt it.


In addition, I find that the whole throws a Max !!!
Be well and @+
PS: Since I like you: I invite you to see the installation "by Night"


If one day, I stop reloading, I could possibly recycle it in Disco!!! :LOL
Disco lights too! you Frenchie’s are All Right!!!
 
Oh, I think I had enough fun improving this press and it's been almost two years... Today it works very well, doesn't suffer from any bugs and fills me with joy. I'll keep posting the latest improvements because I'll be happy if it helps anyone or gives some ideas. To date, I recognize that the SPP (Pro6000) piques my curiosity a lot, so I'm the dedicated thread to learn more about it.
 
I'm posting some small improvements concerning the case colator and the case feeder:


Certainly the case feeder and the case colator are two great tools that greatly facilitate the use of the press. Nevertheless, there are some bugs to report:

- Because of the diameter of the holes of the case colator many cases (more than 15%) in 9mm are upside down

- Some cases bounce and slide on the ramp, which causes the press to block and deteriorates the case lips when the platen is lifted.

These two buggs require a particular attention because they cause a loss of time and patience.


To avoid that the 9mm cases are upside down, I made some reducers in chatterton. Thanks to them I don't have any more cases in the wrong direction. I saw later that LEE was selling these little pieces. Well, mine have the merit of being D.I.Y.

411.jpg


As for the problem of the holster bouncing and sliding under the turret, I made this...A simple cardboard tab that channels the holster as it descends and prevents it from going too far forward.the fact that the tab wears out proves that the holster rubs as it descends .... We'll say it's a wear part to replace if necessary.

211.jpg

311.jpg

These two little tricks work like a charm because since then I have no more problems with my cases.

To remedy the problems with the ball catching bin (bin & bracket):

We all realized that when the finished balls fell into the catcher some of them would bounce and fall to the ground.

I had also slipped a simple card in the place provided for this purpose which prevented the balls to bounce and fall. It's a simple and effective method. But if I didn't empty the tray regularly, the weight of the ammunition would eventually bend the card and ...:angry:

So I improved (a little) the system to make it "a little" more waterproof...

12_cop10.jpg


20200314.jpg

:D 
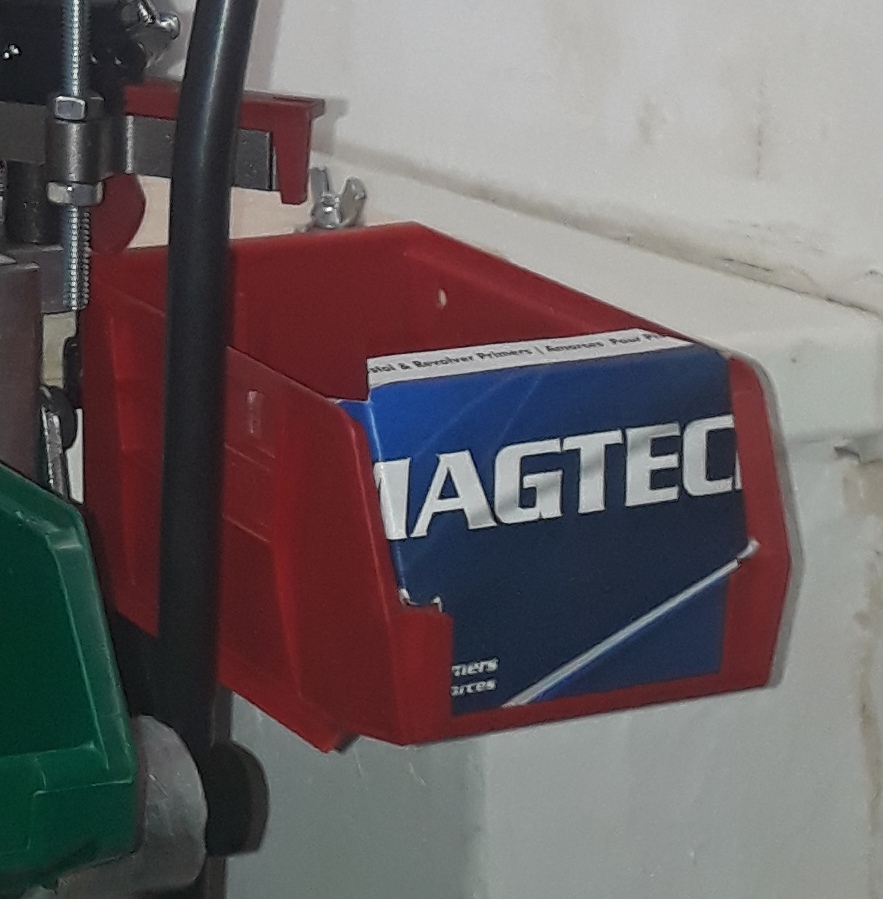
The weight of the bullets presses on the inner fins which prevents the front from bending under the weight ;)

20200311.jpg

20200313.jpg


:D flat view :D

Well, it was only a prototype, but it does the job so well that I kept it as is ;)
 
Thanks to the help of a friend 3D printer, I replaced these small parts by more solid, more beautiful and more practical parts...


1/ The Bin & Bracket cover:


It's just great; solid, practical and ...beautiful.

20210111.jpg

20210110.jpg


2/ The Anti-Lock Tab


Originally a simple cardboard tab taped to the Tool Head and The 3D version: improved, modeled and printed.

20210112.jpg


A second version more "design", found on the net:

20210113.jpg

20210114.jpg


3/ Tube clamps


In addition to giving a certain rigidity to the tubes, they give the case dispenser an amazing look. They also allow the case collator to be removed while holding the tubes full of cases together during a possible refill of the dispenser.


20210117.jpg


4/ Réducteurs, déflecteur et entonnoir
20210116.jpg


1/ The reducers inserted in the case collator force the cases to be presented in the right direction.

2/ The deflector (here, inside the dosing machine) will be very practical when using A1 powder.

3/ The funnel will facilitate the filling of the dosing machine in position.


These 6 prints are already on my press ... They are sturdy, well made, pretty and greatly improve the general use of the press


*****************

*****************


Here is my Breech Lock Pro now upgraded and customized :cheers:

20210118.jpg
 
Great solutions. Glad to see you maximizing the ABLP.

I made this...A simple cardboard tab that channels the holster as it descends and prevents it from going too far forward.the fact that the tab wears out proves that the holster rubs as it descends .... We'll say it's a wear part to replace if necessary.
Case feeder is not supposed to contact/rub the press while it is moving up and down.

Lee Precision instruction for case feeder installation on page 2 for ABLP requires penny's (coin) thickness of 1.5 mm gap/space away from the press tool head casting - https://leeprecision.com/files/instruct/TR3872.pdf

[FIG 7] The 4 tube feed plate should be a penny’s thickness away from the tool head casting.​

Here's Lee Precision factory instructional video on case feeder installation on ABLP showing use of penny/coin to set the gap/space above case mouth to bottom of case feeder and gap/space between the case feeder and press tool head casting.

 
Last edited:
  • Like
Reactions: f.g
yes @LiveLife ...I used to set my Case Feeder like this and it worked pretty well ...
But I must admit that thanks to this little PLA device that prevents the case from moving too far forward, the Case Feeder adjustment becomes less restrictive while ensuring a smooth operation ... zero problems on at least 10.000 cartridges (today)
 
thanks to this little PLA device that prevents the case from moving too far forward, the Case Feeder adjustment becomes less restrictive while ensuring a smooth operation
And because of customer feedback/online forum discussions like on THR (I have a feeling many in the reloading industry are following our discussions/solutions/DIY modifications closely as R&D/beta testing), improvements/enhancements are made to product updates and release of new products.
 
:D As an improvement to the press, I replaced the small spring that pushes the indexing ball that seemed a little too stiff by a softer spring.


20200810.jpg

This makes the rotation of the shell plate smoother and avoids couplings. :D

That's all folks ;-)
 
Last edited:
I think that these small improvements on this press optimize the operation, the performance as well as the comfort of the reloader.

I also think that most of these upgrades could be incorporated in the big sister of the ABLP ... the Six Pack Pro

Sincerely
f.g
 
Bonjour Folks
:) Come on, let's get back to the point...

I did a little reloading session, oh not much, just 150 rounds of 9 mm ammunition, just to seriously test the 3D parts added and mentioned above.

The result is perfect:
- All the cases slid into the tubes in the right direction thanks to the case collator reducers. :)
- The case feeder tubes have more rigidity thanks to the clamps, which makes it easier to rotate and fill the case :) :)
- No casings stuck under the Tool Head thanks to the anti jamming device (the little red tab) :) :) :)
- No ammunition ejected from the Bin & Bracket thanks to its cover. :) :) :) :)


These improvements are well designed and work very well, they bring a plus to the press on an aesthetic level love as well as on a practical level because, you understood it, these small parts solve the majority of the incidents of feeding of cases. :thumbup:

;)Sincerely, I recommend them :thumbup: :thumbup: :thumbup:


:) In short ... C que du Bonheur :)

Cordially
f.g
 
Last edited:
Status
Not open for further replies.
Back
Top