Lee 6000 press

The homage to Bullitt behind the feeder die is a nice touch
Only us "old" people even know "Bullitt"!;)
So I must be "old"? :D

Spent my teenage years fixing/restoring 60's-70's cars. Happy memories.

Okay......I can see that happening.....but I wouldn't be trying to load more with a powder spill all over the press.....clean up time. Crimped brass can bite you worse
Lee Precision is sending me the redesigned "self cleaning" priming pin and I will be putting it through "real world" stress test with copious amounts of Accurate No 2 and other small granule powders - https://www.thehighroad.org/index.p...-oal-consistency.911743/page-14#post-12479625
 
So I must be "old"?
Me too!!!

Cut my teeth working on pre 67 muscle cars!!! 67 vette, 66 goat, 57 panel wagon, 63 split window, 55 Bel Air; WOW those were the days!!! Motor Head!!!

Thanks for the walk down Memory lane!!! Merry Christmas and God Bless!!! You Guys are the Best!!!
 
Well I feel like I should learn the secret hand shake, after running 100 w/ only 1 hitch. My previous attempts had issues with the primer slide.

Today I loaded 100 9mm - 115 HAP, 4.4 gn N320, Federal 100, in never fired Starline brass. I installed the new gray retainer ring, new gray primer slide and spring, and another primer pin Lee sent me. And I went back to the OEM handle and wooden knob. Reconfigured my dies too, Lee sizer, M-style die, then Lee Auto drum, RCBS lock out die, Mr BF Mini, and Lee all-in-one seating/crimp die.

Only hitch I had was 5th or 6th case didn't receive primer, pretty sure the trough from primer tray wasn't full when I started, and may have contributed to the condition. I honestly can't remember if I felt the primer or not, was busy watching the case slider and for bullets to drop.

So to install the new priming pin I had to take the case feed spring off, I put the spring/screw in the hole closest to the press "front hole", but was unsure how far in/out from the case slider block it should go. The hook over the screw before I took it apart, was vertical, I can't get it back to that position, mine is canted a bit. During this session, there were 5 or 6 cases that sort of shot out ..i.e. they didn't slide. It had to do w/ the spring, but I'm not quite sure what was causing it. It was easy enough to catch the error before they flew across the room though. Hadn't done that before in previous reloading attempts, or while just cycling the press was cases in the case feeder.

The seating was pretty consistent 1.143" - 1.144" was probably 90% of them, there were a few 1.142 and six or so 1.145". That's probably just as good as my 550B.

So Lee sent me 2 new priming pins/springs. When I requested them, that was the day before LiveLife posted Lee was changing them up. The two pins they sent me were different in one way from the original pin that came w/ the press. The collar the spring rests on was thinner, about 40 thous thick, the original pin that collar was 60 thous thick. The OAL, the pin diameters at the face and tail end were the same. The new ones were ever so slightly more rounded on the face, but nothing extreme.
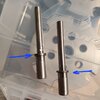
Old_vs_New_PrimerPin.jpg

Original pin on left, new one on the right....no idea if that made any difference. From the face of the pin to where the spring rest - old 1.130" - the new one was longer at 1.155". Granted I was using brand new starline brass, the previous attempts were multi-fired range brass, sorted only by headstamp.

The Mr Bullet Feed mini didn't miss a single drop. Someone on the FB group suggested taking it apart and making sure there were no burrs and clean out holes where the ball bearings seat, and I did that - no burrs, and really no grime in their either.

Going to run another 100 or 200 9mm tomorrow, then maybe switch over to 40s&w.
 
During this session, there were 5 or 6 cases that sort of shot out ..i.e. they didn't slide. It had to do w/ the spring, but I'm not quite sure what was causing it.
I'm slightly confused by the last sentence.

If you're not sure what was causing the flying brass, how do you know it had to do with the spring?

Usually cases launching themselves has to do with their mouths not clearing the case feeder as they are being pushed forward
 
I'm slightly confused by the last sentence.

If you're not sure what was causing the flying brass, how do you know it had to do with the spring?

Usually cases launching themselves has to do with their mouths not clearing the case feeder as they are being pushed forward

I agree....that......or the case head has a backed out primer, or just a damaged or bent head.....heck, I've even ran into military brass with embossing so ill done that it hungup. One more thing I've run into on an APP.....the shell holder or in your case shell plate may be higher than the shuttle surface. The push comes....it hangs....it's forced past the hang and goes flying.

So yeah, either look at the top or the bottom for the hang.
 
Last edited:
I'm slightly confused by the last sentence.

If you're not sure what was causing the flying brass, how do you know it had to do with the spring?

Usually cases launching themselves has to do with their mouths not clearing the case feeder as they are being pushed forward

Honestly look back over what I wrote I'm not sure what I was trying to say in that line
As suggested I did check the case feeder height, and it was low, raised it up and ran 125 again this afternoon, no cases were kicked.

After the first 100, took a break, came back and ran 25 more, the shell plate wasn't indexing quite right. So w/ those 25, I stopped for the evening, went to take the shell plate off and noticed it wasn't on very tight, seems to have worked itself little loose. How much should one crank down on the drive bolt? Instruction say lightly tighten, I certainly did that the other day. But this evening I cranked down on it pretty hard when I put it back on. Guess I'll see next time I use it.

The auto drum towards the end of the first 100, started randomly not fully moving to the dump position, there were a few that had barely any powder in the case. I could take my finger and push the drum to complete the dump. I swear I didn't touch the auto drum from how I had it set up last night, and it seemed to dump fine yesterday, didn't notice any nearly empty cases.

For the last 25 I grabbed an old auto drum I've been using on my 550, set it up and it ran fine, I checked 20 out of the 25 and those were spot on.

Anyway I'll monkey around with the new auto drum later this week....

I now tighten my shell plate drive bolt very snug, I was like you when I first got the press and lightly tightened like the instructions say and like yours mine worked itself loose. On the auto drum, you might try taking it apart and giving it a good cleaning. Also make sure you are making full strokes up and down, that was my biggest problem when I first got the press, I was having several problems that cleared themselves up when I started making sure of the full stroke on the lever.
 
So w/ those 25, I stopped for the evening, went to take the shell plate off and noticed it wasn't on very tight, seems to have worked itself little loose. How much should one crank down on the drive bolt? Instruction say lightly tighten, I certainly did that the other day.
Are you talking about the bolt that you should be tightening with the Allen Wrench that they have provided a holder for at the front of the press?

Lightly tightening with an Allen Wrench is slightly different than with your fingers.

Having loaded on several different progressing presses, it is usually a good idea to check all bolts for tightness before each session
never said I used my fingers, I certainly used the wrench

apparently I need to crank down on it more than whatever lee deems lightly tighten
 
Oops, got threads mixed up and responded to your questions on the other thread - https://www.thehighroad.org/index.p...-oal-consistency.911743/page-14#post-12480795

During this session, there were 5 or 6 cases that sort of shot out ..i.e. they didn't slide. It had to do w/ the spring, but I'm not quite sure what was causing it.
Unlike Dillon 550/Hornady AP LNL shellplate where case base slides unto the top of subplate, Lee SPP shellplate actually captures the case base (Like Dillon 650/750) and shellplate with case together "free floats" on top of the carrier cover that gets screwed to the carrier core. So check to see that the shellplate is not loose as misalignment of case slider surface and shellplate can cause the case rim to snag and not slide into the shellplate freely.

As suggested I did check the case feeder height, and it was low, raised it up and ran 125 again this afternoon, no cases were kicked.
Lee suggests using a penny to set the spacing above the case mouth for the height adjustment of the case feeder and also using a penny to set the spacing between the case feeder body and frame head.

After the first 100, took a break, came back and ran 25 more, the shell plate wasn't indexing quite right ... went to take the shell plate off and noticed it wasn't on very tight, seems to have worked itself little loose. How much should one crank down on the drive bolt? Instruction say lightly tighten
I just snug mine down and haven't had an issue with it loosening
As to tightness of shellplate, I tightened until firm because if shellplate becomes loose, since SPP shellplate design captures the entire case base, enough shellplate movement could affect alignment with case rim to slide in freely and could cause hang up/shooting out of brass you mentioned as case slider spring applies tension.

ETA: Thanks to @9mmepiphany, clarified shellplate differences
 
Last edited:
Oops, got threads mixed up and responded to your questions on the other thread - https://www.thehighroad.org/index.p...-oal-consistency.911743/page-14#post-12480795


Unlike Dillon shellplate where case base slides unto the top of subplate, Lee SPP shellplate actually captures the case base and shellplate with case together "free floats" on top of the carrier cover that gets screwed to the carrier core. So check to see that the shellplate is not loose as misalignment of case slider surface and shellplate can cause the case rim to snag and not slide into the shellplate freely.


Lee suggests using a penny to set the spacing above the case mouth for the height adjustment of the case feeder and also using a penny to set the spacing between the case feeder body and frame head.


As to tightness of shellplate, I tightened until firm because if shellplate becomes loose, since SPP shellplate design captures the entire case base, enough shellplate movement could affect alignment with case rim to slide in freely and could cause hang up/shooting out of brass you mentioned as case slider spring applies tension.

Yeah I responded to "9mmepiphany" earlier, I did double check and the case feed was not set correctly, it was just a touch too low, raised it and it worked fine after that.

I guess in my mind "lightly tighten" means, applying even pressure until the point where the wrench stops moving and hits the wall. (that comes from my experience wrenching on smaller parts) When I re-tightened it before putting the press away, I went firmly past that point, it's on there pretty tight now.
 
Good info right there, thanks for posting.
All the pics show the lever about vertical in the ram down/lever-up/start position and others have complained that the long arc of the lever puts it too low when pushed down.
Your: "Rotated back as far as possible without the lever hitting the bench" position puts the lever higher up when at the bottom position.
Sorry to hear that the ball (and your hand) could contact the case slider if you shorten/slide the lever down into the mount. :(
I was thinking a shorter lever would increase the "feel" of the primer seating and eliminate the chance of dumping powder into a case that has no primer AND shorten the arc of the lever.
:D.

Check out the new instructions on Lee site. (December 2nd version)
Talks about shortening lever for hand gun loading and added need for 1/2" wrench for set up.

GD
 
Lee Precision is sending me the redesigned "self cleaning" priming pin and I will be putting it through "real world" stress test with copious amounts of Accurate No 2 and other small granule powders
New redesigned "self-cleaning" priming pin overview -
https://www.thehighroad.org/index.p...-oal-consistency.911743/page-15#post-12482598

And can you say A LOT of powder? (Yes, they cleaned up fine)
https://www.thehighroad.org/index.p...-oal-consistency.911743/page-15#post-12482601

index.php

index.php

index.php

index.php
 
Last edited:
New primer pin and all known updated parts installed, press is running good with one exception. Still having problem getting primers to feed out of the tray. Have tried the plastic roller, adjusting the carrier cover, bending the pin, different trays, etc. The tray does move when the roller hits the notch but will not feed primers all the time. Problem with bending the pin is that it can get rotated and you then have even less pressure then before. A slight thump with the finger solves the problem for awhile. Lee needs to look at this and I am not the only one with the problem, have read about others having the same problem with the primers not feeding out of the tray.
 
Have you tried different tray?

During my "stress test" of the pen filler sleeve roller for the pin, I used two different trays and one fed better.
 
Have you tried different tray?

During my "stress test" of the pen filler sleeve roller for the pin, I used two different trays and one fed better.

Yes, I have tried different trays, same results, the one I using now is one I have used before on my Load-Master without any problems. I have several so I will try another one. The one that came with the press was pressed together in the middle of the tray and actually trapping the primers.
 
Until buying the 6000, I've never used a Lee plastic triangle hinged tray.....and I only have one. My only complaint is the last three that don't gravity feed without weight behind them. I created the rotary kicker to give them the boot as a temporary measure......hoping for a Lee redesign there.....but I've have not experienced hangups in the tray itself.....but then I only have the one tray for experience too....;)

I liked the RCBS APS strips system, which I found trouble-free when clean, and safer than tubes. Tubes are pretty trouble-free when clean too....except that we have potential "bombs" in those tubes, as some people have demonstrated over the years.

Kudos to Lee as they tried to make it safer than tubes with their trays.....but they aren't perfect either. More hair pulling in engineering departments may find nirvana....but obviously they are not there yet. Primers have always been the weak point on all presses, singles or progressives.
 
The one that came with the press was pressed together in the middle of the tray and actually trapping the primers.
If tray is trapping primers and not allowing the primers to fall freely, contact customer service for replacement.

Until buying the 6000, I've never used a Lee plastic triangle hinged tray.....and I only have one ... I've have not experienced hangups in the tray itself
I have several and some "flow" primers better than others. Member @curlysir may not be experiencing primer attachment problem but rather primer tray problem.

Tubes are pretty trouble-free when clean too....except that we have potential "bombs" in those tubes, as some people have demonstrated over the years.
You can say that again as we have many threads with primer tubes stuck to the ceiling as column of primers "detonated" :eek:

Kudos to Lee as they tried to make it safer than tubes with their trays.....but they aren't perfect either. More hair pulling in engineering departments may find nirvana....but obviously they are not there yet. Primers have always been the weak point on all presses, singles or progressives.
I am continuing my DIY mod testing of Lee flip primer tray and in communication with Calvin from Lee Precision. I am going to suggest some minor things/ideas/totally new approach when my current testing is done.
 
Last edited:
If tray is trapping primers and not allowing the primers to fall freely, contact customer service for replacement.

I have a 1/4" nut in the tray and I am going to leave it overnight to see if it helps with the trapping. I have plenty of trays from all of my presses over the years. This is the first one I have had that problem with.
 
I have a 1/4" nut in the tray and I am going to leave it overnight to see if it helps with the trapping. I have plenty of trays from all of my presses over the years. This is the first one I have had that problem with.
Plastic used for primer tray seems to have memory and there has been subtle changes made to the primer tray over the years which I am finding during my testing. I would contact customer service for replacement and use other trays that don't have the problem in the meantime.
 
New primer pin and all known updated parts installed, press is running good with one exception. Still having problem getting primers to feed out of the tray. Have tried the plastic roller, adjusting the carrier cover, bending the pin, different trays, etc. The tray does move when the roller hits the notch but will not feed primers all the time. Problem with bending the pin is that it can get rotated, and you then have even less pressure than before. A slight thump with the finger solves the problem for a while. Lee needs to look at this and I am not the only one with the problem, have read about others having the same problem with the primers not feeding out of the tray.

Well, I'll jump in here with some info/experience I have had with those primer trays that might just be related here.
Most thin molded parts shrink/warp over time, and I have found the primer trays can cave in and pinch the primers.
I suggest you put something in the trays to push the top and bottom surfaces outward, more towards flat rather than concaved.
You might have to wrap some rubber bands around the tray to hold it closed, then drop it in some boiling water and let it cool with the water.
That should get you some clearance for the primers to slide around and into the trough.
You might be able to get the same results by putting the edge of the tray against your bench and just pushing your thumb outwards against the center of the tray.
That, and check the inside of the trays for feather flashing and burrs of plastic.
jmo,
.
 
Last edited:
Well, I'll jump in here with some info/experience I have had with those primer trays that might just be related here.
Most thin molded parts shrink/warp over time, and I have found the primer trays can cave in and pinch the primers.
I suggest you put something in the trays to push the top and bottom surfaces outward, more towards flat rather than concaved.
You might have to wrap some rubber bands around the tray to hold it closed, then drop it in some boiling water and let it cool with the water.
That should get you some clearance for the primers to slide around and into the trough.
You might be able to get the same results by putting the edge of the tray against your bench and just pushing your thumb outwards against the center of the tray.
That, and check the inside of the trays for feather flashing and burrs of plastic.

I know I mentioned zip ties on the column for tray shake before, but I'll suggest it again here as it worked for me on my Pro1000.
I do want to add that I used SMALL/THIN zip ties.
jmo,
.

I have some very small/thin zip ties, I will give that a try tomorrow.
 
Back
Top