Mark_Mark's 3D Printer, for Reloading Stuff, is On the Way

I want to make a simple powder check die
how about one that uses a cheap Chinese bore scope, and your phone, or laptop screen? That's all I made....results?

Correction....that was a outside micro camera.....here's the bore scope:


can connect to your phone (not iphone) or an I pad or kindle....if it has a usb-c.

Video-Powder-Level.png
only two printed parts.....and a bore scope....
https://www.amazon.com/Inspection-Fantronics-Waterproof-Borescope-Adjustable/dp/B071HYRPND/ref=sr_1_9?adgrpid=1235851386684938&hvadid=77240878154229&hvbmt=bp&hvdev=c&hvlocphy=84462&hvnetw=s&hvqmt=e&hvtargid=kwd-77240961026844:loc-190&hydadcr=12976_13504824&keywords=borescope+phone&qid=1707247974&sr=8-9
 
Last edited:
looks cool!
I got in a hurry....wrong camera case checker......the bore scope is less wide and bright, but it works. I've made too many things to try....hard to keep them straight.... Bore scope is the easiest, but uses a station.....the other one sits outside and uses a car backup camera kit with a screen. You can search THR for the thread.....
 
I was just watching that video and determined that the slide on part was too short for that case......I need to make longer ones for shorter cases so its not such a long dark tunnel in there.....here I go....another project to keep me busy......retirement is so fun....except I'm not....typing this waiting for an appointment to show up......sigh...someday....
 
NOOB question: does the slicer take the 3D theoretical thing and "slice" it into layers of the thickness the printer uses?
 
I was just watching that video and determined that the slide on part was too short for that case......I need to make longer ones for shorter cases so its not such a long dark tunnel in there.....here I go....another project to keep me busy......retirement is so fun....except I'm not....typing this waiting for an appointment to show up......sigh...someday....
I know that feeling.
 
I was only providing the polite meaning for RTFM.
Sort of like PITA stands for Pain In The Butt. :)
I'd be in the same boat as you if I had a brand new 3D printer, though I'm enjoying living vicariously through you.
I don’t understand the point in reading a manual about something I have no clue of the terminology.

I pretty much YouTubed the exact model and a group explained it from unpacking to printing.

But bug thanks to GW! that’s the 3D Master!
 
NOOB question: does the slicer take the 3D theoretical thing and "slice" it into layers of the thickness the printer uses?
Yes and one of the most important settings is layer height. Typically layer height for larger parts like plates and collator bases is .2mm. For the fine stuff like bullet feed dies I always print at .12mm. Parts that have to fit inside parts work better that way.

So this last part printed.....did you Mark Mark even notice the setting for layer height? Some of these setting are covered in more general setting as in Cura's "fine" setting.....but its smart to learn just what setting make up "fine" vs. "course."

Creality used to use a simplified version of Cura.....don't know if they still do....but it is best to learn what every setting does in a slicer.....and you won't learn it in a night.

So Mark MarK......the first print is done......now find out how a steel die screws in......if its too tight....won't even go in. Then you may have settings too course, But even fine and perfect you usually have to screw it in and out 2 or three times.....then it screws in and out like a dream....if not then you may have to change some settings and try again. You will become a good diagnostician.

One thing I have to stress is that every print isn't going to be perfect....1st there is the learning curve, 2nd these are complicated machines and they have to be maintained. Even the nozzles wear out or get clogged and frankly the nozzles are cheap enough, when I clog one its just simpler to unscrew it and get another. Don't get upset wasting a little plastic....that's how you learn. No other way.

It's worth it....gave me something to keep my creativity skills honed. One more thing....pay attention to details....yup the same instruction you hear from the reloading hobby. At least you don't blow things up when you don't......but you will make colorful spaghetti......done that twice.....once for 4 hours while I slept. That one was caused by a part falling over....that's when I took TylerR's advice and bought a polypropylene print bed. For now follow Creality's directions on temperature and bed cleaning between prints.....even with p.p I clean the bed with 99percent isopropyl betwwen each print.
 
Last edited:
Yes and one of the most important settings is layer height. Typically layer height for larger parts like plates and collator bases is .2mm. For the fine stuff like bullet feed dies I always print at .12mm. Parts that have to fit inside parts work better that way.

So this last part printed.....did you Mark Mark even notice the setting for layer height? Some of these setting are covered in more general setting as in Cura's "fine" setting.....but its smart to learn just what setting make up "fine" vs. "course."

Creality used to use a simplified version of Cura.....don't know if they still do....but it is best to learn what every setting does in a slicer.....and you won't learn it in a night.

So Mark MarK......the first print is done......now find out how a steel die screws in......if its too tight....won't even go in. Then you may have settings too course, But even fine and perfect you usually have to screw it in and out 2 or three times.....then it screws in and out like a dream....if not then you may have to change some settings and try again. You will become a good diagnostician.

One thing I have to stress is that every print isn't going to be perfect....1st there is the learning curve, 2nd these are complicated machines and they have to be maintained. Even the nozzles wear out or get clogged and frankly the nozzles are cheap enough, when I clog one its just simpler to unscrew it and get another. Don't get upset wasting a little plastic....that's how you learn. No other way.
I have not tested the part yet, the 3D printer has become very popular in my house, and everyone wants a turn.

anyways. To change filament from a cold machine. Just press the button and pull out the old filament and insert a new one? I did buy a 1 kg spool.
 
GW… that base layer the peels is brilliant! I think I understand how you did that. very cool! peels right off
 
I have not tested the part yet, the 3D printer has become very popular in my house, and everyone wants a turn.

anyways. To change filament from a cold machine. Just press the button and pull out the old filament and insert a new one? I did buy a 1 kg spool.i
No, you change filament when it is at temperature over 200d. At temperature just push on the feed wheel release and pull out the filament....cold filament is stuck and if you try to pull it out it breaks.....then harder all around. So then with an angle cut on the end (so you can sneak it past the out of filament sensor), and holding the feed release push the new filament in. Continue pushing until the old color is mostly gone. Then release the feed wheel and go to the menu and pick a new model to print.
GW… that base layer the peels is brilliant! I think I understand how you did that. very cool! peels right off
Again no, I didn't have anything to do with the "raft" as they call it. That was in the slicer's settings.....so thank Creality, I guess. I rarely do a "raft". There are 4 settings.....nothing, a raft, a brim, and a skirt. The least is what I mostly use....the skirt which is just a couple of passes around the model offset a little from it, like the picture below.....and I do it just to test layer height, and give the new color time to completely take over, before the model starts. (however in the small base print below it didn't have much time :))

-The raft is like a safetynet....if the bed can't be counted on to stick to the model use one. You know what it looks like as you just printed a model on a raft.
-Next the brim is kinda like a raft but only the part against and outside of the model.....used when someone feels they need more support to hold the model down and stick it. A brim is not under the model as far as I know....but I've never used one so what do I know.....;)

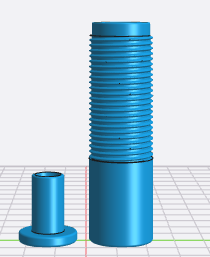
Picture below is a very tall skinny....and top heavy.....it's the insides of a bullet feed die.....a .223 in fact. For sure use a wide raft under such, least until you get a polypropylene bed.

See my dangerous part below printed with only a skirt..... You don't want to watch the whole thing, but it's proof a polybed is worth 10 times it's price.


Notice the paper clamps 2 front and 2back. They are all that's holding the poly bed to crealities original bed. Bed heats just fine through it.
 
Last edited:
Had too pull out the big spool!

I did a print, left the house and ran out of filament. savage one part but the other 2 were not complete. ooh well

View attachment 1193226
You just learned why we all have "remnant spools." That miniature spool Creality gives you does you no favors.....it was too small. There are even products people have come up with to weld remnants together......haven't tried any....;) One more thing ...... when you start designing your own.....you waste good prints.....with unperfected designs.....TylerR says his stash of worthless prints is pretty big....still worth it.
 
Last edited:
Yes and one of the most important settings is layer height. Typically layer height for larger parts like plates and collator bases is .2mm. For the fine stuff like bullet feed dies I always print at .12mm. Parts that have to fit inside parts work better that way.

So this last part printed.....did you Mark Mark even notice the setting for layer height? Some of these setting are covered in more general setting as in Cura's "fine" setting.....but its smart to learn just what setting make up "fine" vs. "course."

Creality used to use a simplified version of Cura.....don't know if they still do....but it is best to learn what every setting does in a slicer.....and you won't learn it in a night.

So Mark MarK......the first print is done......now find out how a steel die screws in......if its too tight....won't even go in. Then you may have settings too course, But even fine and perfect you usually have to screw it in and out 2 or three times.....then it screws in and out like a dream....if not then you may have to change some settings and try again. You will become a good diagnostician.

One thing I have to stress is that every print isn't going to be perfect....1st there is the learning curve, 2nd these are complicated machines and they have to be maintained. Even the nozzles wear out or get clogged and frankly the nozzles are cheap enough, when I clog one its just simpler to unscrew it and get another. Don't get upset wasting a little plastic....that's how you learn. No other way.

It's worth it....gave me something to keep my creativity skills honed. One more thing....pay attention to details....yup the same instruction you hear from the reloading hobby. At least you don't blow things up when you don't......but you will make colorful spaghetti......done that twice.....once for 4 hours while I slept. That one was caused by a part falling over....that's when I took TylerR's advice and bought a polypropylene print bed. For now follow Creality's directions on temperature and bed cleaning between prints.....even with p.p I clean the bed with 99percent isopropyl betwwen each print.

IMHO the slicer is the most important part of the process, it can turn a good print into a great print. And I will say all are not equal. I would also say the versions you pay for give you unlocked features that can be handy.

At one time or another I have used them all, I am on my second printer, one a little larger for bigger prints. The slicer I am currently using is the paid version of Cura.

Also keep in mind that not all filament is not equal, there is some real junk out there, but that said there are some real good and inexpensive options. For the life of me I can't remember what I am using now.
I agree with the first two sentences......but......I've never paid for a slicer, having found one that does everything I could imagine. Even some like texturing that I haven't seen in others.

Your post has no details except "paid version of Cura". What printers do you use, and what brands of filament should we be scared of. So far I've used the reasonably priced Overture, Zyltec, and Matterhackers and I've found no "junk" from them.....lucky I guess. One thing I will say, is they are sometimes "different" as in what nozzle temperature works best for a particular PLA formulation.....( Mark_Mark, read those directions....less than a page), and I acknowledge that I have limited myself to PLA, PLA pro (+), and PLA composites, with special love for the Silks. I don't use an enclosure.....have not needed one, or the harder to use filaments. Haven't wanted the extra grief. Never used ABS or Petg.......okay.....yet......;)

That makes me an amateur, but a happy one. I like IdeaMaker and it's free. Why? No limitations, menus are organized, and easy to follow. And the first thing I turned off was the "simple" mode where lots of decisions are made for you. I wanted to know what every command actually does, and have the experience tweaking each one.
 
my new roll of PLA Grey is stringy. The white roll that came with the machine is smooth and nice.

IMG_0364.png IMG_0363.png
 
More than likely, your slicer placed the two models too close together and retraction is set so that it drags the filament to the other part. Lots to learn, yet, you won't get this completely figured out for a year......and that because you are younger than me. I don't like printing parts one at a time either, but spread them apart more. Curious why you printed two "pushers'. I'd try the tool first and :)see if you even like it.

Okay, whats retraction? That's a setting where the printer retracts the filament a little when traversing from one model or disconnected part of a model so it doesn't string you along.

One of the many internet articles on it.....
https://all3dp.com/2/3d-printer-retraction-speed-what-does-it-mean/
I thought I needed 2 pushers 😂 extra pusher I guess
 
GW - what’s the bullet die you are using? I already have the FA rifle seating die
 
It's actually part of a tube bullet feeder kit which also includes an "M" neck expander which I use also. Sorry it's not cheap best price I see is directly from RCBS:
https://www.rcbs.com/presses/press-...er--rifle-kit-progressive-press/16-82362.html

At least that's two useful dies and a very interesting graphite tube. I even ordered more of those for future projects.

I am tempted to buy one of Lees new "inline" bullet feeders to try, but don't know if the "pusher part would have to be changed a little.

Would be GREAT if Lee (or somebody) would start making "windowed" pistol bullet seaters so we could make this work on pistol as well.
 
Back
Top