
You are using an out of date browser. It may not display this or other websites correctly.
You should upgrade or use an alternative browser.
You should upgrade or use an alternative browser.
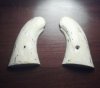
New grips for my Remington
- Thread starter Tinpan58
- Start date
- Status
-
Not open for further replies.
junkman_01
member
They look very aged. What are they made from?
Tinpan58
Member
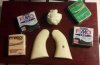
They are made from polymer clay, not hard to make, as you can install all the hardware and do all the carving while the clay is wet, I went kind of over the top when I made these, just wanted to see what I would get by putting different color little chunks in and not completely mixing it, There are many recipes on the net for making realistic ivory. When you are done shaping it you bake it at 350 deg for 15 min. than finish sand, if you make a mistake, you can fix it with wet clay and rebake it, It fills like bone and you can use corse grad sand paper to ad texture, Than a clear coat, to seal them. The white ones in the picture below, are some I have started but not finished yet, cost less then 10 bucks for the clay and hardware to make them. I just would like to find a sorce for nicer hardware.
Attachments
frontloader
Member
- Joined
- Jul 7, 2010
- Messages
- 35
tinpan,that looks good. tell us more
Pancho
Member
Tinpan, I think you've opened up a whole new world for us.
How do you think the finished product would hold up to various oils and solvents?
How do you think the finished product would hold up to various oils and solvents?
Pancho
Member
Is it possible to make a female mold from the original grips and "cast" the new grips?
joecil
Member
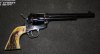
I did these about a month ago from http://www.gripmaker.com/. Now I plan on putting them on my other two 1873 SAA in 5.5 and 4.75 barreled guns.
Attachments
Tinpan58
Member
You can get polymer clay at most craft stores, after it is baked it is slightly flexible but not brittle and can be filed, carved, drilled sanded and painted, It really is not clay but is called that because you can mold it and it will stay playable until it is baked, if you leave it out for several months it will dry out somewhat, but you can add a little vegetable oil and bring it back to life. It comes in many colors and also comes in translucent, and translucent colors, which will add depth to you finished project. From what I have read it done right you can make ivory that is hard to tell from the real thing. Most of the grip manufactures use a form of polymer to make their grips.
1. Get the translucent clay as your base then the other colors you want to add to it. The links below will tell you more about it and recipes, also hardware I use treaded inserts used for furniture, you should be able to get them at most hardware stores.
2. I used a old shoebox for the card board, lay your grips on it and trace the outside of the grips and cut the shape out this is your base to work on, making small holes in the cardboard for the screw placement and on a Remington for the pin placement.
3. mix the clay to your liking and start shaping it on the cardboard, after you get it ruffed out place it into the frame of the gun and continue shaping, once it is shaped fairly close make the screw hole bigger and push the screw thru both sides, it will naturally make the inset in the clay for the final product you may have to cut the screw if it is to long, take the screw out push the insert into the other side, than screw the grips onto the frame and finish shaping.
4. Take the grips off lay them on some aluminum foil bake them in the oven at 350 deg for 15 min then let cool, they will be very hot.
peel or sand the cardboard off the back. it will come off pretty easy, finish sand it, and final fit them and you are done. I used a dermal and sanding drum for most of it then a fine grade sand paper followed by corse sand to ad some grain to them. and a acrylic clear coat spray to seal them.
Note. Their may be some slight worpage when you bake them, if so nail some sand paper to a pice of wood and sand them flat again, if you over sand or make a mistake you can press in some left over clay and rebake it for 10 min and sand it back down. the links below will give you more info. You can also google making faux ivory, making faux ivory out of polymer clay, their are also youtube vids you can search.
http://www.wikihow.com/Make-Faux-Ivory-With-Polymer-Clay
http://www.desiredcreations.com/howTo_Desk.htm
http://sunnibergeron.com/crafts/tutorials.html
http://santafecreativetourism.org/2...ivory-beads-tory-hughes-studio-june-2nd-2012/
http://www.beadsandbeading.com/blog/polymer-clay-tutorial-faux-bone-faux-ivory-technique-video/7197/
http://en.wikipedia.org/wiki/Polymer_clay
Last edited:
BADUNAME30
Member
Tinpan, that is unbelievably awsome !!!
They are by far the most beautiful hand crafted grips i've ever seen.
Great great GREAT design !!!!
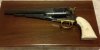
They are meant to be right there on that particular gun.
I can't thank you enough for sharing this with us.
My only question is do we need a seperate oven or is there no 'ill' effects to the one in the kitchen ?
They are by far the most beautiful hand crafted grips i've ever seen.
Great great GREAT design !!!!
They are meant to be right there on that particular gun.
I can't thank you enough for sharing this with us.
My only question is do we need a seperate oven or is there no 'ill' effects to the one in the kitchen ?
Tinpan58
Member
Thanks Jim, you can use the oven you cook in, their are no real hazard warnings on the package, other than bake in a well ventilated room, but I have never noticed a oder, it also says to not contact directly with flame and children under 8 years of age should have adult supervision so it can’t be very dangerous, and wash you hands after use.
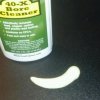
as for your question Pancho, I took the tooth I made in the picture below, which had no clear coat sprayed on it and soaked it in Remington bore cleaner for 1 1/2 hours then cleaned it off with dish soap and warm water, it had no effect on the piece, as for making a mold I am sure it could be done it is playable enough but it dose stick to things when pressure is applied, so you may have to find something to spray into the mold to keep it from sticking, maybe something like pam would work. You could even make the mold out of the clay, possibly use thin plastic wrap or something to place in the mold or it might be able to be baked in the mold then removed, you would have to play around with it.
as for your question Pancho, I took the tooth I made in the picture below, which had no clear coat sprayed on it and soaked it in Remington bore cleaner for 1 1/2 hours then cleaned it off with dish soap and warm water, it had no effect on the piece, as for making a mold I am sure it could be done it is playable enough but it dose stick to things when pressure is applied, so you may have to find something to spray into the mold to keep it from sticking, maybe something like pam would work. You could even make the mold out of the clay, possibly use thin plastic wrap or something to place in the mold or it might be able to be baked in the mold then removed, you would have to play around with it.
Attachments
NineMilePete
Member
Tinpan58:
Wow!!! thanks for opening up a world of possibilities.
Not that I'm particularly up on everything, but I was totally unaware of this product.
Wow!!! thanks for opening up a world of possibilities.
Not that I'm particularly up on everything, but I was totally unaware of this product.
NineMilePete
Member
Tipman:
I bought a few sets of grip screws and escutheons from Brownells.
I would like to find a source of the original type escutheons with the little nubs.
The brownells don't look to bad when installed.
I bought a few sets of grip screws and escutheons from Brownells.
I would like to find a source of the original type escutheons with the little nubs.
The brownells don't look to bad when installed.
Ultravox
Member
That is very cool. Thanks for sharing. I might have to try this for my 1858 or maybe my SAA.
kBob
Member
Reawakening this one.
Has anyone got any results from this thread that would be willing to share them before I go to the craft shop?
Let's see 'em!
Then, tell us how you did it.
-kBob
Has anyone got any results from this thread that would be willing to share them before I go to the craft shop?
Let's see 'em!
Then, tell us how you did it.
-kBob
gifford
Member
Tinpan - thanks for posting the grip making idea. Looks like the real thing; I've got a couple of old, odd hanguns that need grips. This might just be the ticket. Gifford
tom e gun
Member
This is possibly the coolest idea for making grips I have ever seen! I suddenly have the urge to try it very soon. I wonder if sculpey clay would work for this? (It's an oven bake polymer clay)


kBob
Member
Rydan,
Those are pretty and well done. That a .22 pistol? Seems to be a lot of .45/22 semis out their these days. If I weren't spending all my spare change on the smoky nasty habit I might have to have one.....always regret letting my Ace conversion slide go....stupid, stupid, stupid me.
-kBob
Those are pretty and well done. That a .22 pistol? Seems to be a lot of .45/22 semis out their these days. If I weren't spending all my spare change on the smoky nasty habit I might have to have one.....always regret letting my Ace conversion slide go....stupid, stupid, stupid me.
-kBob
I don't know, I very casually nicked some pics from the internetz to illustrate the denim/epoxi thing with blatant disregard for intellectual property
I haven't done it myself yet, maybe my original MNA would benefit from blue jean grips
I haven't done it myself yet, maybe my original MNA would benefit from blue jean grips
Indian Outlaw
Member
Nice!
Moptop
Member
You can use plaster of paris to make a mould of your original grip panels then just press the clay into it to get an exact duplicate with the designs or checkering. Use talcum powder as a releasing agent so the clay won't stick to the mould. It will also cut down on the sanding since it will already be the exact size.
I think the only panels you might have to do extra work on are BHP's because of the ridge on the back side that hooks on the grip to hold them in. You would have to mould and shape that part by hand. Still do-able though.
I think the only panels you might have to do extra work on are BHP's because of the ridge on the back side that hooks on the grip to hold them in. You would have to mould and shape that part by hand. Still do-able though.
Busyhands94
Member
WOW!! both those grips turned out great. I'd like to try that but make red, white, and blue ones for my NAA. Or black and red. Or yellow and black that might look sweet!
You could make plaster molds of both sides of the grips, add the polymer clay, and then press the molds together, to mold the complete grip. All that would be left would be minor sanding.
You may need to cut a couple of grooves in one or both of the mold halves to allow excess clay to flow out.
You may need to cut a couple of grooves in one or both of the mold halves to allow excess clay to flow out.
- Status
-
Not open for further replies.
Similar threads
- Locked
- Replies
- 64
- Views
- 4K