
You are using an out of date browser. It may not display this or other websites correctly.
You should upgrade or use an alternative browser.
You should upgrade or use an alternative browser.
Re barreling a post '64 Winchester 70
- Thread starter Qball16
- Start date
- Status
-
Not open for further replies.
Zeke/PA
Member
Post 64 Winchester?
Leave it alone and shoot it as is !
Nothing that you can personally improve on the rifle in any case,
.
Leave it alone and shoot it as is !
Nothing that you can personally improve on the rifle in any case,
.
1stmarine
Member
WinAge? lol... we are carving a new trail here.
I am not sure about the oil. I use kroil with good results.
Some people say ATF and azetone work better.
Hard to say. Kroil seems to do the trick. I don't use other oils for this.
For cleaning rust white vinegar+time is hard to beat. Different story though.
I am not sure about the oil. I use kroil with good results.
Some people say ATF and azetone work better.
Hard to say. Kroil seems to do the trick. I don't use other oils for this.
For cleaning rust white vinegar+time is hard to beat. Different story though.
Last edited:
Project update! I received the barrel and action jigs from 1stmarine. He sent inserts for Winchester and Savage and I'm keeping them for future projects.


I had been soaking the barrel threads for about a week with Liquid Wrench. After about 4 days, I could see some leaking through.

So after many PM questions were answered, I cleaned everything with brake cleaner, applied some coca-cola to the barrel portion, let it dry sticky and clamped everything down. It took less force than I was expecting to break it free. Thanks Liquid Wrench.

Everything looks great. Got it all cleaned up and we're ready for the next step in the Winchester barrel nut conversion. I'll be sending him my .225 barrel to extend the threading for a nut. 1stmarine will be sending me back my .225 plus an Ultimate Shadow .308 barrel, also re-threaded for the barrel nut system. After that, it's onto the stock for some accurizing. I can't thank 1stmarine enough for all of the time, guidance and patience. This is certainly my biggest gun project to date and so far it's going very smoothly.
Thank you, 1stmarine!
I had been soaking the barrel threads for about a week with Liquid Wrench. After about 4 days, I could see some leaking through.
So after many PM questions were answered, I cleaned everything with brake cleaner, applied some coca-cola to the barrel portion, let it dry sticky and clamped everything down. It took less force than I was expecting to break it free. Thanks Liquid Wrench.
Everything looks great. Got it all cleaned up and we're ready for the next step in the Winchester barrel nut conversion. I'll be sending him my .225 barrel to extend the threading for a nut. 1stmarine will be sending me back my .225 plus an Ultimate Shadow .308 barrel, also re-threaded for the barrel nut system. After that, it's onto the stock for some accurizing. I can't thank 1stmarine enough for all of the time, guidance and patience. This is certainly my biggest gun project to date and so far it's going very smoothly.
Thank you, 1stmarine!
1stmarine
Member
No problem man. I am happy to help.
Perhaps this will inspire others to give new life to an old beloved rifle w/o having to invest an eye.
I just love the way your grandpa first and then you took care of that Winchester M70.
It also looks the penetrating oil did its job while we were enjoying the holidays.
did you end up using a bit of soda in the barrel clamp? although it is not like some rem700 that can be a bitch to remove sometimes.
1stmarine
Member
The beauty and the beast...

Wreck-n-Crew
Member
Awesome. I am hoping to see that bad boy with some pics! Props to 1stmarine. Oh and a range report! ")
Winchester rebarreling report. So I got the barrels and nut back from 1stmarine. He also sent along a bushing to use with the Savage barrel nut wrench on the Ruger barrel nut that he used for the conversion. In addition, he sent me a much stronger bolt for the nut wrench, which has been a weak spot for the tool. I had to do some minor in-letting of the stock to accommodate the barrel nut.
 He extended the threads on both barrels to accept the barrel nut.


This is the original .225 barrel with extended threading.

and the .308 barrel with nut attached.

.225 barrel, with nut, in the stock.

Mr. Hamilton approves!
Range report to come......
Thank you, 1stmarine! You are a one of the good ones.
He extended the threads on both barrels to accept the barrel nut.
This is the original .225 barrel with extended threading.
and the .308 barrel with nut attached.
.225 barrel, with nut, in the stock.
Mr. Hamilton approves!
Range report to come......
Thank you, 1stmarine! You are a one of the good ones.
1stmarine
Member
Thanks man. Looking nice!. I love this kind of projects to give new life and purpose to an old rifle.
I know how much this rifle means to you as it was your grandpas.
It seems the ruger barrel nut blends pretty well with the winchester although the bluing is a bit out of sync.
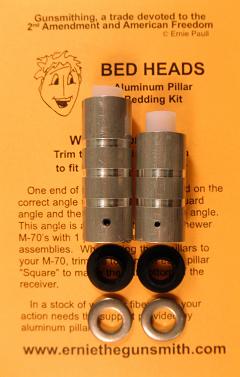
you also want to bed that bad boy using a couple of bushings like these...
http://erniethegunsmith.com/catalog/i155.html
Using the no-stress method you could dig a bit more with the dremel and then give some rigidity and bed all
around the recoil lug and skim bed under the barrel. I would actually consider opening up the barrel channel
a tad and reinforce it with a threaded metal rod or something and wrap the barrel around several times with tape
so the channel will take a wider profile if you want to go that way ina a swap later on.
Bart b. also suggested to open that up and I agree so when you bed it that is the perfect time to do it.
I think with some old stocks not only makes them more robust and prevents potential failure but
a tad of rigidity and weight will help with accuracy. From the back of the stock you could drill deep into the grip
and insert another threaded rod with epoxy in case you fall this could prevent the stock from breaking by the grip.
The same channel could be used to later insert a small pvc tube with lead shot in case you want a bit more weight
to counter-balance and also works as a dead blow weight so it helps wiht any recoil.
When you get to 308 and heavy loads like 180gr then the tad extra weight is a welcome addition to help with the
beating. Same thing removing the hard butt plate but that is a sensitive matter as it will alter the original aesthetics a tad.
But some softer modern ones look classic and are better than an old hard one.
I know how much this rifle means to you as it was your grandpas.
It seems the ruger barrel nut blends pretty well with the winchester although the bluing is a bit out of sync.
you also want to bed that bad boy using a couple of bushings like these...
http://erniethegunsmith.com/catalog/i155.html
Using the no-stress method you could dig a bit more with the dremel and then give some rigidity and bed all
around the recoil lug and skim bed under the barrel. I would actually consider opening up the barrel channel
a tad and reinforce it with a threaded metal rod or something and wrap the barrel around several times with tape
so the channel will take a wider profile if you want to go that way ina a swap later on.
Bart b. also suggested to open that up and I agree so when you bed it that is the perfect time to do it.
I think with some old stocks not only makes them more robust and prevents potential failure but
a tad of rigidity and weight will help with accuracy. From the back of the stock you could drill deep into the grip
and insert another threaded rod with epoxy in case you fall this could prevent the stock from breaking by the grip.
The same channel could be used to later insert a small pvc tube with lead shot in case you want a bit more weight
to counter-balance and also works as a dead blow weight so it helps wiht any recoil.
When you get to 308 and heavy loads like 180gr then the tad extra weight is a welcome addition to help with the
beating. Same thing removing the hard butt plate but that is a sensitive matter as it will alter the original aesthetics a tad.
But some softer modern ones look classic and are better than an old hard one.
I wouldn't bed under the barrel. A stiffened sporter stock fore end only will still bend hinging below the receiver ring. A stiffening rod has to go on both sides from the back of the magazine to near the fore end tip to work, but it only reduces how much it bends.
I've tested match rifles whose stocks had a bedding pad under the barrel chamber area. All strung shots vertical as the barrel heated up and expanded. Routed out that pad and no more vertical shot stringing.
The reason match rifle wood stocks are wide from trigger forward is to stiffen them at their weakest point. That's at the area below the receiver ring between barrel and magazine well and around the recoil lug.
The claim's often made that such pads relieve the stress on the receiver from barrel weight. If that mattered, then all those heavy 30" totally free floating barrels winning matches and setting records surviving that barrel flexing like a wiggling fishing pole wouldn't be doing that well.
Last edited:
1stmarine
Member
Bedding can be done under the barrel but what it should not be done is to put a dam at the end of the chamber and allow any of the chamber area to touch the bedding.
Free bloat is free float all the way and you have a barrel nut too that you want to create plenty of relief. The channel should be as wide and deep as needed by the
thickest barrel you are going to swap and provide plenty of clearance.
The right way to do it is like McMillan does it with their custom shop (as many others) that is to wrap the barrel with adhesive sheets (still grease them) and then one can create
a stiffer new channel but here the idea is to go deep like the lug area. Skim doesn't do anything for you with wood underneath.
Like Bart well pointed out the rod will have to go in both sides and deep enough under the action. One could leave some ridges but otherwise the more material
one removes to be filled with the compound the better the job will result. Alternatively one could use long hardened steel screws on the sides up to 6 inches
but I would still anchor them as much as I could under the action. Essentially you are building a skeleton and the wood becomes the external mold for that new stronger structure.
But I am thinking, if the hand-guard doesn't touch the barrel with plenty of clearance you might want to keep it simple and avoid going deep with a comprehensive
bedding job but you definitely want to put some pillars under the action and some skim bedding around at the same time that is a very easy project and
will show improvement. With heavy rounds and recoil the action will loosen up from the wood unless you do something about it.
In some cases wood stocks might split right in the middle and along and that is why good bedding helps too.
Cross bolt the wood stock at both ends of the magazine to prevent splitting.
I never pillar bedded a stock, just full contact epoxy around the receiver. One 30 caliber magnum's and one 308's gone through 3 barrels on the same receiver and bedding in wood stocks.
Never seen any proof that pillar bedding is better than standard full receiver contact bedding. Except on early synthetic stocks with soft filler in the receiver area. That's the reason pillars were needed in the first place. No longer are pillars required.
1stmarine
Member
It depends what type of wood but wood is mostly affected by air humidity. The pillar is a simple way to deal with that and
the rods (if needed) will prevent warping. The crossbolts are also a great addition and some really pretty for a classic type of rifle.
the rods (if needed) will prevent warping. The crossbolts are also a great addition and some really pretty for a classic type of rifle.
I opened up the stock a bit more for the nut, torqued it down to 40lbs, reattached the scope and it's off to the range tomorrow with my .308 Win/age. Anyone care to chime in on barrel break-in procedure. I usually just shoot 'em but I'm open to suggestions. I want to get a realistic idea of the accuracy, but not sure what to expect with a brand new barrel.

I've never broke in a barrel. If the barrel's made right to start with, it'll shoot most accurate when new. Every shot fired erodes away and roughens up the origin of the rifling. Accuracy drops off at a fairly constant rate.
If one feels better breaking in a barrel, by all means do so. Barrels have no feelings either way.
Most Winchester 70's do best with 60 inch-pounds of torque on all three stock screws.
Rods in the fore end won't prevent warping, but they'll reduce it if they extend back along the magazine cutout.
If one feels better breaking in a barrel, by all means do so. Barrels have no feelings either way.
Most Winchester 70's do best with 60 inch-pounds of torque on all three stock screws.
Rods in the fore end won't prevent warping, but they'll reduce it if they extend back along the magazine cutout.
Last edited:
- Status
-
Not open for further replies.
Similar threads
- Replies
- 43
- Views
- 5K